HL-2170W
FAQs & Troubleshooting |
Replace the drum unit.
Follow the procedure below to replace the drum unit.
The Brother machine has separate consumables the toner cartridge and the drum unit. Verify you replace only the drum unit and not the toner cartridge. If you want to know their difference, refer to "What is the difference between the toner cartridge and the drum unit?"
- For best performance, use only genuine Brother toner. The printer should be used only in a clean, dustfree environment with adequate ventilation.
- Printing with a third-party drum unit may reduce not only the print quality but also the quality and life of the printer itself. Warranty coverage does not apply to problems caused by the use of a third-party drum unit.
- For the order number (Order No.) of the drum unit, please refer to the User's guide provided with your Brother Printer or the Consumables & Options page of your model on Brother Solutions Center. To visit Consumables & Options page, click your model name link on the top section and then click "Consumables & Options" link on the opened page.
- While removing the drum unit, handle it carefully because it may contain toner.
- Every time you replace the drum unit, clean the inside of the printer. See How can I clean the inside of the printer?
- Do NOT use any type of spray to clean the inside or outside of the machine. Doing this may cause a fire or electrical shock.

-
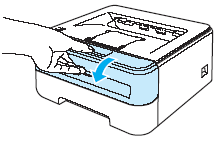
Make sure that the printer is turned on and the Drum LED is blinking. Open the front cover.
-
Slowly but firmly pull the drum unit and toner cartridge assembly out of the machine.

- We recommend that you put the drum unit and toner cartridge assembly on a piece of disposable paper or cloth in case you accidentally spill or scatter toner.
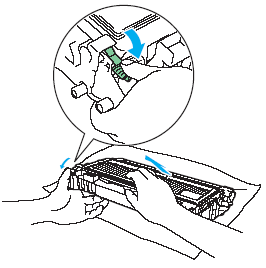
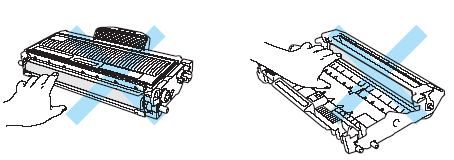
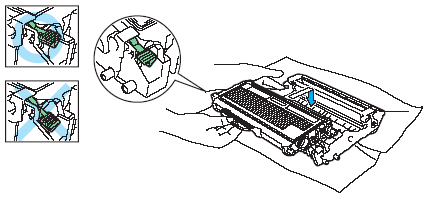
- To prevent damage to the printer from static electricity, DO NOT touch the electrodes shown in the illustration.

-
Push down the green lock lever and take the toner cartridge out of the drum unit.
- Handle the toner cartridge carefully. If toner scatters on your hands or clothes, wipe or wash it off with cold water at once.
- To avoid print quality problems, DO NOT touch the shaded parts shown in the illustrations.
- Be sure to seal up the drum unit tightly in a bag so that toner powder does not spill out of the unit.
- Discard the used toner cartridge according to local regulations, keeping it separate from domestic waste. If you have questions, call your local waste disposal office.
-
Unpack the new drum unit.
Wait to unpack a drum unit until immediately before you put it in the printer. Exposure to direct sunlight or room light may damage the drum unit.
-
Put the toner cartridge firmly into the new drum unit until you hear it lock into place. If you put the cartridge in properly, the green lock lever will lift automatically.
Make sure that you put in the toner cartridge properly, or it may separate from the drum unit.
-
Put the drum unit and toner cartridge assembly back in the printer.
DO NOT close the front cover yet.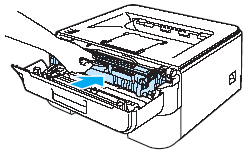
-
Reset the drum counter. Press and hold down the white button (shown as blue in the image below) for about 4 seconds until all the LEDs light up. Once all 4 LEDs are lit, release the button.
Only when you replace the drum unit with a new one, you need to reset the drum counter. Do not reset the drum counter when you only replace the toner cartridge.

- Close the front cover.
- Make sure that the Drum LED is now off.