Innov-is A16
FAQ & Fehlerbehebung |
Outline of viewing the LCD Screen
LCD Operation
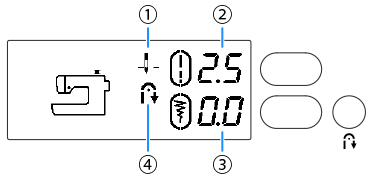
When the machine is turned on, the LCD will light up and the following screen is displayed.
To change the displayed settings, use the operation keys and stitch pattern selection dial.

| No. | Display | Item Name | Explanation | ||||||
| (1) | Needle position setting |
Shows whether the needle is in the programmed raised or lowered position.
|
|||||||
| (2) | Stitch length |
Shows the stitch length of the currently selected stitch pattern.
When |
|||||||
| (3) | Stitch width |
Shows the stitch width of the currently selected stitch pattern.
When |
|||||||
| (4) | Automatic reverse/ reinforcement stitching |
Shows that the automatic reverse/reinforcement stitching is currently turned on. | |||||||
Stitch pattern display window
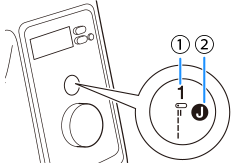
The stitch number and presser foot are shown in the stitch pattern display window.
 |
(1) Stitch number (2) Presser foot |
- The symbols for certain presser feet, such as zipper foot "I" and the quilting foot, may not appear in the Stitch pattern display window.
