HL-2600CN
FAQs & Troubleshooting |
What is the Optional LT-26CL used for and how do I install it?
The lower tray unit is a device that functions as a second paper source. It can hold a maximum of 500 sheets of paper (75 g/m2 or 20 lbs). To purchase the optional lower tray unit, please consult the dealer where you purchased the printer.
With the lower tray unit installed, load paper into the lower paper cassette the same way you load paper in the upper media cassette.
To install the lower tray unit, follow the steps below:
- This printer is heavy and weighs approximately 39kg (86 lbs). To avoid injury when moving or lifting this printer, be sure to use at least two people.
- When you lift the printer be sure to use the handholds located at the bottom four corners of the printer.
- When moving or lifting this printer, be sure to keep the printer flat. To avoid spills, you must first remove the Toner Cartridges, Waste Toner Pack, Oil Bottle and Fusing Unit.
-
Turn the printer off and unplug the power cord from the AC outlet.
-
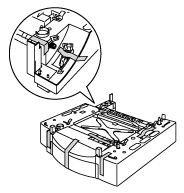
Place the Lower Tray Unit on a flat table, and then remove the protective parts.
-
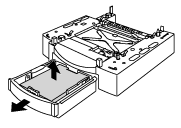
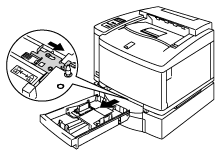
Pull out the Paper Cassette from the Lower Tray Unit, and then remove the tapes and the protective parts inside of the Cassette. Install the Paper Cassette into the Lower Tray Unit.
-
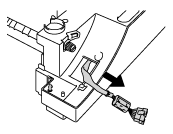
Pull out the connection cable located at the left rear side of the Lower Tray Unit.
-
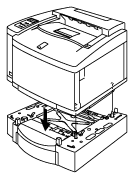
Check the two alignment pins on the Lower Tray Unit. Use two people to lift the printer and place it onto the Lower Tray Unit.
- Be sure to use the handholds located at the bottom four corners of the printer.
- Ensure that the pins are correctly aligned into the printer.
-
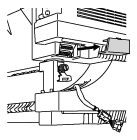
Remove the connector cover from the base cover at the left side of the printer.
-
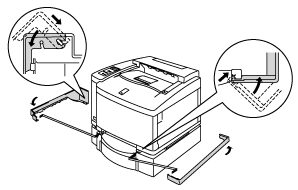
Loosen the locking clip thumbscrew on the left side of the Lower Tray Unit by rotating it counterclockwise. Rotate the locking clip and hook it onto the printer so that it hangs down, and then secure it with the thumbscrew.
-
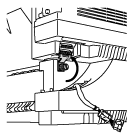
Insert the connection cable into the printer's connector.
-
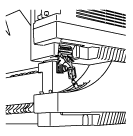
Pull out the Upper Paper Cassette, and then connect the Lower Tray Unit with the printer by sliding the locking clip to the right on the top surface of the Lower Tray Unit.
-
Install the right hand side cover into the right side of the Lower Tray Unit by first fitting the hook at the front. Install the left hand side cover by fitting the hole at the rear side of the side cover to the shaft of the Lower Tray Unit. Close the side cover by fitting the notch to the hook of the Lower Tray Unit.
-
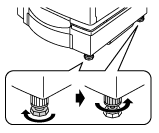
To level the tray unit, adjust the Anchor Feet located at the front and rear on the right hand side at the bottom of the Lower Tray Unit. The Anchor Foot moves up and down as it is turned. It is correctly adjusted when the Anchor Foot touches the work surface and the tray unit is level. Turn the lock screw to secure the Anchor Foot.
Do not load Transparencies, Labels and Envelopes in the cassette installed into the optional Lower Tray Unit. It may cause paper jams.