HL-2600CN
FAQs & Troubleshooting |
How do I install additional memory?
Follow the procedure below to install additional memory.
-
Turn off the printer, and then unplug the power cord from the AC outlet.
Be sure to turn off the power to the printer before installing or removing the DIMMs.
-
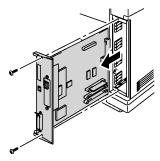
Unscrew the two screws that secure the rear plate of the main controller board, and then pull out the main controller board.

-
Unpack the DIMM and hold it by its edges.
Do not touch the memory chips and the surface of the main controller board. If static electricity collects, it may damage these electrical parts.
-
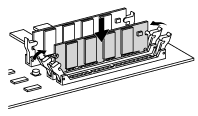
Hold the DIMM with your fingers on the side edges and thumb against the back edge. Align the notches on the DIMM with the DIMM slot. (Check that the locks on each side of the DIMM slot are open, or outward).

-
Press the DIMM straight into the slot (press firmly). Make sure the locks on each side of the DIMM snap inward into place. (To remove a DIMM, the locks must be released.)
- When you install less than two DIMMs, be sure to install them in the order Slot 1, Slot 2 and then Slot 3.
- When you install different capacities of DIMMs, be sure to install the larger capacity DIMM in Slot 1 and the smaller capacity DIMM in Slot 2 and then Slot 3.
-
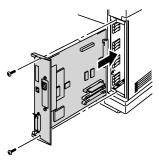
Reinstall the main controller board into the printer by sliding it into the guide rails.

-
Secure the main controller board with the two screws.
-
Reconnect the printer cable from your computer. Plug the power cord into the AC outlet, and turn on the printer.
-
To check whether the DIMM has been installed correctly, you may perform a Test Print "Print Configuration" that will print the current memory size.