DCP-J125
FAQs & Troubleshooting |
Scan a document in Mac OS X 10.6.
You can scan a document using one of the following methods:
- Using the Image Capture application
- Scanning directly from the "Print & Fax" section
Method 1: Using the Image Capture application
In order to use Image Capture included with Mac OS X 10.6, the ICA Scanner Driver is required. The Brother CUPS Printer Driver for Mac OS X 10.6 contains the ICA Scanner Driver. To install the ICA Scanner Driver, please install the CUPS Printer Driver.
Please follow the steps below:
- Connect your Brother machine to the Macintosh using a USB cable.
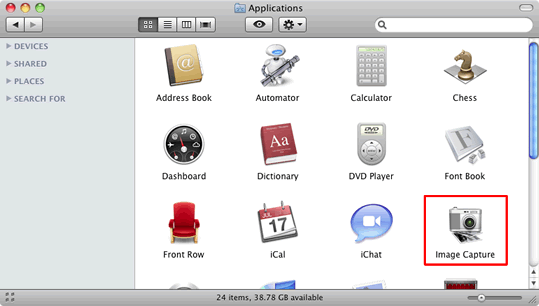
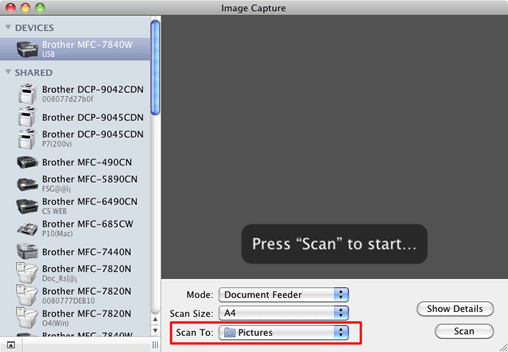
- Launch the Image Capture application.
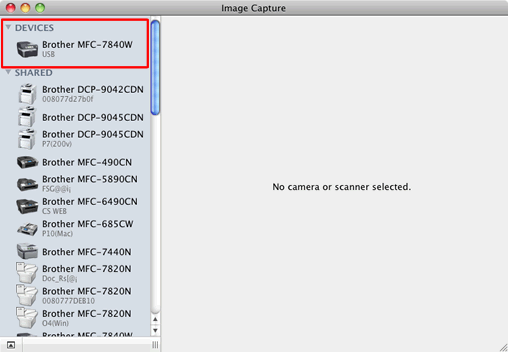
- Select the machine from the list on the left side of the screen. You will see the machine in the DEVICES area.
- Place your document in the ADF or on the scanner glass.
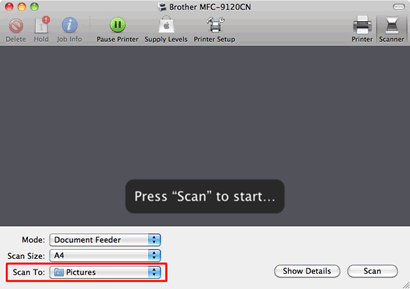
- If you place the document in the ADF, select "Document Feeder" for Mode and the size of your document for Scan Size.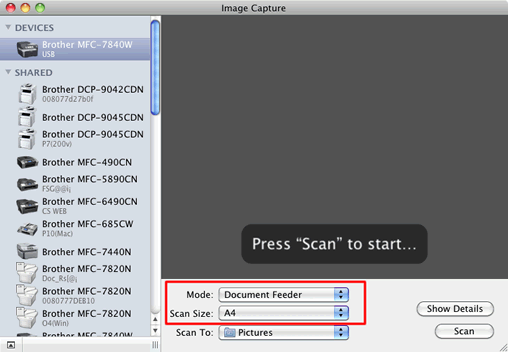
- If you place the document on the scanner glass, select "Flatbed" for Mode.
Notes:
* If your Brother machine does not have an ADF, the Mode option does not show up.
* When the Detect Separate Items box is unchecked, the document will be scanned as one item and saved as one file. When the Detect Separate Items box is checked, the program will detect each image and save them as separate files. If the program does not automatically crop the document as you want, you can do it manually by dragging the mouse pointer over the portion you want to scan from the dialog box that can be accessed by clicking on Show Details.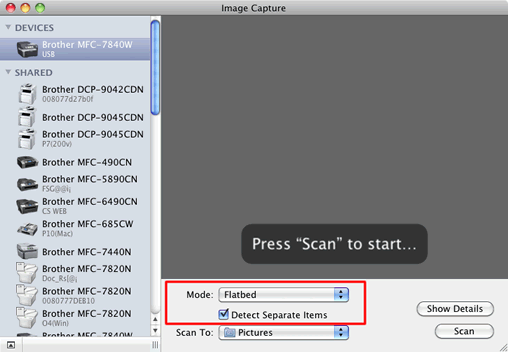
- Select the destination folder or destination application for Scan To.
Hint:
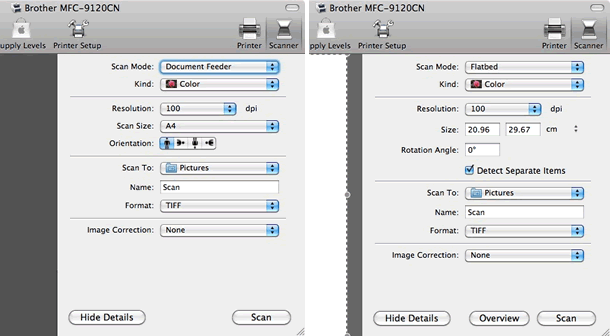
You can adjust the following settings, if needed, in the dialog box accessed by clicking on Show Details. Please note that the item name and assignable value may vary depending on the machine.
- Scan Mode: Choose "Document Feeder" or "Flatbed".
- Document Kind: Choose from "Color", "Black & White" or "Text".
- Resolution: Choose the resolution you want to scan your document at.
- Scan Size: Select the paper size of the document being scanned from the Document Feeder or the scan area from the Flatbed.
- Orientation or Rotation Angle: Select the orientation of the document from the Document Feeder or the angle of the scan from the flatbed.
- Duplex: You can select 2-sided(duplex) scanning from the Document Feeder if the model you are using supports this feature.
- Scan To: Choose the destination folder or destination application.
- Name: Enter the prefix text used for the name of the scanned image.
- Format: Select the file format of the scanned data.
- Image Correction: From the manual setting you can adjust Brightness, Tint, Temperature and Saturation.
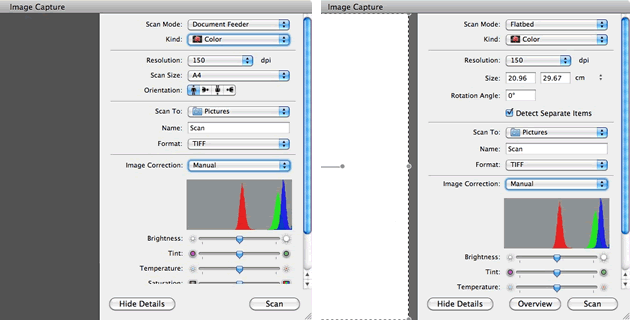
- Click on Scan to start scanning.
Method 2: Scanning directly from the "Print & Fax" section
If you already added your Brother machine in the Print & Fax section, you can scan directly from there. Please follow the steps below:
- Connect your Brother machine to the Macintosh using a USB cable.
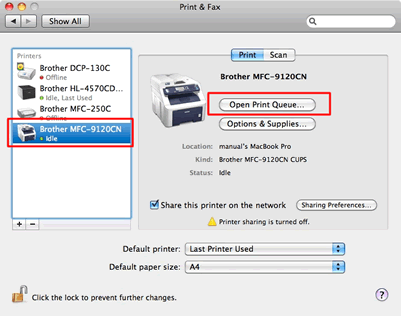
- Select System Preferences from the Apple Menu.
- Click on the Print & Fax icon.
- Select the machine from the list on the left side of the screen and click on Open Print Queue... .
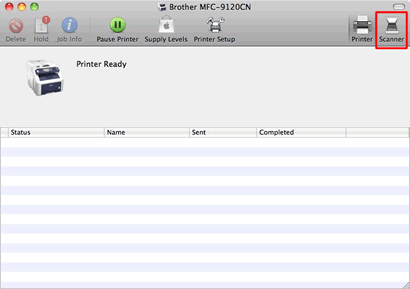
- Click on the Scanner icon.
- Place your document in the ADF or on the scanner glass.
- If you place the document in the ADF, select "Document Feeder" for Mode and the size of your document for Scan Size.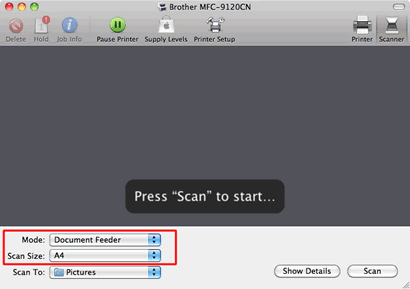
-If you place the document on the scanner glass, select "Flatbed" for Mode.
Notes:
* If your Brother machine does not have an ADF, the Mode option does not show up.
* When the Detect Separate Items box is unchecked, the document will be scanned as one item and saved as one file. When the Detect Separate Items box is checked, the program will detect each image and save them as separate files. If the program does not automatically crop the document as you want, you can do it manually by dragging the mouse pointer over the portion you want to scan from the dialog box that can be accessed by clicking on Show Details.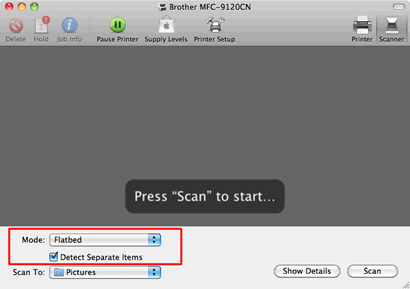
- Select the destination folder or destination application for Scan To.
Hint:
You can adjust the following settings, if needed, in the dialog box accessed by clicking on Show Details. Please note that the item name and assignable value may vary depending on the machine.
- Scan Mode: Choose "Document Feeder" or "Flatbed".
- Document Kind: Choose from "Color", "Black & White" or "Text".
- Resolution: Choose the resolution you want to scan your document at.
- Scan Size: Select the paper size of the document being scanned from the Document Feeder or the scan area from the Flatbed.
- Orientation or Rotation Angle: Select the orientation of the document from the Document Feeder or the angle of the scan from the flatbed.
- Duplex: You can select 2-sided(duplex) scanning from the Document Feeder if the model you are using supports this feature.
- Scan To: Choose the destination folder or destination application.
- Name: Enter the prefix text used for the name of the scanned image.
- Format: Select the file format of the scanned data.
- Image Correction: From the manual setting you can adjust Brightness, Tint, Temperature and Saturation.
- Click on Scan to start scanning.