QL-810W/810Wc
FAQs & Troubleshooting |
Using the Device Settings (for Windows)
To use the Device Settings, please follow the steps below:
-
Open the Printer Setting Tool.
Refer to "Using the Printer Setting Tool (for Windows)".
-
Select [Device Settings].
The Device Settings window appears.
-
Specify or change the settings.
See below for detailed information.Applying Setting Changes to Multiple Printers
Settings Dialog Box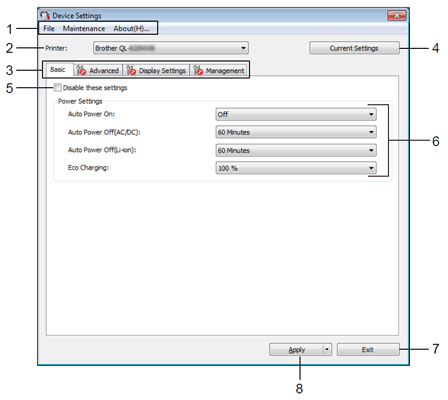
-
Menu Bar
Select a command contained in each menu from the list.
-
Printer
Specifies the printer whose device settings are to be configured.
If only one printer is connected, it is unnecessary to make a selection because only that printer will appear.
-
Settings Tabs
Contains settings that may be specified or changed.If
 appears in the tab, the settings in that tab cannot be specified or changed. In addition, the settings in the tab will not be applied to the printer even if [Apply] is clicked. The settings in the tab will also not be saved or exported when the [Save in Command File] or [Export] command is executed.
 -
Current Settings
Retrieves the settings from the currently connected printer and displays them in the dialog box. Settings will also be retrieved for parameters on tabs with .
.
-
Disable these settings
When this check box is selected, appears in the tab, and the settings can no longer be specified or changed.
Settings in a tab where appears will not be applied to the printer even if [Apply] is clicked. In addition, the settings in the tab will not be saved or exported when the [Save in Command File] or [Export] command is executed.
-
Parameters
Displays the current settings.
-
Exit
Exits [Device Settings], and returns to the main window of the “Printer Setting Tool”.
-
Apply
Applies the settings to the printer.
To save the specified settings in a command file, select [Save in Command File] from the drop-down list.
The saved command file can be used with the mass storage mode to apply the settings to a printer.
Menu Bar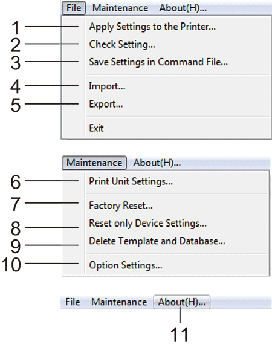
-
Apply Settings to the Printer
Applies the settings to the printer.
Performs the same operation as when [Apply] is clicked.
-
Check Setting
Displays the current settings.
-
Save Settings in Command File
Saves the specified settings in a command file.
Performs the same operation as when [Save in Command File] is selected from the [Apply] drop-down list.
-
Import
Imports the exported file.
-
Export
Saves the current settings in a file.
-
Print Unit Settings (QL-810W/QL-820NWB only)
Prints a report containing firmware version and device setting information.
You can also print this report using the [Cutter] ( ) Button (QL-810W) or the LCD menu (QL-820NWB).
Refer to "Can I print out the printer settings?". -
Factory Reset
Resets all printer settings to factory settings.
-
Reset only Device Settings (QL-810W/QL-820NWB only)
Deletes the user settings stored in the printer.
-
Delete Template and Database (QL-810W/QL-820NWB only)
Deletes the templates and databases stored in the printer.
-
Option Settings
If the [Do not display an error message if the current settings cannot be retrieved at startup] check box is selected, a message will not be displayed next time.
-
About
Displays the version information.
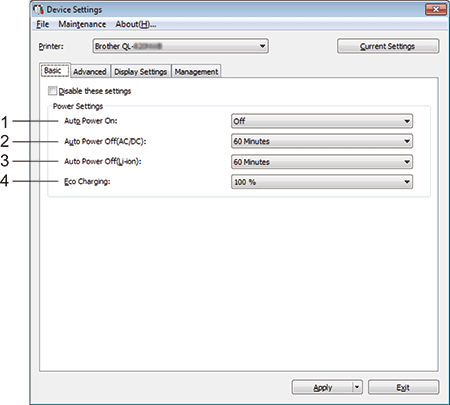
-
Auto Power On
Specifies whether the printer turns on automatically when the power supply cord is plugged into an AC power outlet.
Available settings: [Disable], [Enable]
-
Auto Power Off (AC/DC)
Specifies the period of time that passes before the printer turns off automatically when connected to an AC power outlet.
Available settings: [None], 10/20/30/40/50/60 minutes -
Auto Power Off (Li-ion) (QL-810W/QL-820NWB only)
Specifies the period of time that passes before the printer turns off automatically when powered by the rechargeable Li-ion battery.
Available settings: [None], 10/20/30/40/50/60 minutes[Auto Power Off] is disabled when connecting with wireless network, wired network (QL-820NWB only), or Bluetooth® connection (QL-820NWB only).
-
Eco Charging (QL-810W/QL-820NWB only)
Specifies to switch to Eco Charging. The service life of the battery can be extended by setting it to charge to [80 %].
Available settings: [100 %], [80 %]To get the longest life from the battery, select [80 %]. Although the number of pages that can be printed on a single charge will be less when you select [80 %], you can get a longer life from the battery.
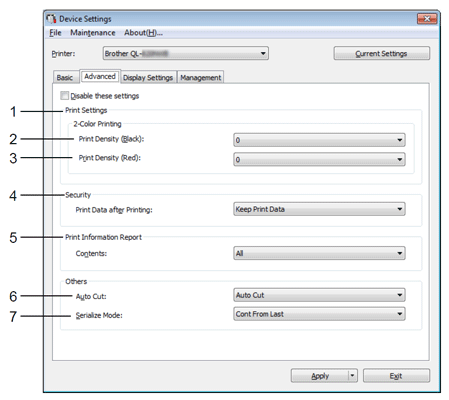
-
2-Color Printing
Sets the color density for printing.
-
Print Density (Black)
Sets the density of black.
Available settings: [+6/+5/+4/+3/+2/+1/0/-1/-2/-3/-4/-5/-6]
-
Print Density (Red)
Sets the density of red.
Available settings: [+6/+5/+4/+3/+2/+1/0/-1/-2/-3/-4/-5/-6]
-
Security (QL-810W/QL-820NWB only)
Selects whether or not print data is erased after printing.
Available settings: [Keep Print Data], [Erase All Print Data]
-
Printer Information Report (QL-810W/820NWB only)
Selects the information you want to include in the Printer Information Report.
Available settings: [All], [Usage Log], [Printer Settings], [Printer Transfer Data]
-
Auto Cut (QL-810W/820NWB only)
Sets the cutting method when printing multiple labels.
Available settings: [OFF], [Auto Cut], [Cut at End] (Only cuts the places that have finished printing when multiple labels are printed.).
-
Serialize Mode (QL-810W/820NWB only)
Available settings: [Cont From Last] (Select to serialize from the last number printed.), [From Starting] (Select to serialize from the default number each time you print.).
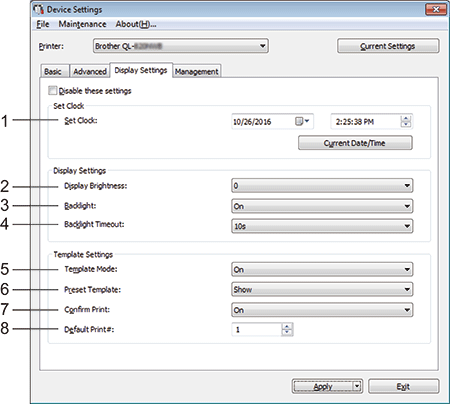
Display Settings Tab (QL-820NWB only)
-
Set Clock
Sets date and time.
Clicking the [Current Date/Time] button will sync to the date and time on the computer.
-
Display Brightness
Sets the brightness of the display. The higher the number, the brighter the display.
Available settings: [+2/+1/0/-1/-2]
-
Backlight
Switches the backlight On or Off.
Available settings: [On], [Off]
-
Backlight Timeout
Sets the period of time before the backlight turns off if the Label Printer is not used.
Available settings: [Off] (never turns off), [5/10/20/30/60 seconds]
-
Template Mode
Specifies whether the Label Printer operates in P-touch Template Mode.
P-touch Template Mode allows you to enter just text and print labels using a previously configured template.
Available settings: [On], [Off]
-
Preset Template
Specifies whether to display preset templates when using templates other than the factory preset templates.
Available settings: [Show], [Hide]
-
Confirm Print
Specifies whether a message appears before printing so that the number of copies can be confirmed.
Available settings: [On], [Off]
-
Default Print
Specify the default value for the print quantity.
Available settings: [1-999]
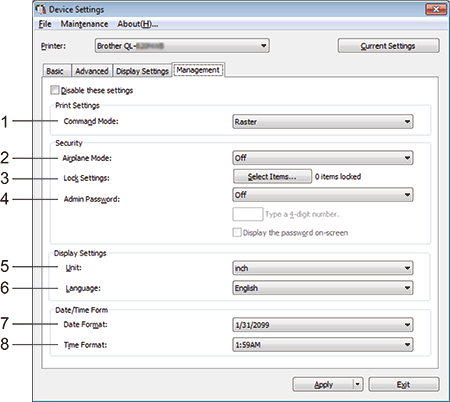
Management Tab (QL-810W/820NWB only)
-
Command Mode
Selects the type of command mode.
Available settings: [Raster], [ESC/P], [P-touch Template]
-
Airplane Mode
Allows disabling the Bluetooth or Wi-Fi® connection. This function is useful when you use the printer in a place where signal transmissions are not allowed. The following conditions apply.
QL-810W: Pressing and holding the Wi-Fi ( ) Button and WPS Button will be ineffective.
QL-820NWB: The [WLAN] and [Bluetooth] menus will disappear from the LCD.
-
Lock Settings (QL-820NWB only)
Locks the menu settings so that they cannot be changed.
Mark the settings to be locked using the [Select] button.
-
Admin Password (QL-820NWB only)
Selects On to configure administrator mode. Set a 4-digit password that must be used in order to change the menu settings.
Available settings: [Off], [On]
-
Unit (QL-820NWB only)
Selects the measurement units (mm or inch) for displayed settings.
Available settings: [inch], [mm]
-
Language (QL-820NWB only)
Selects the language of the LCD.
-
Date Format (QL-820NWB only)
Selects the date format for the clock.
-
Time Format (QL-820NWB only)
Selects the time format for the clock.
Applying Setting Changes to Multiple Printers-
After applying settings to the first printer, disconnect the printer from the computer, and then connect the second printer to the computer.
-
Select the newly connected printer from the [Printer] drop-down list.
-
Click [Apply].
The same settings that were applied to the first printer are applied to the second printer.
-
Repeat steps 1 - 3 for all printers whose settings you want to change.To save the current settings in a file, click [File] - [Export].
The same settings can be applied to another printer by clicking [File] - [Import], and then selecting the exported settings file.
-
Menu Bar