BM3850
FAQs & Troubleshooting |
How do I select a pattern, and adjust a stitch width or length?
- When you use the pattern selection dial to choose a pattern, raise the needle by turning the handwheel toward you (counterclockwise) so that the mark on the wheel points up.
- If the needle is in the down position when you turn the pattern selection dial, the needle, presser foot or fabric may be damaged.
To choose a stitch, simply turn the pattern selection dial in either direction.
- Raise the needle by turning the handwheel toward you (counterclockwise) so that the mark on the wheel points up.
- Turn the pattern selection dial in either direction to select the stitch that you want to sew.
- If necessary, adjust the stitch width and stitch length for best result of sewing.
Refer to the chart of patterns in the Operation Manual for your machine.
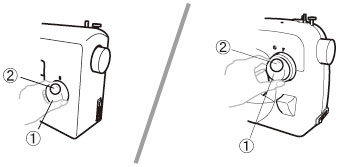
(1) Pattern selection dial
(2) Chosen pattern number
Setting the stitch length dial to the stretch stitch mark ("SS", "SS1" or "SS2") changes the selected pattern to a stretch stitch.
- Raise the needle by turning the handwheel toward you (counterclockwise) so that the mark on the wheel points up.
- Set the stitch length dial to the mark "SS", "SS1" or "SS2".
- Turn the pattern selection dial to select the stretch stitch that you want to sew.
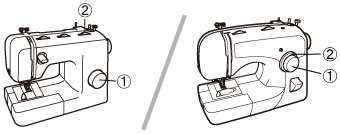
(1) Pattern selection dial
(2) Stitch length dial
![Set the stitch length dial to the mark [SS], [SS1] or [SS2].](/g/b/img/faqend/faqh00000589_000/us/en/37644/faq589_fig02c1.jpg)
Marks “SS” or “SS1”/“SS2” on the stitch length dial vary depending on the machine model.
- Raise the needle by turning the handwheel toward you (counterclockwise) so that the mark on the wheel points up.
- Turn the stitch width dial to adjust the stitch width that you want to sew.
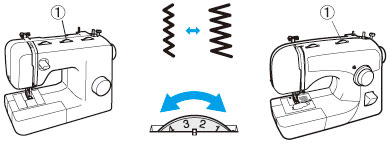
(1) Stitch width dial
When the Straight or Triple Stretch Stitch is selected, the needle position can be changed from left to right by adjusting the stitch width dial.
After adjusting the stitch width, slowly turn the handwheel toward you (counterclockwise) and check that the needle does not touch the presser foot.
If the needle hits the presser foot, the needle may bend or break.
Depending on the selected stitch, you may need to adjust the stitch length for best results.
- Raise the needle by turning the handwheel toward you (counterclockwise) so that the mark on the wheel points up.
- Turn the stitch length dial to adjust the stitch length that you want to sew.
- The higher the number, the longer the stitch.
- With the "0" setting, material is not fed. This is used when sewing a button.
- The "F"-"1" range is for making a satin stitch (closed zigzag stitch), which is used for making buttonholes and decorative stitches.
- The position needed for making the satin stitch varies according to the material and thread being used.
- To determine the exact dial position, first test the stitch and length settings on a scrap piece of fabric to observe the feeding of the material.

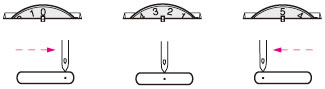
(1) Stitch length dial
(2) Shorter
(3) Longer
If the stitches are bunched together, lengthen the stitch length and continue sewing.
Do not continue sewing without lengthening the stitch length, otherwise the needle may break and cause injury.