DCP-585CW
FAQs & Troubleshooting |
My printed documents are missing colors.
- Print a Print Quality Check Sheet (PQCS).
*If your Brother machine has a touchscreen, please follow the steps under "For touchscreen models" below.
- Do one of the following:
- If your Brother machine has the INK key on its control panel, press the INK key.
- If not:
- Press the MENU key.
- Press the UP OR DOWN ARROW key to select Ink.
- Press the OK key.
- Press the MENU key.
- Press the UP OR DOWN ARROW key to select Test Print.
- Press the OK key.
- Press the UP OR DOWN ARROW key to select Print Quality.
- Press the OK key.
- Press the COLOR START key.
<For touchscreen models>
- Press
 or
or  (Ink indicator).
- Press Test Print.
- Press Print Quality.
- Press the COLOR START key.
The machine will generate the Print Quality Check Sheet (PQCS). On the PQCS each of the four colors is represented by a slanted square pattern. The colors should appear (from left to right): Black - Yellow - Cyan - Magenta. Cyan is the light blue color and Magenta is the pinkish color. - Do one of the following:
- The LCD will display Is Quality OK?. Do NOT answer Yes or No.
Press the STOP/EXIT key to return to the Date and Time display.
- Evaluate the Print Quality Check Sheet (PQCS) to determine the print quality issue.
The document below contains examples of Black Ink printing issues. A similar print issue can occur in each of the colors C/M/Y.
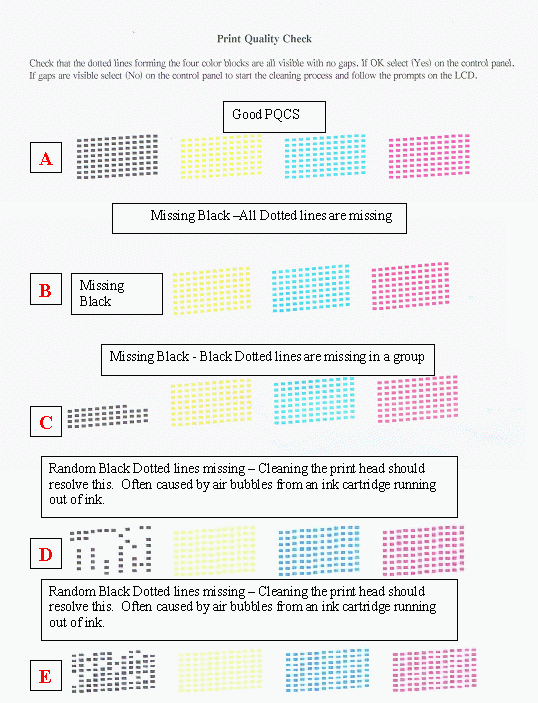
- If all four colors printed with no missing blocks (example A), the issue is resolved.
- If Black only has a print issue like B, C, D or E, go to solution - My printed documents are missing black.
- If Black AND any of the other colors has a print issue like B or C, go to solution - My printed documents are missing black.
- If Black AND any of the other colors has a print issue like D or E, go to STEP 4.
- If a single color (C, Y, M) or combination of colors (not black) has an issue like B, C, D or E go to STEP 4.
- If all four colors printed with no missing blocks (example A), the issue is resolved.
- Verify your cartridge(s) is installed correctly by uninstalling and reinstalling the ink cartridge.
- If you are using non genuine Brother ink, you may want to consider using genuine Brother ink cartridges. Use of inferior quality inks can affect the hardware performance and print quality. The ink formulation in genuine Brother ink cartridges is made to prevent smearing and clogging of the print head.
- Do the following to clean the print head:
Cleaning the print head consumes ink. Cleaning too often uses ink unnecessarily.
*If your Brother machine has a touchscreen, please follow the steps under "For touchscreen models" below.
- Do one of the following:
- If your Brother machine has the INK key on its control panel, press the INK key.
- If not:
- Press the MENU key.
- Press the UP OR DOWN ARROW key to select Ink.
- Press the OK key.
- Press the MENU key.
- Press the UP OR DOWN ARROW key to select Cleaning.
- Press the OK key.
- Press the UP OR DOWN ARROW key to select BLACK, COLOR or ALL depending on what you want to clean.
- Press the OK key.
<For touchscreen models>
- Press
 or
or  (Ink indicator).
- Press Cleaning.
- Select BLACK, COLOR or ALL depending on what you want to clean.
- Do one of the following:
- Print another Print Quality Check Sheet (PQCS).
*If your Brother machine has a touchscreen, please follow the steps under "For touchscreen models" below.
- Do one of the following:
- If your Brother machine has the INK key on its control panel, press the INK key.
- If not:
- Press the MENU key.
- Press the UP OR DOWN ARROW key to select Ink.
- Press the OK key.
- Press the MENU key.
- Press the UP OR DOWN ARROW key to select Test Print.
- Press the OK key.
- Press the UP OR DOWN ARROW key to select Print Quality.
- Press the OK key.
- Press the COLOR START key. The machine will generate another PQCS.
<For touchscreen models>
- Press
 or
or  (Ink indicator).
- Press Test Print.
- Press Print Quality.
- Press the COLOR START key. The machine will generate another PQCS.
- Do one of the following:
- The LCD will display Is Quality OK?. Do NOT answer Yes or No.
Press the STOP/EXIT key to return to the Date and Time display.
- Review the new PQCS and do the following based on the quality of the sheet:
- If all four colors printed correctly and the print quality is acceptable, the issue is resolved.
- If any of the colors (C, Y, M) only (not black) still has a print issue and there is NO improvement in the print quality of the 2nd PQCS compared to the 1st PQCS, complete at least 3 more cleanings by following STEP 6. The recommendation is to complete the print head cleaning at least four (4) times total to ensure the head is completely clean.
After completing 3 more cleanings, print the PQCS again (STEP 7). Compare the new PQCS to the previous PQCS and determine if there is any improvement.
- If Black AND any of the other colors still has a print issue and there is NO improvement in the print quality of the 2nd PQCS compared to the 1st PQCS, go to STEP 10.
- If there IS improvement in the print quality of the second PQCS compared to the first PQCS, complete at least 3 more cleanings by following STEP 6. The recommendation is to complete the print head cleaning at least four (4) times total to ensure the head is completely clean.
- If all four colors printed correctly and the print quality is acceptable, the issue is resolved.
- Contact Brother Customer Service, and we will assist with a cleaning process that will possibly resolve the issue. If repair is needed Brother may extend the warranty. Please contact Brother Customer Service from "Contact Us".