MFC-L2740DW
常見問題&故障排除 |
使用我的 Brother 設備上的掃描鍵掃描並以 PDF 格式保存文檔(掃描到文件)
您可以按 Brother 設備控制面板上的掃描鍵,將 PDF 格式的檔案掃描並保存到首選文件夾。
如果您想將多頁掃描成一個檔案,請參閱常見問題解答,“將多頁掃描成一個檔案,而不是將每個掃描件保存為一個單獨的檔案”。
按照以下說明設定和使用掃描到文件功能。
注:以下插圖來自代表性產品和作業系統,可能與您的 Brother 設備和作業系統不同。
注:以下插圖來自代表性產品和作業系統,可能與您的 Brother 設備和作業系統不同。
步驟 A:設定掃描到文件功能
Windows
-
打開控制中心/Control Center。
-
Brother Utilities 有支援持的型號
-
打開 Brother Utilities.
-
Windows 7 / 10 / 11
點選 或
或  (Start) > (All Programs or All apps >) Brother > Brother Utilities.
 -
Windows 8
在“開始”屏幕上,點選 .
.
如果 不在“開始”屏幕上,請右鍵點選空白處的某個位置,然後點選欄中的“All Apps”。
點選 Brother Utilities.
-
Windows 7 / 10 / 11
- 點選 Scan.
- 點選 ControlCenter4.
-
打開 Brother Utilities.
-
Brother Utilities 不支援持的型號
點選 (Start) > All Programs > Brother > [model name] > ControlCenter4.
-
Brother Utilities 有支援持的型號
-
開啟 Device Scan Settings 視窗.
在 Home Mode:
點選 Device Settings 分頁 > Device Scan Settings.

在 Advanced Mode:
點選 Device Settings 分頁 > Device Scan Settings.

-
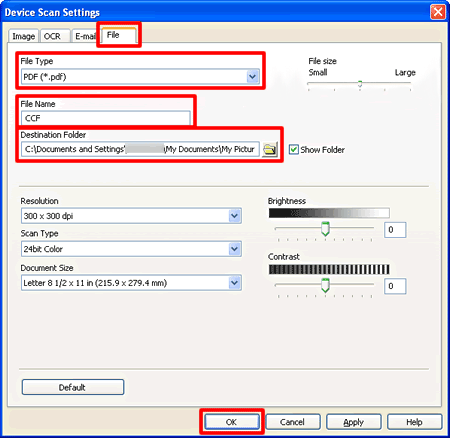
“Device Scan Settings”視窗將出現。 點選File分頁並在File Type中選擇 PDF(*.pdf)。 配置設定並 點選OK。 例如,您可以在文件名框中設置用於掃描數據File Name的前綴碼文字。 您還可以設置文件夾以將掃描數據保存在Destination Folder框中。
- 轉到 步驟 B。
Macintosh
此步驟在 macOS 10.14 或之前版本可用。
如果您使用 macOS 10.15 或更新版本,則必須安裝 Brother iPrint&Scan 和 iPrint&Scan Push Scan Tool。
> 點此處在下載部分下載 Brother iPrint&Scan 和 iPrint&Scan Push Scan Tool。
安裝 iPrint&Scan Push Scan Tool 後,您必須從 Brother iPrint&Scan 配置 Brother 設備的掃描按鈕設置。
-
開啟 ControlCenter.
要打開 ControlCenter2 應用程序,點選 Finder 欄中的Go,Applications > Brother > ControlCenter。 點兩下ControlCenter。ControlCenter 將打開,並且一個圖標將放置在停靠欄中。 - 按住鍵盤上的 Ctrl 鍵並點選File。
-
點選 Device Button 分頁 並在File Type選擇 PDF(*.pdf). 配置設定並 點選OK. 例如,您可以在文件名框中設置用於掃描數據File Name的前綴碼文字。 您還可以設置文件夾以將掃描數據保存在Destination Folder框中。

步驟 B:使用 Brother 設備上SCAN鍵的掃描到文件功能
- 放置您的文檔。
- 按下 Scan > to File.
-
如果機器通過網絡連接,請按向上或向下箭頭鍵顯示要向其發送數據的電腦,然後按電腦名稱。
如果 LCD 提示您輸入電腦的 PIN,請在 LCD 上輸入四位數的 PIN,然後按確定。
-
執行以下操作之一:
- 要更改掃描設置,請按Options,然後轉到步驟 5。
-
要使用預設掃描設置,請按Start。
機器開始掃描。 如果您使用機器的掃描儀玻璃板,請按照 LCD 說明完成掃描作業。要更改掃描設置,必須在連接到本機的電腦上安裝 Brother 的控制中心軟件。
-
要掃描文檔的兩面:
按2-sided Scan/雙面掃描,然後選擇文檔類型。 -
選擇您要更改的掃描設置:
- Scan Type
- Resolution
- File Type
- Scan Size
-
Remove Background Color
(僅適用於Color和Gray 選項。)
- 按 OK.
-
按 Start.
機器開始掃描。 如果您使用機器的掃描儀玻璃板,請按照 LCD 說明完成掃描作業。
您可以使用 ControlCenter 等有用的應用程序從您的電腦進行掃描。
> 請參閱有關如何在 Windows/Macintosh 上使用控制中心的相關常見問題解答。