CM550DX/ CM550
FAQs & Troubleshooting |
How do I perform the initial setting (position adjustment) for region embossing?
Perform the region emboss initial setting according to the following procedure.
Initial setup for region embossing is done by performing the following operations:
Trial Cutting, Scanning/Cutting Position Adjustment, and Emboss Template Position Adjustment.
Prepare the following.
| Size | 12" × 12" (305 mm × 305 mm) size of thick paper that has not been embossed. |
| Paper | Thick paper with one white side |
| Thickness | Thick paper equivalent to 150 g/m2 through 200 g/m2 |
| Mat |
Middle tack adhesive mat
The cutting mats used by this machine have been redeveloped with a different design, type, function, etc. |
| Blade | Holder (turquoise) |
-
Recall the pattern you want to emboss.
-
Touch
 .
.

-
Select "Region Emboss".

-
Select "Create template".

-
Touch the "OK" key.

Trial Cutting
First, perform trial cutting to check that the prepared materials can be cut.
-
Attach the prepared paper to the middle tack adhesive mat.
Make sure that the white side is facing up when attaching the paper to the mat.

(1) White surface When using prepared paper with one colored side, be sure to attach the paper with the white side facing up. -
Adjust the blade extension according to the paper.
Adjust the blade extension according to the thickness of the prepared paper, such as a setting of 3.5 for 150 g/m2 paper and a setting of 4 for 200 g/m2 paper.
(1)Turn to the left to decrease the blade extension.
(2) Turn to the right to increase the blade extension.If too much of the blade is extended, the blade may break or the mat may be cut. When increasing the blade extension, adjust it in increments of half a marking, and then perform trial cutting. -
Insert the holder into the carriage, and push down on the holder lock lever.

-
Adjust the cutting pressure.
When using 150 g/m2 to 200 g/m2 paper, set the cutting pressure to 0.

- Touch the "OK" key.
-
Press
 to load the mat with the thick paper, and press Start/Stop button.
 -
Touch the "OK" key if the sheet is cut cleanly.

If the paper is not cut cleanly, touch the "Cancel" key.
Repeatedly perform trial cutting and adjust the blade extension until the material is cut cleanly.
Scanning/Cutting Position Adjustment
After performing trial cutting to confirm that the material can be cut, follow the procedure below to adjust the scanning/cutting position.
-
Press Start/Stop button to start "Scanning/Cutting Position Adjustment".


-
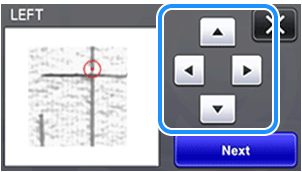
When the scan of the cut (left) appears, touch the arrow keys to align the center of the red circle with the center of the cut.
-
Touch the "Next" key.

-
Adjust the right cut in the same way, and then touch the "OK" key.

-
When the following message appears, touch the "OK" key.

Emboss Template Position Adjustment
-
Press in the operation panel to feed out the mat.
-
Fold the cut-out embossing adjustment sheet in half, along the dotted line.
Fold the sheet, as shown below, so that the numbers can be read.

- Touch the "OK" key.
-
Overlap
 .
.
Referring to the numbers below the rectangles, select the number for the cutout that is perfectly aligned on the left and right.

- Press the "OK" key.
-
Press the "OK" key.

The region emboss initial setting is finished.
Refer to "What should I do if I want to change the initial setting (position adjustment) for region embossing?" if you want to change the setting.