MFC-J430W
FAQs & Troubleshooting |
Scan a document and save the scanned image to a folder on a local or network hard disk (For Windows)
You can scan a document and save the scanned image to a preferred folder using ControlCenter4. Click the link below for the ControlCenter4 user interface you are using to see more details.
NOTE: Illustrations shown below are from a representative product and operating system and may differ from your Brother machine and operating system.
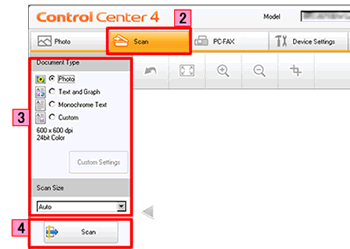
Home Mode
- Load your document.
- Click the Scan tab.
- Select the Document Type and Scan Size.
-
Click Scan.
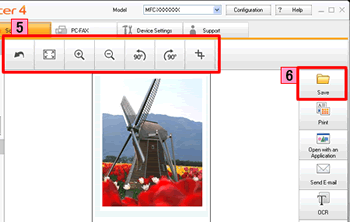
- The scanned image will be displayed in the image viewer. Confirm and edit (if necessary) the scanned image.
-
Click Save.
-
The Save dialog will appear. Configure the settings, and click OK. The image will be saved in the folder you have selected in the settings window.
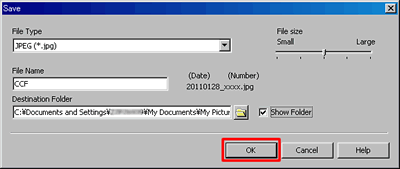
File Type:
Select the file type for the scanned image from the File Type drop-down list. The following file types are available:
*Note: The available file types vary depending on your Brother machine and operating system.- Windows Bitmap (*.bmp)
- JPEG (*.jpg)
- TIFF (*.tif)
- TIFF Multi-Page (*.tif)
- Portable Network Graphics (*.png)
- PDF (*.pdf)
- Secure PDF (*.pdf)
-
XML Paper Specification (*.xps)
Note:- The XML Paper Specification is available for Windows Vista or later, or when using applications which support XML Paper Specification files.
- If you set the file type to JPEG, PDF or Secure PDF, you can configure File size.
- If you set the file type to TIFF or TIFF Multi-Page, you can select "Uncompressed" or "Compressed".
File Name:
Configure the prefix text used for the file name of the scanned image in the File Name box.
Destination Folder:
Set the folder to save the scanned image in the Destination Folder box.
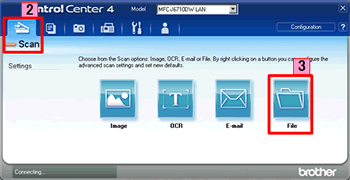
Advanced Mode
- Load your document.
- Click the Scan tab. If you want to change the scan settings, click here to see the details of how to change scan settings.
-
Click File. The image will be saved in the folder you have selected in the settings window for Scan to File.