MFC-790CW
FAQs & Troubleshooting |
When I print photos, the color quality is not good.
When printing photos, there are five factors that can affect the quality of the printed image. The brand of paper, mixing color, generic ink supplies, driver settings and improper drying. The steps listed below will help to enhance the photos image quality .
StepA : Checking the print quality
-
Print a Print Quality Check Sheet.
-
Press
 or
or  .
.
-
Press Test Print.
-
Press Print Quality.
- Press Color (Colour) Start. The machine begins printing the Print Quality Check Sheet.
-
Press
-
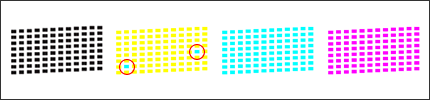
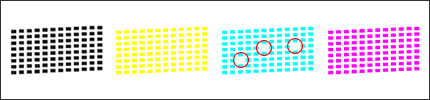
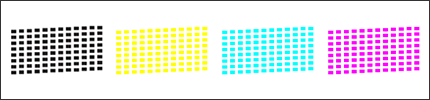
Compare the print quality of Check Sheet you just printed with the examples listed below:
(A) Mixing colors
(B) Missing colors
(C) Normal
-
If Check Sheet is normal, go to the stepB. If your Check Sheet is mixing colors or missing colors, you need to clean print head. Please refer to "How can I improve poor print quality?"
If mixing colors or missing colors are improved in head cleaning, please print once and check printing quality.
If there is still a printing quality, go to the stepB.
-
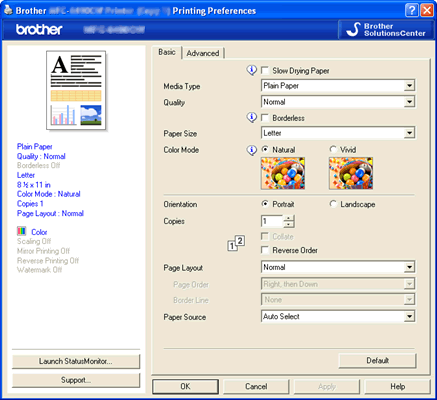
Open Printing Preference. (Click here to see the details of how to open Printing Preferences.)
-
On the Basic tab, you may adjust the following settings:
-
Media Type: To achieve the best print results, the media being printed on should be selected in the driver. The machine changes the way it prints depending on the selected media type.
-
Quality: The quality selection lets you choose the print resolution. As print quality and speed are related, the higher the quality, the longer it will take to print the document. The quality selections that are available will vary depending on the media type you choose.
-
Color Mode: Color is adjusted to get the closest color match with the PC monitor.
- Natural: Use for photographic images. The color is adjusted to print more natural colors.
-
Vivid: Use for business graphics such as charts, graphics and text. The color is adjusted to print more vivid colors.
-
Media Type: To achieve the best print results, the media being printed on should be selected in the driver. The machine changes the way it prints depending on the selected media type.
- Click Apply.
- Click on the Advanced tab.
-
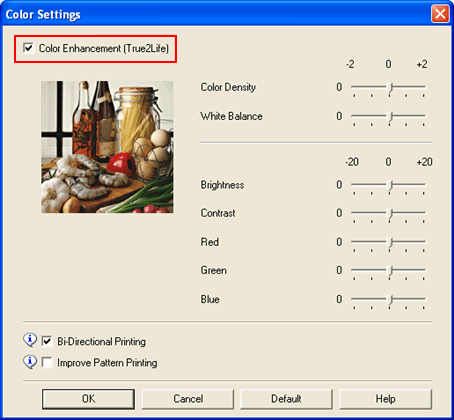
Click Color Settings.

-
Check Color Enhancement (True2Life®) and then adjust color.
This feature analyzes your image to improve its sharpness, white balance and color density. This process may take several minutes depending on the size of the image and the specifications of your PC. With this option you may manually adjust the following settings:
-
Color Density: Adjusts the total amount of color in the image. You can increase or decrease the amount of color in an image to improve a washed out or weak looking picture.
-
White Balance: Adjusts the hue of the white areas of an image. Lighting, camera settings and other influences will affect the appearance of white. The white areas of a picture may be slightly pink, yellow or some other color. By adjusting the white balance you can adjust those white areas.
-
Brightness: Adjusts the brightness of the whole image. To lighten or darken the image, move the scroll bar to the right or left.
-
Contrast: Adjusts the contrast of an image. This will make darker areas darker and lighter areas lighter. Increase the contrast when you want an image to be clearer. Decrease the contrast when you want an image to be more subdued.
-
Red: Increases the intensity of Red in the image to make the image redder.
-
Green: Increases the intensity of Green in the image to make the image greener.
-
Blue: Increases the intensity of Blue in the image to make the image bluer.
-
Color Density: Adjusts the total amount of color in the image. You can increase or decrease the amount of color in an image to improve a washed out or weak looking picture.
- Click OK to close the windows.
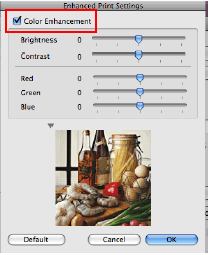
- For Mac OS X users
- Open Print dialog. (Click here to see the details of how to open Print dialog.)
- In the Print dialog box choose Print Settings.
- Click the Advanced button.
-
Click the Color Settings button.

-
Check Color Enhancement and then adjust color.
For Photo printing from a memory card or USB Flash memory drive
-
Make sure you have put a memory card or USB Flash memory drive in the proper slot.
Press Photo Capture key. -
Press View Photos. Do one of the following:
-If you want to choose photos to print or print more than one for an image, go to step 3.
-If you want to print all photos, press (Print All Photos) . Press Yes to confirm. Go to step 6.
- Press and choose a photo from the thumbnail.
- Enter the number of copies you want either by pressing the number or pressing + or -. Press OK.
- Repeat step 3 and 4 until you have chosen all the photos that you want to print.
- After you have chosen all the photos, press OK. Press Print Setting.
- Press the up or down arrow key to display Color Enhance or True2Life.
- Press Color Enhance or True2Life.
- Press On.
- Press and choose White Balance, Sharpness or Color Density.
- Press the left or right arrow key to adjust the degree of the setting. Press OK.
-
Press
 .
. - Press Color (Colour) Start to print.
Recommended ink type
-
Brother strongly recommends that customers do not use generic ink or refill their Brother ink cartridges. Using non-Brother supplies may affect the hardware performance, print quality and machine reliability since the ink formulation in genuine Brother ink cartridges prevents smearing and clogging of the print head. The Brother limited warranty does not apply to any problem that was caused by the use of unauthorized third party ink and/or cartridges.
> Brother Genuine Supplies information
Paper types
- Print quality is also affected by the type and brand of paper used as well as the selected print or copy resolution. In order to achieve optimum print quality, Brother Paper is recommended, but other brands may work as well depending on the type of document you are printing.
Proper paper handling after page has been printed
- After the photo has finished printing, remove the photo immediately from the machine and place on flat surface to dry for 24 hours. Do not allow additional printed documents lay on top of the photo while in the machines paper output tray.
- Do not place anything on top of the photo until after 24 hours. This can cause the picture not to dry properly.
- Do not place a photo in a photo album or a picture frame until after 24 hours. This can cause the picture not to dry properly.