PT-P750W
FAQs & Troubleshooting |
How do I connect the printer to my computer via Wi-Fi®?
To connect your printer to a wireless network, you must use the supplied AC adapter or Li-ion battery. If your Brother printer is powered by alkaline or Ni-MH batteries, you cannot connect it to a wireless network.
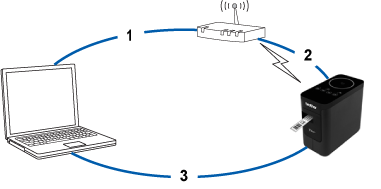
To connect the printer and your computer:
-
Connect your computer to your wireless router/access point.
(You can skip this step if your computer is already connected to a Wi-Fi® network.) -
Connect your Brother printer to the same wireless router/access point.
-
Connect your Brother printer and your computer.
Depending on whether the printer driver is installed, do one of the following:
(The printer driver is not provided for macOS 11 or later. Follow the steps in "Set up the wireless connection manually with the printer driver installed (For Mac)".)
| The printer driver is not installed | Set up the wireless connection while installing the printer driver. |
| The printer driver is installed |
Set up the wireless connection manually: |
Set up the wireless connection while installing the printer driver
Before you begin, confirm the SSID (Network Name) and the password (Network Key) of your wireless router/access point.
-
Make sure your computer is connected to your wireless router/access point.
(If your computer is already connected to a Wi-Fi network, go to the next step.) - Download the printer driver and P-touch Editor from the [Downloads] section of this website.
- Double-click the downloaded file to begin the installation.
-
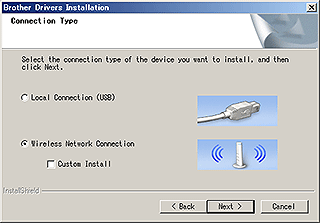
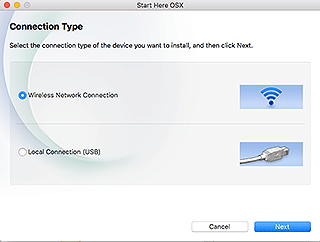
Select [Wireless Network Connection] and then click [Next].
Windows
Mac
-
Windows: Select [Brother Peer-to-Peer Network Printer].
Mac: Go to step 7.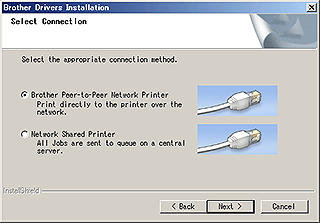
-
(Windows only) Select [Change the Firewall port settings to enable network connection and continue with the installation.(Recommended)], and then click [Next].
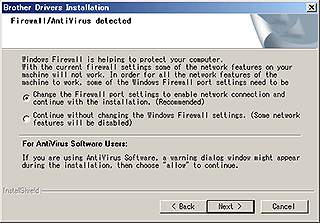
-
Prepare a USB cable. Select [Yes, I have a USB cable to use for installation.].
WPS Users Only
If you want to use WPS (Wi-Fi Protected Setup™), select [No, I do not have a USB cable]. Follow the on-screen instructions to complete the software installation, and then go to step 13.Windows
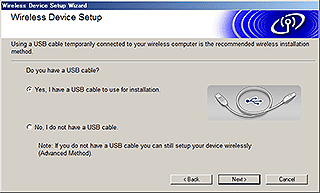
Mac
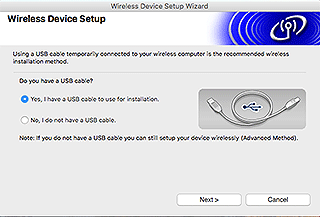
-
Select the SSID (Network Name) you confirmed previously, and then click [Next].
Windows
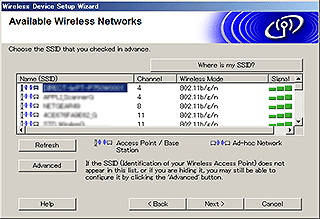
Mac
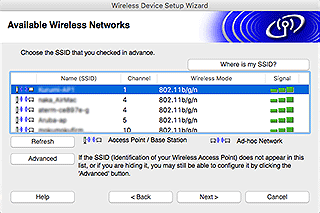
- When the installation confirmation screen appears, make sure the check box is selected, and then click [Next].
-
Confirm that the SSID (Network Name) is correct, and then select [Yes].
Windows
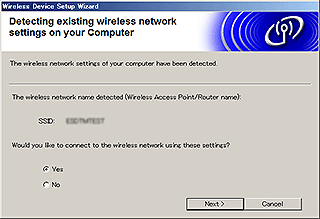
Mac
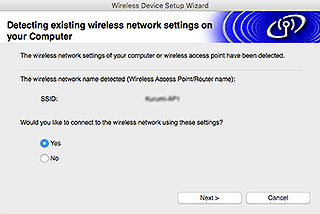
-
Follow the on-screen instructions to complete the software installation.
When the installation is complete, click [Finish] to close the installer window. - When the printer is connected to your wireless router/access point, the printer’s Wi-Fi LED becomes lit.
- Make sure that the Editor Lite LED is off. Start the P-touch Editor and select the printer from the list.
- You can now edit and print labels wirelessly from your computer.
Set up the wireless connection manually with the printer driver installed (For Windows)
To connect your printer to a wireless network, you must use the supplied AC adapter or Li-ion battery. If your Brother printer is powered by alkaline or Ni-MH batteries, you cannot connect it to a wireless network.
- Make sure that the printer driver, Printer Setting Tool, and P-touch Editor are installed on your computer.
- Turn on the printer.
-
Make sure the printer’s Wi-Fi LED is flashing.
If the Wi-Fi LED is not flashing
Press and hold the Wireless Mode button for one second to turn on the wireless mode. When the Wi-Fi LED is lit, release the Wireless Mode button. - Connect the printer to the computer with a USB cable.
- Start the Printer Setting Tool on the computer, and click [Communication Settings]. For more information about the Printer Setting Tool, see "Using the Printer Setting Tool (for Windows)".
-
In [Wireless Settings] in the [Wireless LAN] tab, do the following:
- Make sure that [Infrastructure] is selected for [Communication Mode].
- Enter the SSID (Network Name) that you used previously, or click [Search...] and select the SSID from the list.
-
Enter the password as [Passphrase] and click [Apply].
Enter the correct [Authentication Method] and [Encryption Mode] settings for your wireless network.
- When the printer and the wireless router/access point are connected successfully, the printer’s Wi-Fi LED stops flashing, and then becomes lit.
- Make sure that the Editor Lite LED is off. Start the P-touch Editor and select the printer from the list.
- You can now edit and print labels wirelessly from your computer.
Set up the wireless connection manually with the printer driver installed (For Mac)
To connect your printer to a wireless network, you must use the supplied AC adapter or Li-ion battery. If your Brother printer is powered by alkaline or Ni-MH batteries, you cannot connect it to a wireless network.
-
Download the Full Software Package from the [Downloads] section of this website.
-
Double-click the downloaded file.
- Open the [Utilities] folder and find the Wireless Device Setup Wizard.
- Double-click [Wireless Device Setup Wizard.app].
-
Follow the on-screen instructions to set up the wireless settings between the printer and your wireless router/access point.
We recommend using a USB cable to complete the setup.
- Connect your computer to the wireless router/access point.
-
Make sure the Wi-Fi function of your computer is activated.
Select the SSID that you used in step 5. The connection between your computer and your wireless router/access point will be established.
If your computer is already connected to a Wi-Fi network, go to the next step. -
Make sure that the Editor Lite LED is off. Start the P-touch Editor and select the printer from the list.
-
You can now edit and print labels wirelessly from your computer.
You can also try the following alternative connection methods:
Wireless Direct: "How can I connect the printer and my Apple mobile device wirelessly?"
Ad-hoc Mode: "How can I print wirelessly from a computer in Ad-hoc mode?"
(Not all computers, mobile devices, and operating systems, may support Ad-hoc mode.)