TD-4410D
FAQs & Troubleshooting |
How to set the Head Unit
Movie: How to set the Head Unit
*The video clip is being streamed from YouTube.
Place the product on an Electrostatic Discharge (ESD) grounding mat or use anti-static gloves, otherwise this product or its accessories may get damaged or destroyed.
-
Make sure you disconnect the printer from the AC power outlet.
-
Pull up the release levers on both sides of the printer to unlock the Roll Compartment Cover, and then open the cover.

Do not directly touch the Tear Bar with your hands (except for TD-4420DN(FC)/4550DNWB(FC)). Doing so may result in injury.
-
Push up the lever on the inside of the cover.

-
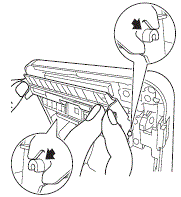
While holding the cable, remove the connector from the head unit.
-
Connect the connector to the new head unit.

-
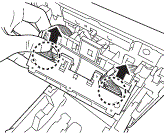
Affix the head unit to the hubs on both sides.
-
Holding the cover, lift up the head unit by pressing on its central part until it makes a clicking sound.

- Close the Roll Compartment Cover until it locks into place.