HL-3260N
FAQs & Troubleshooting |
How do I replace the drum unit?
Follow the procedure below to replace drum unit.
Do NOT use flammable substances or any type of spray to clean the inside or outside of the machine. Doing this may cause a fire or electrical shock.

-
Turn off the printer.
-
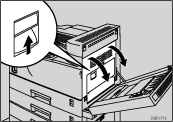
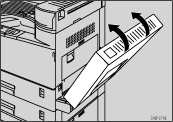
If the Duplex unit is installed, open the Duplex unit by lifting the catch.
-
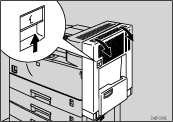
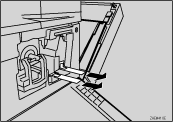
Open the Right cover of the printer by lifting the catch.
-
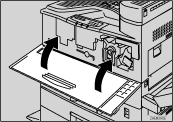
Open the Front cover.

-
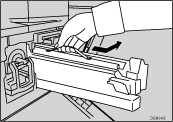
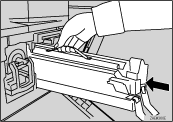
While pressing the green button, slide the Drum unit out until it stops.

-
Raise the green carrying handle and slide the Drum unit out.
- Do not tilt or drop the removed Drum unit. Moving the unit abruptly can scatter toner.
- While the Drum unit is removed, do not change the toner.
-
Take the new drum unit from the box and remove the plastic bag, holding the Drum unit by the carrying handle.
- Do not drop or refit the removed Drum.
- Do not touch the side of the Drum.
-
Put the Drum unit removed in Step 6 into the plastic bag emptied in Step 7, keeping the unit at the same angle as when it was installed. Then, seal the plastic bag.
-
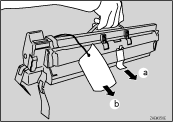
Remove the two red sheets from the Drum unit in the order shown in the illustration.
- Remove the drum unit keeping the unit parallel to the ground as shown in the illustration, otherwise the toner in the unit might scatter.
- Do not touch the inside of the unit or the green parts after the black protection sheet is removed.
-
Align the new Drum unit onto the rail of the printer. Slide the unit all the way into the printer.
-
Push the Drum unit into the printer until it clicks into place.

-
Remove the red sheet from the Drum unit and remove the two pieces of tape.
-
Close the Front cover.
-
If the Duplex unit is installed, close the Duplex unit cover.
- Turn on the printer.
- Do not incinerate the used drum unit. Toner dust might ignite when exposed to an open flame.
- Disposal should take place at an authorized dealer or an appropriate collection site.
- If you dispose of the used parts yourself, dispose of them according to local regulations.
After you have replaced the Drum Unit, you should reset the drum counter on the panel, see the insertion sheet in the Drum Unit carton for instructions.