RJ-3250WB
FAQs & Troubleshooting |
A security warning appears when accessing Web Based Management via HTTPS.
When you use HTTPS to access Web Based Management, your browser will display a security warning dialogue box. To prevent the dialogue box from appearing, install a self-signed certificate to use SSL/TLS communication.
> 1. Create a Self-Signed Certificate
> 2. Install a Self-Signed Certificate
1. Create a Self-Signed Certificate
Safari users do not need to create a Self-Signed Certificate but only install one.
> Click here to see how to install a Self-signed certificate.
Google Chrome™
- Start Google Chrome™.
-
Type "https://machine's IP address" in Google Chrome's address bar (where "machine's IP address" is the machine's IP address).
If a security warning appears, click here to access Web Based Management via HTTPS.
-
If required, type your machine's password in the Login field, and then click Login.
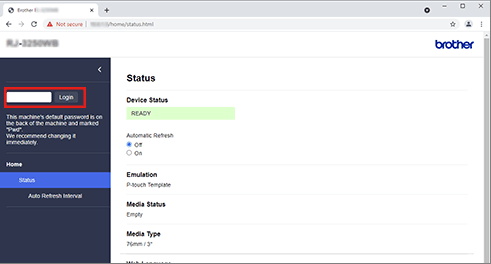
The default password to manage this machine's settings is located on the back of the machine and marked "Pwd".
-
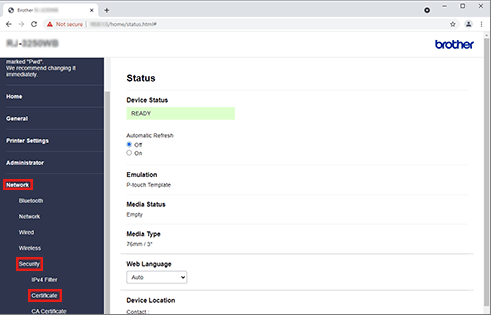
Go to the navigation menu, and then click Network > Security > Certificate.
-
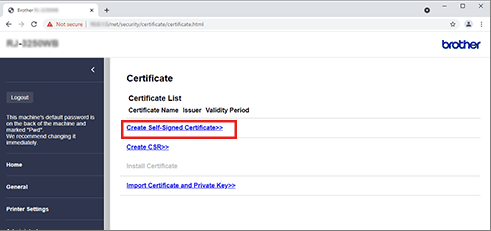
Click Create Self-Signed Certificate.
-
Enter a Common Name and a Valid Date.
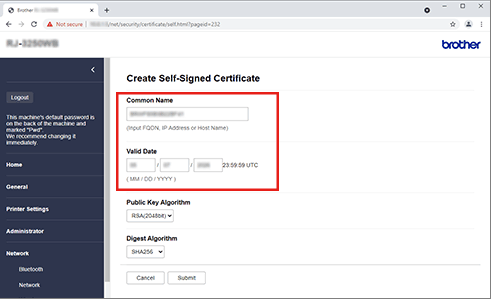
- The length of the Common Name must be less than 64 bytes.
- A warning will appear if you use the IPPS or HTTPS protocol and enter a different name in the URL than the Common Name that was used for the self-signed certificate.
- If the URL is a node name beginning with BR, enter the node name as the Common Name.
- If the URL is an IP address, enter the IP address as the Common Name.
- Select the setting you want from the Public Key Algorithm drop-down list (Default setting: RSA(2048bit)).
- Select the setting you want from the Digest Algorithm drop-down list (Default setting: SHA256).
- Click Submit.
-
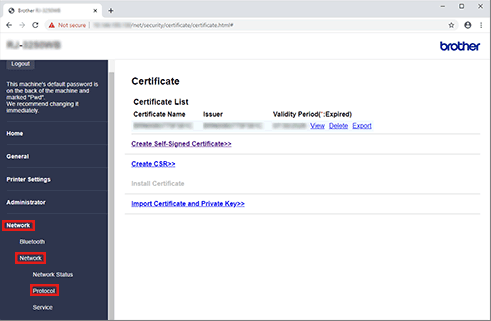
Go to the navigation menu, and then click Network > Network > Protocol.
-
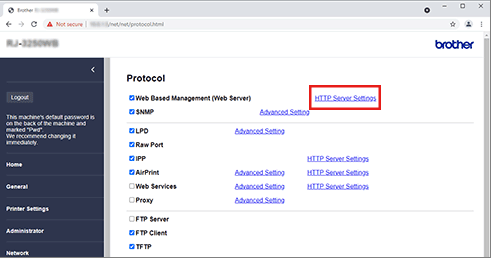
Click HTTP Server Settings.
-
Select the certificate you want to configure from the Select the Certificate drop-down list.
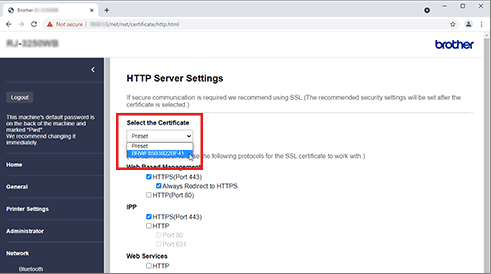
- Click Submit.
-
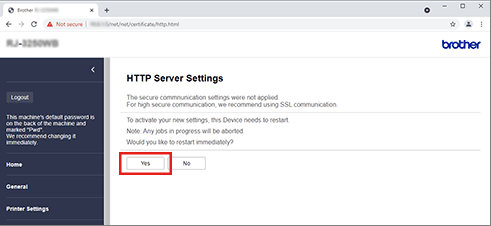
Click Yes to restart your machine's print server.
Microsoft Edge
- Start Microsoft Edge.
-
Type "https://machine's IP address" in Microsoft Edge's address bar (where "machine's IP address" is the machine's IP address).
If a security warning appears, click here to access Web Based Management via HTTPS.
-
If required, type your machine's password in the Login field, and then click Login.
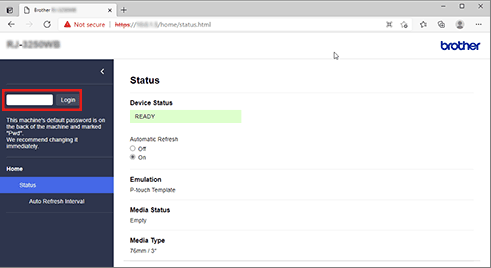
The default password to manage this machine's settings is located on the back of the machine and marked "Pwd".
-
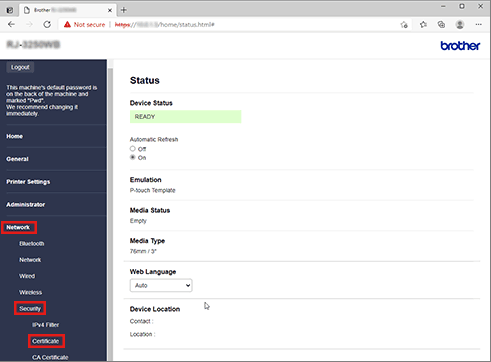
Go to the navigation menu, and then click Network > Security > Certificate.
-
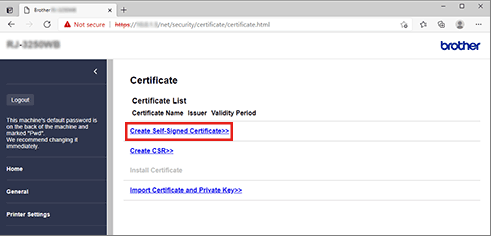
Click Create Self-Signed Certificate.
-
Enter a Common Name and a Valid Date.
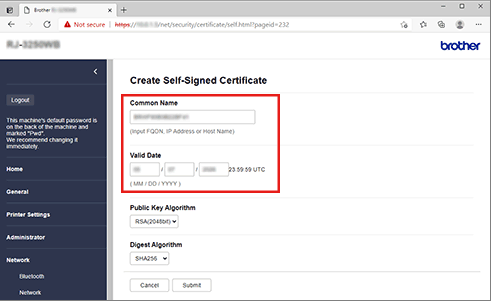
- The length of the Common Name must be less than 64 bytes.
- A warning will appear if you use the IPPS or HTTPS protocol and enter a different name in the URL than the Common Name that you used for the self-signed certificate.
- If the URL is a node name beginning with “BR”, enter the node name as the Common Name.
- If the URL is an IP address, enter the IP address as the Common Name.
- Select the setting you want from the Public Key Algorithm drop-down list (Default setting: RSA(2048bit)).
- Select the setting you want from the Digest Algorithm drop-down list (Default setting: SHA256).
- Click Submit.
-
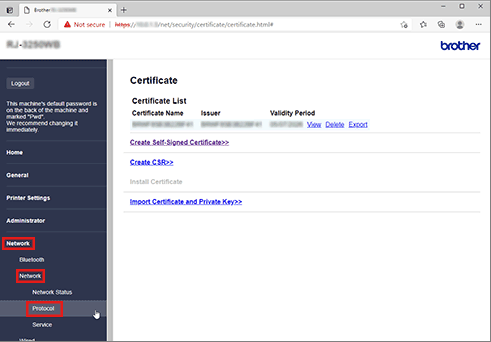
Go to the navigation menu, and then click Network > Network > Protocol.
-
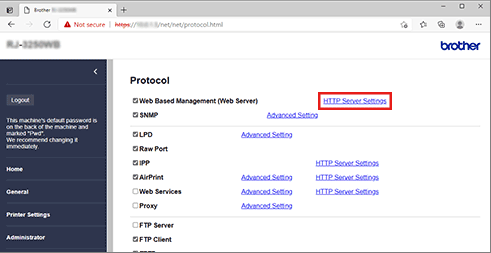
Click HTTP Server Settings.
-
Select the certificate you want to configure from the Select the Certificate drop-down list.
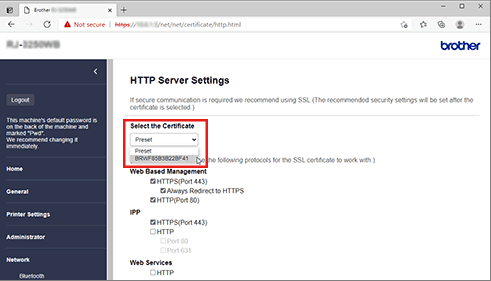
- Click Submit.
-
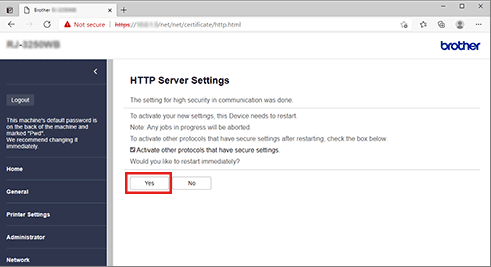
Click Yes to restart your machine's print server.
Internet Explorer®
- Start Internet Explorer®.
-
Type "https://machine's IP address" in Internet Explorer's address bar (where "machine's IP address" is the machine’s IP address).
If a security warning appears, click here to access Web Based Management via HTTPS.
-
If required, type your machine's password in the Login field, and then click Login.
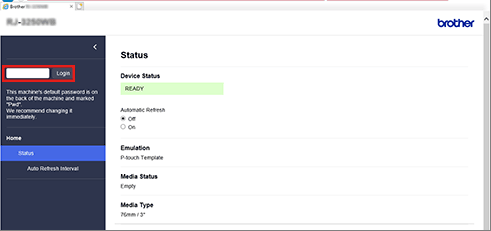
The default password to manage this machine's settings is located on the back of the machine and marked "Pwd".
-
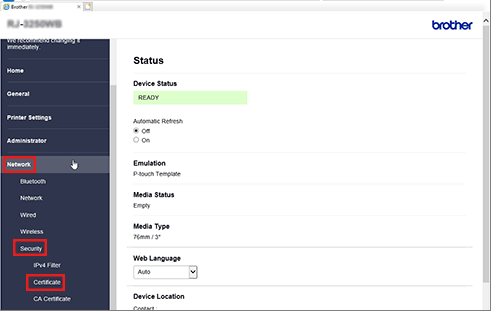
Go to the navigation menu, and then click Network > Security > Certificate.
-
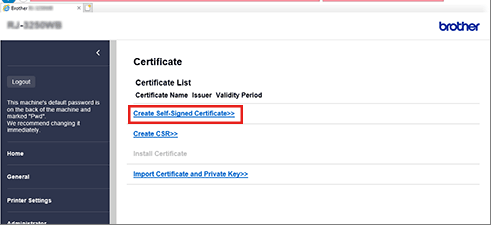
Click Create Self-Signed Certificate.
-
Enter a Common Name and a Valid Date.
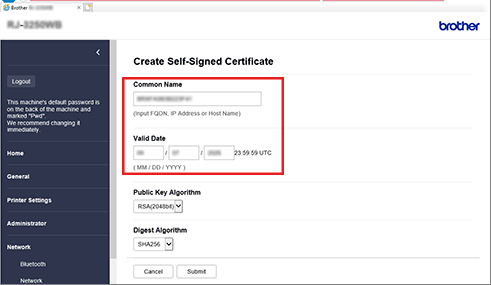
- The length of the Common Name must be less than 64 bytes.
- A warning will appear if you use the IPPS or HTTPS protocol and enter a different name in the URL than the Common Name that you used for the self-signed certificate.
- If the URL is a node name beginning with “BR”, enter the node name as the Common Name.
- If the URL is an IP address, enter the IP address as the Common Name.
- Select the setting you want from the Public Key Algorithm drop-down list (Default setting: RSA(2048bit)).
- Select the setting you want from the Digest Algorithm drop-down list (Default setting: SHA256).
- Click Submit.
-
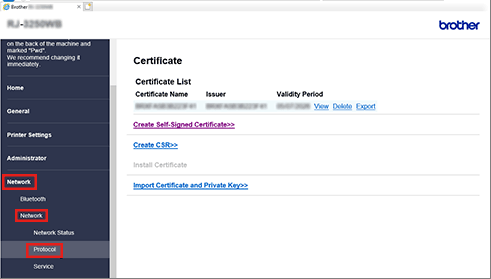
Go to the navigation menu, and then click Network > Network > Protocol.
-
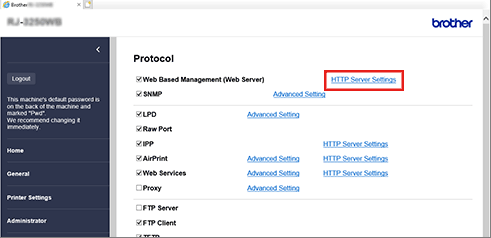
Click HTTP Server Settings.
-
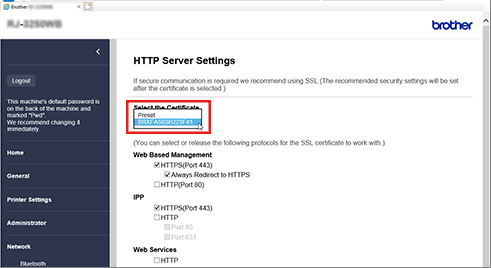
Select the certificate you want to configure from the Select the Certificate drop-down list.
- Click Submit.
-
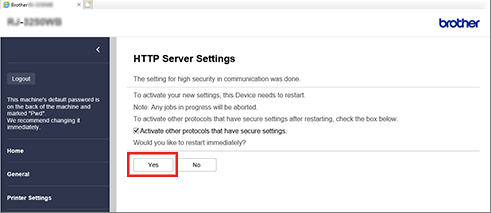
Click Yes to restart your machine's print server.
2. Install a Self-Signed Certificate
Google Chrome™
- Start Google Chrome™.
-
Type "https://machine's IP address" in Google Chrome's address bar (where "machine's IP address" is the machine's IP address).
If a security warning appears, click here to access Web Based Management via HTTPS.
-
If required, type your machine's password in the Login field, and then click Login.

The default password to manage this machine's settings is located on the back of the machine and marked "Pwd".
-
Go to the navigation menu, and then click Network > Security > Certificate.

-
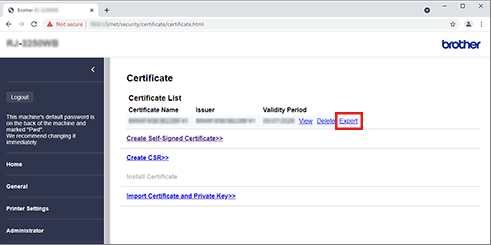
Click Export.
-
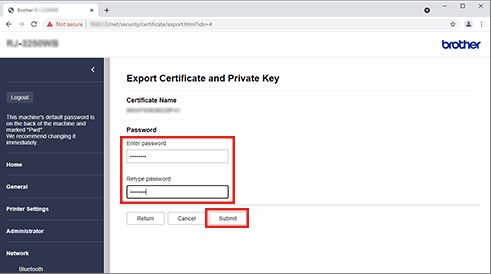
If you want to encrypt the output file, type a password in the Enter password field.
If the Enter password field is blank, your output file will not be encrypted. -
Type the password again in the Retype password field, and then click Submit.
-
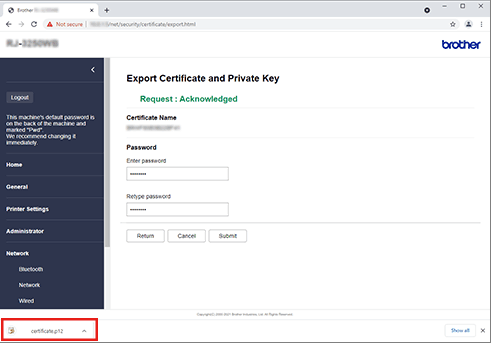
Click the downloaded file and start the Certificate Import Wizard.
-
Click Next.

-
Click Next.

-
If required, type a password in the Password field, and then click Next.

-
Select Place all certificates in the following store, and then click Browse....

-
Select Trusted Root Certification Authorities, and then click OK.

-
Click Next.

-
Click Finish.

-
Click Yes, if the fingerprint (thumbprint) is correct.

-
Click OK.

Safari
> Click here to see how to create and install a Self-signed certificate.
Microsoft Edge
- Start Microsoft Edge.
-
Type "https://machine's IP address" in Microsoft Edge's address bar (where "machine's IP address" is the machine's IP address).
If a security warning appears, click here to access Web Based Management via HTTPS.
-
If required, type your machine's password in the Login field, and then click Login.

The default password to manage this machine's settings is located on the back of the machine and marked "Pwd".
-
Go to the navigation menu, and then click Network > Security > Certificate.

-
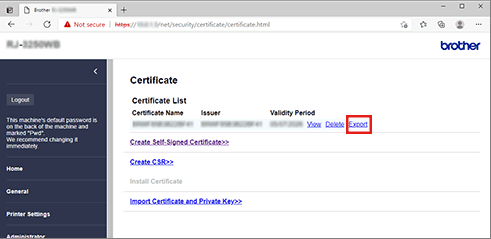
Click Export.
-
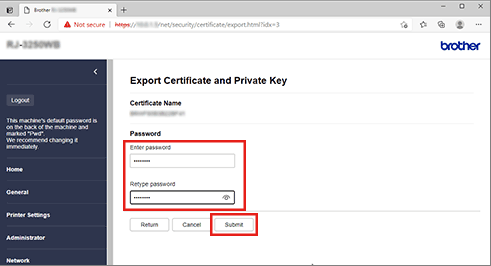
If you want to encrypt the output file, type a password in the Enter password field.
If the Enter password field is blank, your output file will not be encrypted. -
Type the password again in the Retype password field, and then click Submit.
-
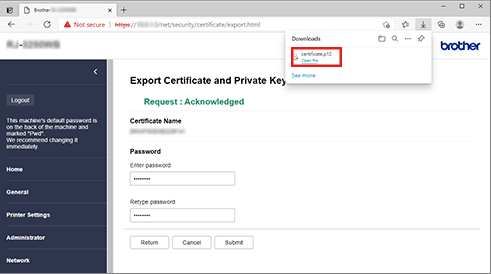
Click Open file and start the Certificate Import Wizard.
-
Click Next.

-
Click Next.

-
If required, type a password in the Password field, and then click Next.

-
Select Place all certificates in the following store, and then click Browse....

-
Select Trusted Root Certification Authorities, and then click OK.

-
Click Next.

-
Click Finish.

-
Click Yes, if the fingerprint (thumbprint) is correct.

-
Click OK.

Internet Explorer®
-
Do one of the following:
-
Windows 10
Click (Start) > Windows Accessories. -
Windows 8.1
Right-click the Internet Explorer icon in the taskbar.
-
Windows 10
-
Right-click Internet Explorer®, and then click Run as administrator.
- If the More option appears, click More.
- If the User Account Control section appears, click Yes.
-
Type "https://machine's IP address" in Internet Explorer's address bar (where "machine's IP address" is the machine's IP address).
If a security warning appears, click here to access Web Based Management via HTTPS.
-
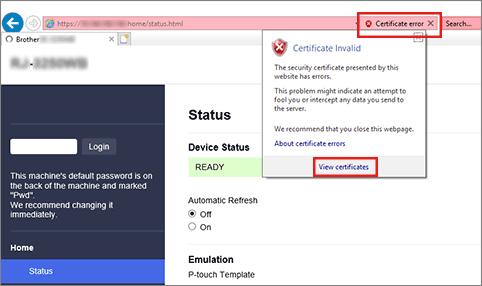
Click Certificate error, and then click View certificates.
-
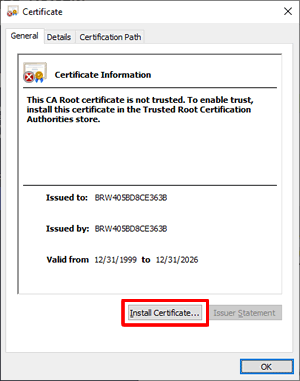
Click Install Certificate....
-
When the Certificate Import Wizard appears, click Next.

-
Select Place all certificates in the following store, and then click Browse....

-
Select Trusted Root Certification Authorities, and then click OK.

-
Click Next.

-
Click Finish.

-
Click Yes, if the fingerprint (thumbprint) is correct.

-
Click OK.
