HL-3070CW
FAQs & Troubleshooting |
Out of Memory
The printer cannot print full pages of a document, please complete the following steps:
-
If you want to print the remaining data in the printer memory, press Go.
If you want to cancel the processing or printing of data, press Cancel. The LCD shows "Cancel Printing." until the job cancelled.
If you want to delete all jobs, press Cancel for about 4 seconds until the LCD shows "Cancel All Jobs" and then release it.
To exit the control panel menu and return the printer to the Ready state, press Cancel.
-
Reduce the complexity of your document.
-
Lower the print resolution.
The instructions vary depending on your Operating System (OS). Choose your OS and follow the instructions.
Windows | Macintosh
[Printer Driver]
-
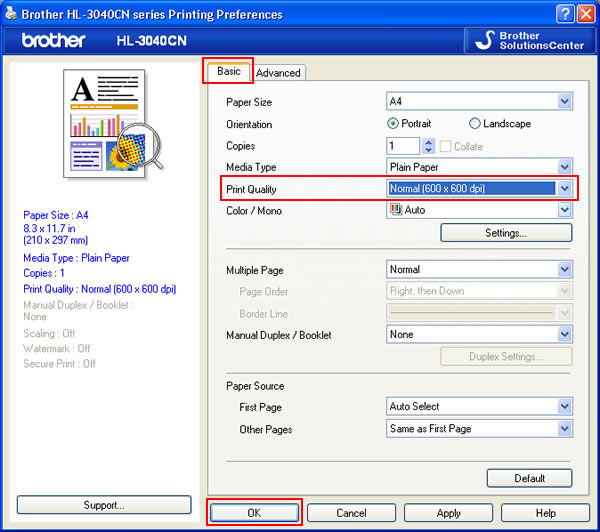
Open Printing Preferences. (Click here to see the details of how to open Printing Preferences.)
-
Open the Basic tab and choose the lower print resolution for Print Quality. Click OK. Print from the application as usual.
[BR-Script printer driver]
-
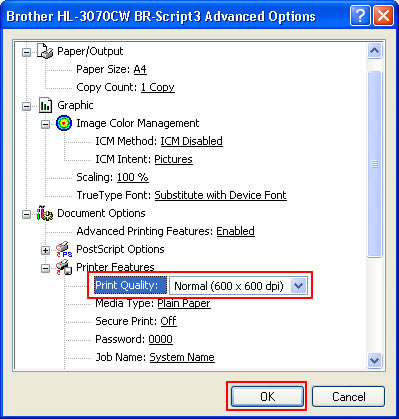
Open Printing Preferences. (Click here to see the details of how to open Printing Preferences.)
-
Open the Layout tab and click Advanced.

-
Choose the lower print resolution for Print Quality. Click OK. Print from the application as usual.
For Macintosh users:
[Printer driver]
-
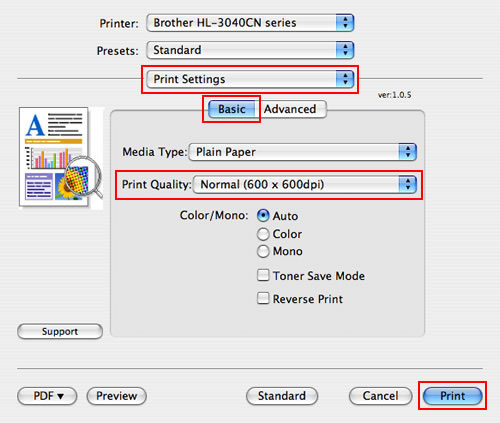
Open the Print dialog. (Click here to see the details of how to open the Print dialog.)
-
[Mac OS X 10.3.9 or 10.4.x users]
-
Choose the "Print Settings" option from the pop-up menu under Presets.
-
Click Basic and choose the lower print resolution for Print Quality. Click Print.
-
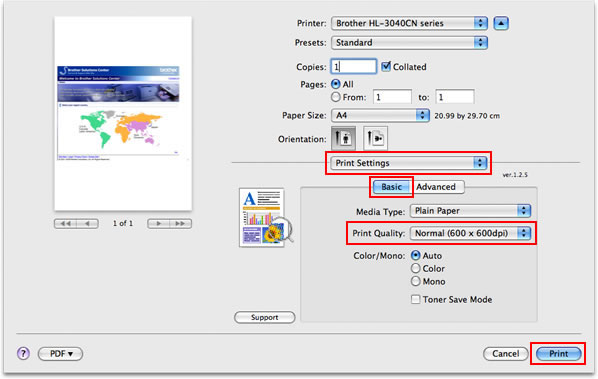
Choose the "Print Settings" option from the print options pop-up menu.
-
Click Basic and choose the lower print resolution for Print Quality. Click Print.
-
Choose the "Print Settings" option from the pop-up menu under Presets.
[BR-Script printer driver]
-
Open the Print dialog. (Click here to see the details of how to open the Print dialog.)
-
[Mac OS X 10.3.9 or 10.4.x users]
-
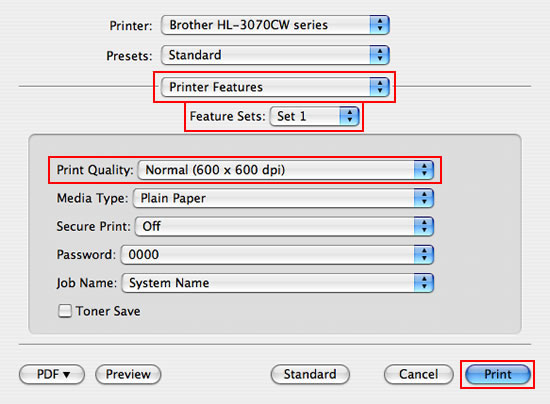
Choose the "Printer Features" option from the pop-up menu under Presets.
-
Choose "Set 1" in the Feature Sets and choose the lower print resolution for Print Quality. Click Print.
-
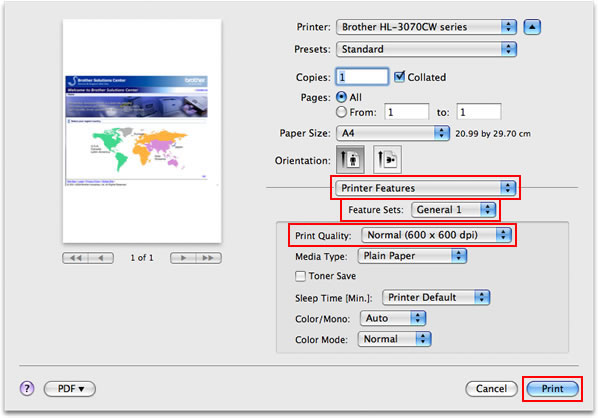
Choose the "Printer Features" option from the print options pop-up menu.
-
Choose "General 1" in the Feature Sets and choose the lower print resolution for Print Quality. Click Print.
-
Choose the "Printer Features" option from the pop-up menu under Presets.
-
Open Printing Preferences. (Click here to see the details of how to open Printing Preferences.)
-
Add more memory
Click here to see details of how to install additional memory.