MFC-9840CDW
FAQs & Troubleshooting |
Duplex (two-sided) scan
For instructions on how to 2-sided(duplex) scan, click on the link below for your scanning method:
-
Using ControlCenter
-
Using the Scan Key
-
Using ScanSoft™ PaperPort™ 11SE (Windows Only)
- Using Presto! PageManager (Macintosh Only)
USING CONTROLCENTER
-
Open the ControlCenter:
-
Windows Users: Click Start => (All) Programs => Brother => [model name] => ControlCenter3. Double-click on the ControlCenter3 icon located in the Task Tray to launch the program window.
-
Macintosh Users: Click Macintosh HD => Library => Printers => Brother => Utilities => ControlCenter => ControlCenter.
If your hard drive icon (Macintosh HD icon) is not on the desktop:
- Click Finder => Preferences....
- In the General tab, check "Hard disks" in the "Show these items on the desktop:"
-
Close the Finder Preferences window.
Your hard drive icons will appear on the desktop.
-
Windows Users: Click Start => (All) Programs => Brother => [model name] => ControlCenter3. Double-click on the ControlCenter3 icon located in the Task Tray to launch the program window.
-
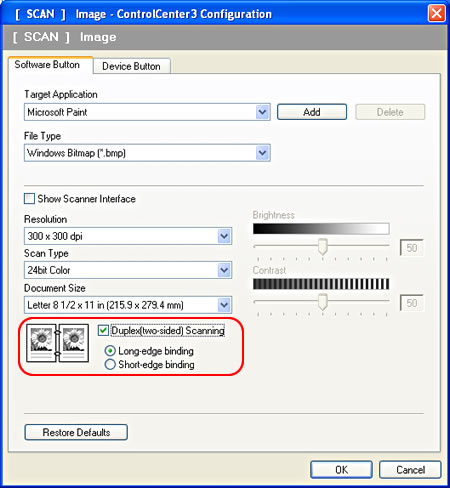
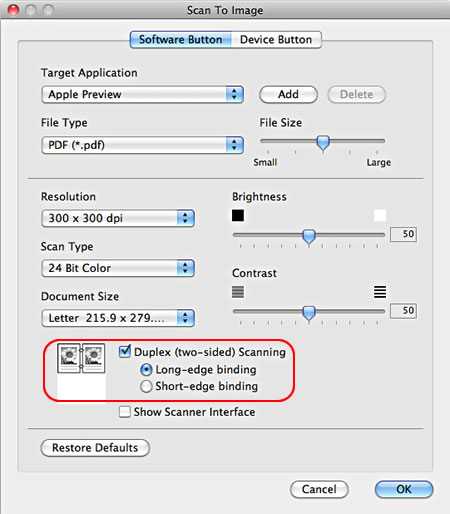
Click on Configuration => Scan => select your desired Scan Type.
-
Place a check in the box for Duplex (two-sided) Scanning. You will then be able to select one of the following binding options:
-
Long-edge binding
- Short-edge binding
Windows ControlCenter
Macintosh ControlCenter
-
Long-edge binding
-
Click OK. All subsequent scans will use this setting.
-
To use the "Scan to" feature from the ControlCenter application:
-
Place the document to be scanned on the Automatic Document Feeder (ADF).
-
Within the ControlCenter application's main screen, click on the desired Scan option that you configured previously.
- The document will now scan.
-
Place the document to be scanned on the Automatic Document Feeder (ADF).
USING THE SCAN KEY
-
Place the document to be scanned on Automatic Document Feeder (ADF).
-
Press the SCAN key on the Brother machine.
-
Press the UP OR DOWN ARROW key to select the scan option you would like to use and press OK.
-
Press the UP OR DOWN ARROW key to select one of the following options and then press OK:
-
1sided
-
2sided (L) Edge (ADF Only)
- 2sided (S) Edge (ADF Only)
-
1sided
-
If prompted, "Scan to E-mail" users should press the UP OR DOWN ARROW key to select PC and then press OK.
-
If prompted, Network users will have to select the computer that you would like to scan to and press OK.
If the LCD prompts you to enter a PIN number, enter the 4-digit PIN number for the destination PC on the control panel and press OK. -
Press Black (Mono) Start or Color (Colour) Start to begin the process.
The selected Start button does not affect the scan's color settings. These settings are configured within the ControlCenter's Device Button Configuration.
USING ScanSoft™ PaperPort™ 11SE (Windows Only)
-
Click Start => (All) Programs => ScanSoft PaperPort 11 => PaperPort.
-
If the Scan or Get Photo panel is not already displayed on the left side of the screen, click File => Scan Or Get Photo. The Scan panel should then appear.
-
Under the scanner section click SELECT.
-
Ensure that TWAIN has a check next to it and from the list of available scanners select the TWAIN driver for your model brother machine. (ex: TWAIN: TW-BROTHER [model name])
-
Click OK. Your scanner should now be listed under the scanner section of the scan panel.
-
Adjust any of the settings to your desired configuration.
-
Place a check next to Display Scanner Dialog Box and Show Capture Assistant.
-
Place the document you wish to scan in the Automatic Document Feeder (ADF) and click SCAN.
-
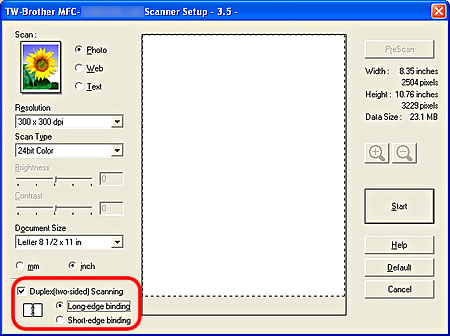
In the "Scanner Setup" dialog box adjust any of the settings to your desired configuration.
Legal sized scanning is unavailable when 2-sided(duplex) scanning. -
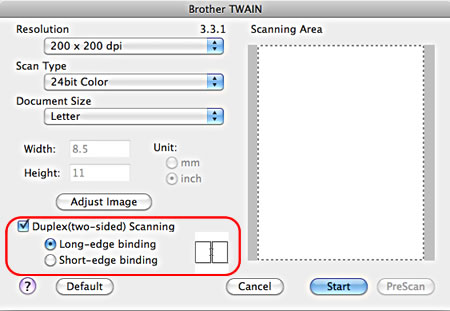
Ensure that Duplex (two-sided) Scanning is checked. You will then be able to select one of the following binding options:
-
Long-edge binding
- Short-edge binding
-
Long-edge binding
-
Click the START button in the scanner window to begin the scan job.
-
When the scanning is complete, click CANCEL. You will be prompted with the following options:
-
Scan More Pages: Select this option if you wish to add additional pages to this scan job.
-
Scan Other Side: Select this option to perform a manual 2-sided(duplex) scan of documents with images on both sides of a page.
- Done: Select this option if you are finished scanning.
-
Scan More Pages: Select this option if you wish to add additional pages to this scan job.
- When you are done scanning you will be taken to the PaperPort Desktop and the scanned document should appear.
USING Presto! PageManager (Macintosh Only)
-
Double click on the Presto! PageManager shortcut icon on the desktop or click Macintosh HD -> Application -> Presto! PageManager 9 for BR -> Presto! Page Manager SE 9.app or click Go -> Application -> Presto! PageManager 9 for BR -> Presto! Page Manager 9.35.app.
-
Place your document on the ADF (Automatic Document Feeder).
-
In Presto click the Acquire button.
-
Place a check in Duplex (two-sided) Scanning. You will then be able to select one of the following binding options:
-
Long-edge binding
- Short-edge binding
-
Long-edge binding
-
Once you have configured all of your settings, click START. The document will scan.
- Once the scan is complete, click CANCEL.