DCP-9022CDW
FAQs & Troubleshooting |
The color of your printouts is not what you expected

Check the following points to solve the problem:
NOTE: Illustrations shown below are from a representative product and operating system, and may differ from your Brother machine and operating system.
-
To get the best print quality, we suggest using the recommended paper. Check that you are using paper that meets our specifications. Click here to see details of the recommended paper.
-
The drum units or toner cartridges may not be installed correctly. Check that the drum units or toner cartridges are installed correctly.
- Click here to see how to install the drum unit.
- Click here to see how to install the toner cartridges.
-
To improve the color density, perform the calibration. Click here to see how to carry out calibration.
-
To adjust the print position of colors for sharper edges, perform an automatic color registration. Click here to see how to perform an automatic color registration.
-
Adjust the copy density and contrast if you are copying. Click here to see how to adjusting the copy density and contrast.
-
Make sure toner save mode is off in the control panel or the printer driver. Click here to see how to change the toner save mode setting.
-
If the print quality of the black portion is not what you expected, choose the Print Text in Black check box in the printer driver.
(Windows printer driver)- Open Printing Preferences. Click here to see how to open Printing Preferences.
- Click Advanced.
- Click Other Print Options.
- Choose the Print Text in Black from the Printer Function list.
-
Choose the Print Text in Black check box, and click OK.

- Click Apply => OK.
-
If the print quality is poor, disable the Improve Gray Color mode of the printer driver.
(Windows printer driver)- Open Printing Preferences. Click here to see how to open Printing Preferences.
- Choose Manual for Document Type.
- Click Settings....
-
Clear the Improve Gray Color check box, and click OK.
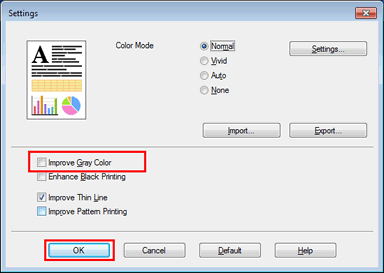
- Click Apply => OK.
(Windows BR-Script printer driver) (supported models only)- Open Printing Preferences. Click here to see how to open Printing Preferences.
- Click Advanced....
-
Choose Off for Improve Gray Color in Printer Features, and click OK.
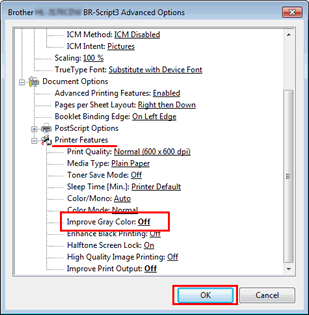
- Click Apply => OK.
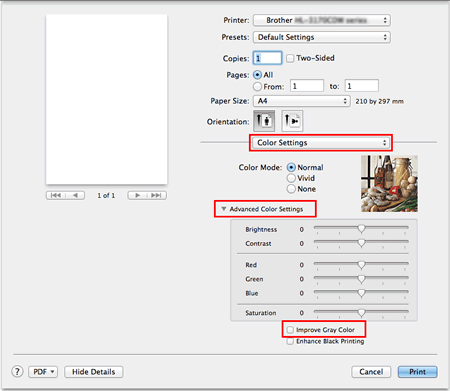
(Mac OS X CUPS printer driver)- Open the Print dialog. Click here to see how to open Print dialog.
- Choose Color Settings from the pane pop-up menu and click the Advanced Color Settings menu.
-
Clear the Improve Gray Color check box.
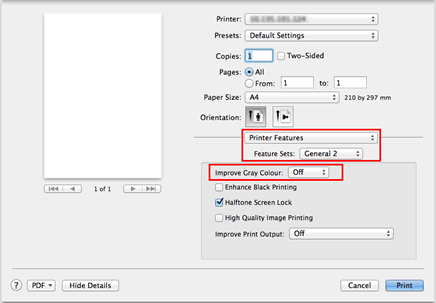
(Mac OS X BR-Script printer driver) (supported models only)- Open the Print dialog. Click here to see how to open Print dialog.
- Choose Printer Features from the pane pop-up menu and choose General 1 or General 2 for Feature Sets.
-
Choose Off for Improve Gray Color.
If the print quality of the black portion is not what you expected, choose the Enhance Black Printing mode of the printer driver.
(Windows printer driver)- Open Printing Preferences. Click here to see how to open Printing Preferences.
- Choose Manual for Document Type.
- Click Settings....
-
Choose the Enhance Black Printing check box, and click OK.
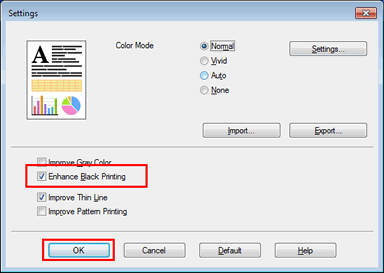
- Click Apply => OK.
(Windows BR-Script printer driver) (supported models only)- Open Printing Preferences. Click here to see how to open Printing Preferences.
- Click Advanced....
-
Choose On for Enhance Black Printing in Printer Features, and click OK.
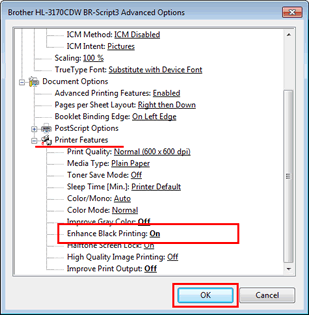
- Click Apply => OK.
(Mac OS X CUPS printer driver)- Open the Print dialog. Click here to see how to open Print dialog.
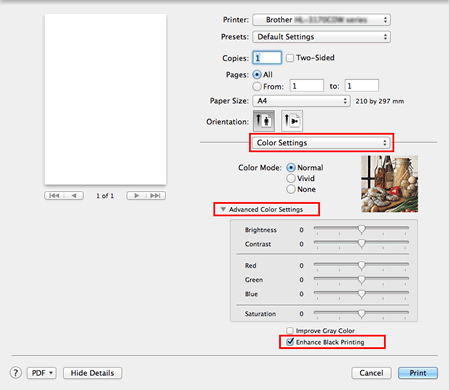
- Choose Color Settings from the pane pop-up menu and click the Advanced Color Settings menu.
-
Choose the Enhance Black Printing check box.
- Open the Print dialog. Click here to see how to open Print dialog.
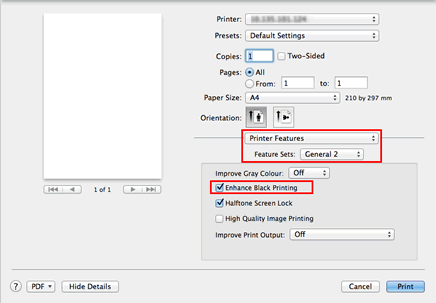
- Choose Printer Features from the pane pop-up menu and choose General 1 or General 2 for Feature Sets.
-
Choose the Enhance Black Printing check box.
-
The toner cartridge may be damaged. Install a new toner cartridge as follow:
- Click here to print the chart. [11KB/ PDF]
- Compare your printed document with the printed chart to identify the color causing the problem.
- Replace the toner cartridge of the color. Click here to see how to replace the toner cartridge.
- The drum unit may be damaged. Identify the color causing the problem by using the chart printed in Step 8, and install a new drum unit of the color. Click here to see how to replace the drum unit.