Innov-is XP1
FAQs & Troubleshooting |
How do I sew buttonhole? (One-step Buttonholes)
With one-step buttonholes, you can make buttonholes appropriate to the size of your button.
- Precautions on using the Buttonhole foot “A+”
- Stitch chart
- One-step Buttonholes
- Sewing Stretch Fabrics
- Odd Shaped Buttons/Buttons that do Not Fit into the Button Holder Plate
- Sewing Thick Fabrics
- Sewing Thick Seams or Fabric That Cannot Be Correctly Fed
Precautions on using the Buttonhole foot “A+”
When attaching and removing buttonhole foot A+, do not apply excessive force to the presser foot, otherwise it may be damaged. In addition, be careful not to hit the needle when attaching and removing buttonhole foot A+, otherwise the needle may break.
-
Before attaching the presser foot, check that there is enough thread in the bobbin.
-
When the presser foot is attached, the compartment of the flat bed attachment cannot be opened. Be sure to first remove any necessary accessories.
-
Sew trial stitches on fabric that is the same as that used in your project, referring to Combination of fabric, thread and needle.
-
The built-in camera detects the position of buttonhole foot A+. Do not touch the camera.
-
Camera detects A+ and the 3 dots of the buttonhole to determine the buttonhole size.
-
Do not peel the A+ sticker off buttonhole foot A+ or cover the sticker with the upper thread, etc., otherwise the camera cannot detect the presser foot or buttonholes cannot be sewn.

(1) Maximum 47 mm (1-3/4 inch) of buttonhole sewing
(2) A+ sticker
(3) 3 dots
* When attaching or removing the buttonhole foot A+, do not apply pressure on the presser foot. This may cause damage to the presser foot.
Stitch chart
The following chart shows information for one-step buttonholes.
| Stitch | Stitch name | Presser foot | Stitch | Stitch name | Presser foot |
| Narrow rounded buttonhole | Wide round ended buttonhole | ||||
| Tapered round ended buttonhole | Round ended buttonhole | ||||
| Round ended buttonhole | Round double ended buttonhole | ||||
| Narrow squared buttonhole | Wide squared buttonhole | ||||
| Squared buttonhole | Stretch buttonhole | ||||
| Heirloom buttonhole | Bound buttonhole | ||||
| Keyhole buttonhole | Tapered keyhole buttonhole | ||||
| Keyhole buttonhole |
One-step Buttonholes
One-step buttonholes are sewn from the front of the presser foot to the back, as shown below.
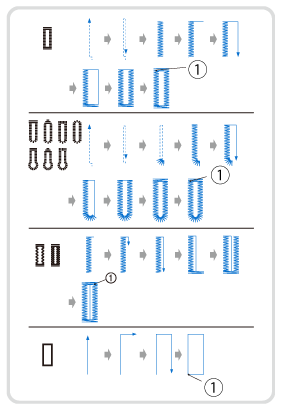 |
(1) Reinforcement stitching |
-
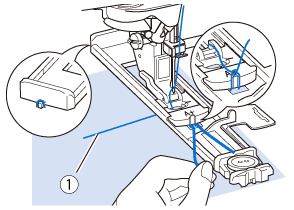
Select a buttonhole stitch, and attach buttonhole foot A+.
-
Mark the position and length of the buttonhole on the fabric.

(1) Marks on fabric
(2) Buttonhole sewingThe maximum buttonhole length is about 47 mm (approx. 1-3/4 inches) (diameter + thickness of the button).
-
Pull out the button holder plate on the presser foot, and insert the button that will be put through the buttonhole. Then tighten the button holder plate around the button.
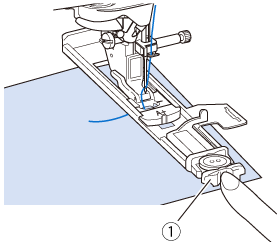
(1) Button holder plate The size of the buttonhole is determined by the size of the button in the button holder plate.
-
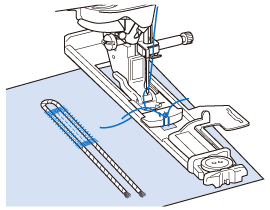
Align the presser foot with the mark on the fabric, and lower the presser foot.
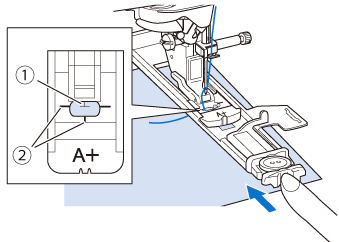
(1) Mark on the fabric
(2) Marks on the presser foot- Pass the thread underneath the presser foot.
-
Slide the outside frame of the buttonhole foot backward as far as possible as shown in the illustration, making sure that there is no gap behind the part of the foot marked A+. If the buttonhole foot is not slid back as far as possible, the buttonhole will not be sewn at the correct size.

-
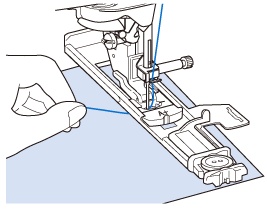
Gently hold the end of the upper thread, and then start sewing.
Feed the fabric carefully by hand while the buttonhole is sewn.
>> Once sewing is completed, the machine automatically sews reinforcement stitches, and then stops.If automatic thread cutting is turned on before you start sewing, both threads are automatically cut after the reinforcement stitches are sewn. If the fabric does not feed (for example, because it is too thick), increase the stitch length setting.
-
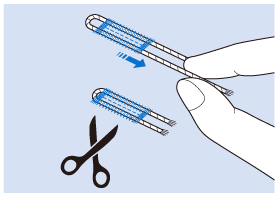
Insert a pin along the inside of one of the bar tacks, and then insert the seam ripper into the center of the buttonhole and cut towards the pin.
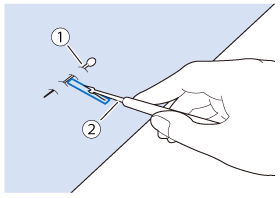
(1) Basting pin
(2) Seam ripperWhen using the seam ripper to open the buttonhole, do not put your hand or finger in the path of the ripper. The ripper may slip and cause injury. Do not use the seam ripper in any other way than how it is intended.
For keyhole buttonholes, use the eyelet punch to make a hole in the rounded end of the buttonhole. Then insert a pin along the inside of one of the bar tacks, insert a seam ripper into the hole made with the eyelet punch, and cut towards the pin.
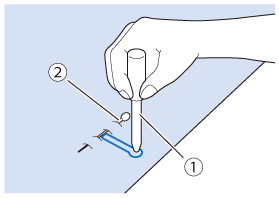
(1) Eyelet punch
(2) Basting pin
Sewing Stretch Fabrics
Attach stabilizer material to the back of stretch fabrics to prevent them from stretching.
When sewing on stretch fabric with ![]() or
or ![]() , sew the buttonhole stitches over a gimp thread.
, sew the buttonhole stitches over a gimp thread.
-
Hook the gimp thread onto the back of presser foot A+. Insert the ends into the grooves at the front of the presser foot, and then temporarily tie them there.
(1) Upper thread
-
Lower the presser foot and start sewing.
Set the width of the satin stitches to the width of the gimp thread, and set the buttonhole width to be 2-3 times the width of the gimp thread.
-
Once sewing is completed, gently pull the gimp thread to remove any slack, and trim off any excess.
After using the seam ripper to cut open the threads over the buttonhole, trim off the threads.
Odd Shaped Buttons/Buttons that do Not Fit into the Button Holder Plate
Use the markings on the presser foot scale to set the size of the buttonhole. One mark on the presser foot scale equals 5 mm (approx. 3/16 inch). Add the button diameter and thickness together, and then set the plate at the calculated value.
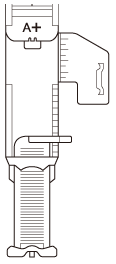 |
(1) Presser foot scale (2) Button holder plate (3) Completed measurement of diameter + thickness (4) 5 mm (approx. 3/16 inch) |
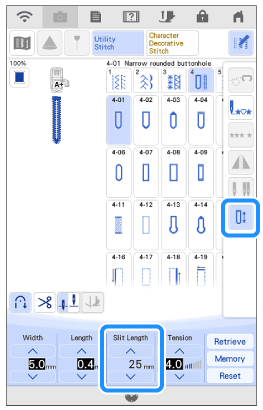
Example) For a button with a diameter of 15 mm (about 9/16 inch) and thickness of 10 mm (about 3/8 inch), align the scale with 25 mm (about 1 inch), or specify 25 mm in the screen.
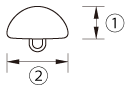 |
(1) 10 mm (approx. 3/8 inch) (2) 15 mm (approx. 9/16 inch) |
 |
|
Sewing Thick Fabrics
Place a piece of folded fabric or cardboard beside the fabric being sewn to level the buttonhole foot and allow for easier and even feeding.
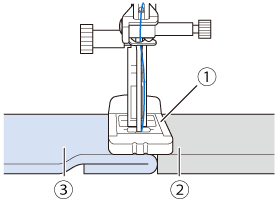 |
(1) Buttonhole foot A+ (2) Thick paper (3) Fabric |
If automatic thread cutting is turned on before you start sewing, both threads are automatically cut after the reinforcement stitches are sewn. If the fabric does not feed (for example, because it is too thick), increase the stitch length setting.
Sewing Thick Seams or Fabric That Cannot Be Correctly Fed
Attach the buttonhole stabilizer, and then feed the fabric between the stabilizer and the presser foot.
 |
(1) Buttonhole foot stabilizer |