PR1050X
FAQs & Troubleshooting |
Reserved needle bar and sewing speed settings
Normally, the machine automatically assigns thread colors to the needle bars; however, a specific thread color can be manually assigned to a certain needle bar. If a needle bar is specified, that needle bar is removed from the machine’s automatic assignments and the specified color remains assigned to it.
By specifically assigning often used thread colors to certain needle bars, the trouble of changing the thread spools can be reduced.
Also, the maximum sewing speed can be specified to the assigned needle bar. It is useful when you specially set a weak thread such as a metallic thread to the assigned needle bar.
- This feature is not accessible through the embroidering screen.
-
You can assign thread colors up to 9 needle bars in normal mode. When you set "Manual Color Sequence" to "ON" in settings screen, it is available to assign up to 10 needle bars. If you assign all the 10 needle bars in the "Manual Color Sequence" mode, and then you set the machine to the normal mode, the setting of needle bar 10 is canceled automatically.
For details, refer to "How do I manually specify or manage the thread colors assigned to each needle bar? ".
Once a manual needle bar setting is specified, it remains applied until the setting is cancelled.
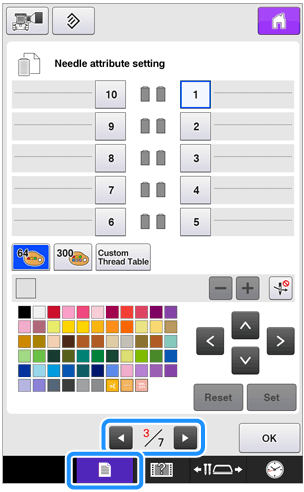
The manual needle bar settings can be specified in page 3 of the settings screen.
Assigning a specific thread color to a certain needle bar manually
-
Touch
 , and then touch
  and
and  to display page 3 of the settings screen.
-
Touch any of the key from
![[1] [1]](/g/b/img/faqend/faqh00100520_000/au/en/1186825/setting_haribo_1_s.gif) to
to ![[10] [10]](/g/b/img/faqend/faqh00100520_000/au/en/1186826/setting_haribo_10_s.gif) for the number of the needle bar that you wish to specify.
for the number of the needle bar that you wish to specify.
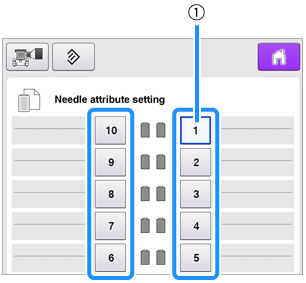
(1) Indicates the number of the selected needle bar
-
Select the color to be assigned to the needle bar.
Touch ,
,  ,
,  and
and  , or directly touch a color, to select the desired color.
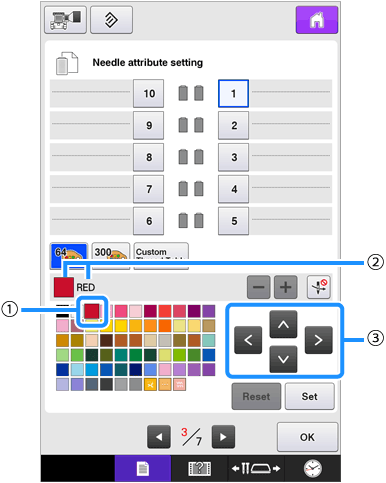
(1) The color that appears enlarged is the color that is selected.
(2) Displays the color that is selected and its name.
(3) Highlighting a color square moves in the direction of the arrow on the key that is touched.
-
Touch
 .
.
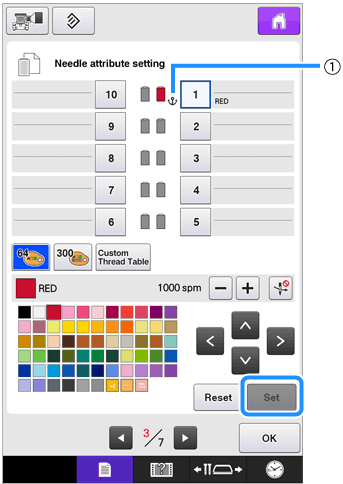
→ The color selected in step 3 is specified.
(1) The selected color of thread and appear on the spool.
-
Touch
 or
or  to set the maximum sewing speed for the assigned needle bar.
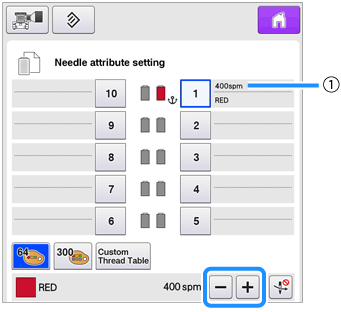
(1) Value of maximum sewing speed setting
- Decrease the sewing speed to 400 spm, when you specially set a specialty thread such as a metallic thread to the assigned needle bar.
- The maximum sewing speed specified here is always effective to the assigned needle bar, even if you set the faster speed in the embroidering screen.
-
If necessary, touch
 to cancel automatic needle threading.
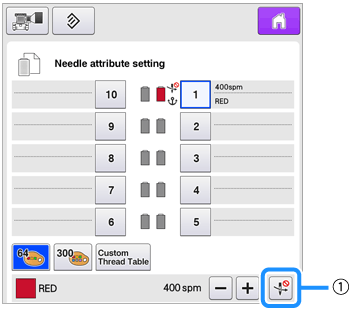
(1) Disable needle threader key
-
Touch
 .
.
• Specified needle bar is indicated with
 and the specified maximum sewing speed in the embroidering screen.
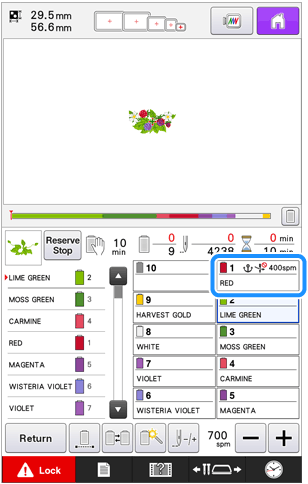
Cancelling the setting
To change the setting, first cancel it, and then select the new setting.
-
Touch any of the key from
![[1] [1]](/g/b/img/faqend/faqh00100520_000/au/en/1186838/setting_haribo_1_s.gif) to
to ![[10] [10]](/g/b/img/faqend/faqh00100520_000/au/en/1186839/setting_haribo_10_s.gif) for the number of the needle bar whose setting you wish to cancel.
for the number of the needle bar whose setting you wish to cancel.
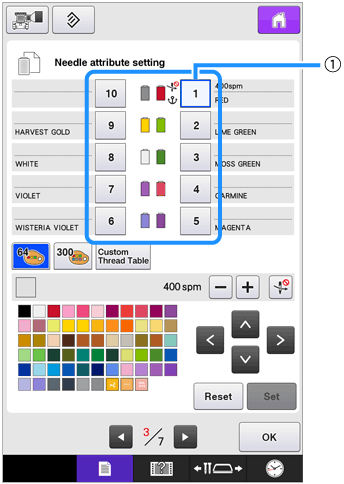
(1) Indicates the number of the selected needle bar
-
Touch
 .
.
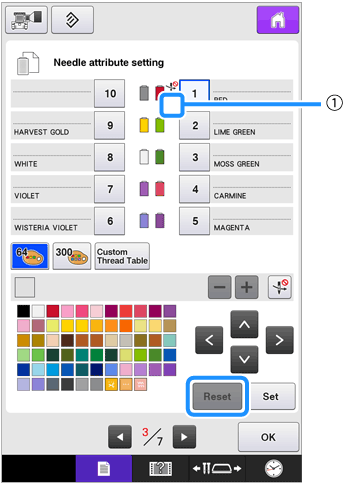
(1)
 disappears from the thread spool.
→ This cancels the manual needle bar setting.
-
To cancel the cancel needle threading setting, touch
 again.
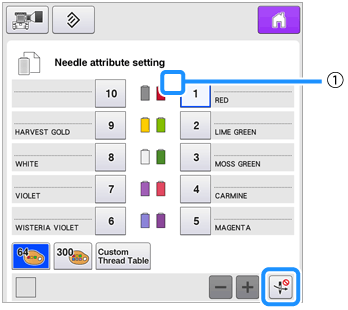
(1)
 disappears from the thread spool.
→ This cancels the cancel needle threading setting.
Follow the procedure from from step 3 on "Assigning a specific thread color to a certain needle bar manually" to assign the other thread color to the needle bar you canceled the setting.