MFC-990CW
FAQs & Troubleshooting |
Improve poor print quality.
Brother strongly recommends that you do not refill the ink cartridges provided with your machine. We also strongly recommend that you continue to use only Genuine Brother Brand replacement ink cartridges. Use or attempted use of potentially incompatible ink and/or cartridges in the Brother machine may cause damage to the machine and/or may result in unsatisfactory print quality. Our warranty coverage does not apply to any problem that is caused by the use of unauthorized third party ink and/or cartridges. To protect your investment and obtain premium performance from the Brother machine, we strongly recommend the use of Genuine Brother Supplies
> Click here for more information about Genuine Brother Supplies.
Cleaning the four color print heads (black, cyan, magenta and yellow) and/or adjusting the vertical alignment may improve the print quality. To determine if the alignment needs to be set and to identify which print heads need to be cleaned, print the Print Quality Check sheet and the Alignment Check sheet.
Below are instructions for improving the following:
-
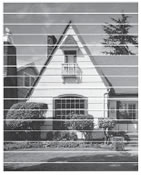
Horizontal lines in text or graphics
-
Blank text
- Blurred or faded text and images
Please follow the instructions that apply to your issue.
-
If your printed pages have a horizontal line in the text or graphics (as shown in the illustration below) or blank text, some of the nozzles may be clogged and need to be cleaned. Go to Section 1 for instructions on how to print the Print Quality Check sheet and clean the clogged print head.
-
If your printed pages have text that become blurred or images that become faded (as shown in the illustration below), you may need to adjust the print alignment. Go to Section 2 for instructions on how to print the Alignment Check sheet and adjust the print alignment.

Section 1: Checking the print quality and cleaning the print head
-
Print a Print Quality Check Sheet.
-
Make sure you put paper in the paper tray(1).
-
Press
 (Ink indicator).
 - Press Test Print.
- Press Print Quality.
- Press Color(Colour) Start. The machine begins printing the Print Quality Check Sheet.
-
Make sure you put paper in the paper tray(1).
-
Closely examine the Print Quality Check Sheet. Each of the four colors is represented by a slanted square pattern made up of individual blocks. The colors should appear in the following order from left to right: Black - Yellow - Cyan - Magenta.
-
Compare the print quality of the Check Sheet you just printed with the three examples listed below:
(A) One or more complete blocks of colors are missing:
(B) Most of the short diagonal lines are missing from one or more color blocks:
(C) Some parts of the short diagonal lines are missing from one or more color blocks:
- The LCD asks you if the print quality is OK. Press No.
- The LCD asks you if the print quality is OK for black and three colors. Press Yes or No.
- Press Color(Colour) Start. The machine starts cleaning the print head.
-
When the machine completes cleaning the print head, press Color(Colour) Start. Another Print Quality Check Sheet will print.
-
Repeat the cleaning and the quality check process following the Step 4-7.
-
Compare the second Print Quality Check Sheet with the first one you printed:
-
If the print quality on the first Check Sheet matched Example (A) or (B) and you do not see any improvement on the second or third Check Sheet, please contact Brother Customer Service from below.
-
If the print quality on the first Check Sheet matched Example (A) or (B) and you see some improvement on the second or third Check Sheet but it's not perfect, repeat the cleaning and the quality check process three more times (totally five times). If you do not see any further improvement after that, please contact Brother Customer Service from below.
-
If the print quality on the first Check Sheet matched Example (C) and you do not see any improvement on the second or third Check Sheet, repeat the cleaning and the quality check process three more times (totally five times). If you still do not see any improvement, please contact Brother Customer Service from below.
-
In USA
If your unit is still within warranty, please click here for more information.
If your unit is out of warranty, please click here for information on contacting an Authorized Service Center near you.
-
In Canada, Europe, Asia/Oceania
For the Brother Customer Service telephone numbers for assistance, please click here.
-
In Latin America
For the Brother Customer Service telephone numbers for assistance in Latin America, please click here.
-
-
If the print quality on the first Check Sheet matched Example (A) or (B) and you do not see any improvement on the second or third Check Sheet, please contact Brother Customer Service from below.
- Press Stop/Exit.
DO NOT touch the print head. Touching the print head may cause permanent damage and may void the print head's warranty.
Section 2: Checking the Print Alignment
-
Press
 (Ink indicator).
 - Press Test Print.
- Press Alignment.
- Press Black(Mono) Start or Color(Colour) Start. The machine starts printing the Alignment Check Sheet.
- Check the 600 dpi and 1200 dpi test prints to see if number 5 most closely matches number 0.
-
Do one of the following:
- If the number 5 samples of both the 600 dpi and 1200 dpi test prints are the best matches, press Yes to finish the Alignment Check and go to step 9.
- If another test print number is a better match for either 600 dpi or 1200 dpi, press No to choose it.
- For 600 dpi, press the number of the test print that most closely matches the number 0 sample (1-8).
- For 1200 dpi, press the number of the test print that most closely matches the number 0 sample (1-8).
- Press Stop/Exit.
If the print quality continues to be poor, go to Section 1 to clean the print head.