MFC-885CW
FAQs & Troubleshooting |
Improve poor print quality.
Brother multifunction machines are designed to work with ink of a particular specification and will work to a level of optimum performance and reliability when used with genuine Brother Branded ink cartridges. Brother cannot guarantee this optimum performance and reliability if ink or ink cartridges of other specifications are used. Brother does not therefore recommend the use of cartridges other than genuine Brother Branded cartridges or the refilling of empty cartridges with ink from other sources. If damage is caused to the print head or other parts of this machine as a result of using other brands of ink or ink cartridges, any repairs required as a result may not be covered by the warranty.
> Click here for more information about Genuine Brother Supplies.
Cleaning the four color print heads (black, cyan, magenta and yellow) and/or adjusting the vertical alignment may improve the print quality. To determine if the alignment needs to be set and to identify which print heads need to be cleaned, print the Print Quality Check sheet and the Alignment Check sheet.
Below are instructions for improving the following:
-
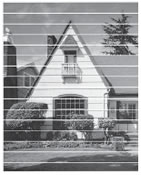
Horizontal lines in text or graphics
-
Blank text
- Blurred or faded text and images
Please follow the instructions that apply to your issue.
-
If your printed pages have a horizontal line in the text or graphics (as shown in the illustration below) or blank text, some of the nozzles may be clogged and need to be cleaned. Go to Section 1 for instructions on how to print the Print Quality Check sheet and clean the clogged print head.
-
If your printed pages have text that become blurred or images that become faded (as shown in the illustration below), you may need to adjust the print alignment. Go to Section 2 for instructions on how to print the Alignment Check sheet and adjust the print alignment.
Section 1: Checking the print quality and cleaning the print head
-
Print a Print Quality Check Sheet.
- Press Menu.
- Press the UP OR DOWN ARROW key or the dial pad to choose Ink Management and press OK.
- Press the UP OR DOWN ARROW key or the dial pad to choose Test Print and press OK.
- Press the UP OR DOWN ARROW key or the dial pad to choose Print Quality/Alignment and press OK.
- Press Color (Colour) Start. The machine begins printing the Print Quality Check Sheet.
-
Closely examine the Print Quality Check Sheet. Each of the four colors is represented by a slanted square pattern made up of individual blocks. The colors should appear in the following order from left to right: Black - Yellow - Cyan - Magenta.
-
Compare the print quality of the Check Sheet you just printed with the three examples listed below:
(A) One or more complete blocks of colors are missing:
(B) Most of the short diagonal lines are missing from one or more color blocks:
(C)Some parts of the short diagonal lines are missing from one or more color blocks:
- The display will then ask you if the print quality is OK for black. Press the DOWN ARROW key or 2 to choose No for black with the problem.
- The display will then ask you if the print quality is OK for Color. Press the DOWN ARROW key or 2 to choose No for color with the problem.
-
The display will then show Start Cleaning? Yes No.
Press the UP ARROW key or 1 to choose Yes and the machine will start cleaning the color ink cartridges. -
When the machine completes cleaning the print head, press Color (Colour) Start. Another Print Quality Check Sheet will print.
-
Repeat the cleaning and the quality check process following the Step 4-7.
-
Compare the second or third Print Quality Check Sheet with the first one you printed in step1:
-
If the print quality on the first Check Sheet matched Example (A) or (B) and you do not see any improvement on the second or third Check Sheet, please contact Brother Customer Service from "Contact Us."
-
If the print quality on the first Check Sheet matched Example (A) or (B) and you see some improvement on the second or third Check Sheet but it's not perfect, repeat the cleaning and the quality check process three more times (totally five times). If you do not see any further improvement after that, please contact Brother Customer Service from "Contact Us."
- If the print quality on the first Check Sheet matched Example (C) and you do not see any improvement on the second or third Check Sheet, repeat the cleaning and the quality check process three more times (totally five times). If you still do not see any improvement, please contact Brother Customer Service from "Contact Us."
-
If the print quality on the first Check Sheet matched Example (A) or (B) and you do not see any improvement on the second or third Check Sheet, please contact Brother Customer Service from "Contact Us."
- Press Stop/Exit.
Section 2: Checking the Print Alignment
- Press Menu.
- Press the UP OR DOWN ARROW key or the dial pad to choose Ink Management and press OK.
- Press the UP OR DOWN ARROW key or the dial pad to choose Test Print and press OK.
- Press the UP OR DOWN ARROW key or the dial pad to choose Print Quality/Alignment and press OK.
- Press Black (Mono) Start or Color (Colour) Start. The machine begins printing the Alignment Check Sheet.
- By reviewing this Check Sheet, you can determine if the alignment needs adjustment.
-
Examine the 600 dpi and 1200 dpi test prints on the Alignment Check Sheet. If the number 5 sample of both the 600 dpi and 1200 dpi most closely matches the 0 sample, press the UP ARROW key or 1 to choose Yes.
If one of the other samples is a better match for the 0 sample, press the DOWN ARROW key to choose No. The display will then prompt you to choose the sample that most closely matches the 0 sample for 600 dpi and then 1200 dpi. - Press Stop/Exit.
If the print quality continues to be poor, go to Section 1 to clean the print head.