PT-D610BT
FAQs & Troubleshooting |
How do I uninstall the printer driver?
You can download and install the latest printer driver from the [Downloads] section of this website.
> Windows 11
> Windows 10 / Windows Server 2016 / Windows Server 2019
> Windows 8 / Windows 8.1 / Windows Server 2012 / Windows Server 2012 R2
> Windows 7 / Windows Server 2008 R2
> Windows Vista / Windows Server 2008
> Windows 2000/ XP
> macOS 13 or later
> macOS 12 or earlier
- Confirm that the printer is turned off.
- Click the [Start Menu] - [All apps] - [Windows Tools] - [Control Panel] - [Hardware and Sound] - [Devices and Printers].
- Select [Brother [model name]] and click [Remove device], or right-click the icon and click [Remove device]. If a User Account Control message appears, type in the password, and then click [Yes].
- Select [Fax] or [Microsoft XPS Document Writer] in the Devices and Printers window, and then click [Print server properties], which appears in the menu bar.
- Click the [Drivers] tab, and then click [Change Driver Settings]. If a User Account Control message appears, type in the password, and then click [Yes]. Select [Brother [model name]], and then click [Remove...].
- Select [Remove driver and driver package], and then click [OK]. Follow the on-screen instructions.
- Close the Print Server Properties window. The printer driver has been uninstalled.
Windows 10 / Windows Server 2016 / Windows Server 2019
- Confirm that the printer is turned off.
- Click the [Start Menu] - ([All apps] -) [Windows System] - [Control Panel] - [Hardware and Sound] - [Devices and Printers].
- Select [Brother [model name]] and click [Remove device], or right-click the icon and click [Remove device]. If a User Account Control message appears, type in the password, and then click [Yes].
- Select [Fax] or [Microsoft XPS Document Writer] in the Devices and Printers window, and then click [Print server properties], which appears in the menu bar.
- Click the [Drivers] tab, and then click [Change Driver Settings]. If a User Account Control message appears, type in the password, and then click [Yes]. Select [Brother [model name]], and then click [Remove...].
- Select [Remove driver and driver package], and then click [OK]. Follow the on-screen instructions.
- Close the Print Server Properties window. The printer driver has been uninstalled.
Windows 8 / Windows 8.1 / Windows Server 2012 / Windows Server 2012 R2
- Confirm that the printer is turned off.
- Click [Control Panel] on the [Apps] screen - [Hardware and Sound] - [Devices and Printers].
-
Select [Brother [model name]] and click [Remove device], or right-click the icon and click [Remove device].
If a User Account Control message appears, type in the password, and then click [Yes]. - Select [Fax] or [Microsoft XPS Document Writer] in the [Devices and Printers] window, and then click [Print server properties], which appears in the menu bar.
- Click the [Drivers] tab, and then click [Change Driver Settings]. If a User Account Control message appears, type in the password, and then click [Yes]. Select [Brother [model name]], and then click [Remove...].
- Select [Remove driver and driver package], and then click [OK]. Follow the on-screen instructions.
- Close the [Print Server Properties] window. The printer driver has been uninstalled.
Windows 7 / Windows Server 2008 R2
- Confirm that the printer is turned off.
- Click the [Start] button - [Devices and Printers].
-
Select [Brother [model name]], and click [Remove device] or right-click the icon and then click [Remove device].
If a User Account Control message appears, type in the password, and then click [Yes]. - Select [Fax] or [Microsoft XPS Document Writer] in the Devices and Printers window, and then click [Print server properties], which appears in the menu bar.
- Click the [Drivers] tab, and then click [Change Driver Settings]. If a User Account Control message appears, type in the password, and then click [Yes]. Choose [Brother [model name]], and then click [Remove...].
- Select [Remove driver and driver package], and then click [OK]. Follow the on-screen instructions.
-
Close the Print Server Properties window.
The printer driver has been uninstalled.
Windows Vista / Windows Server 2008
- Confirm that the printer is turned off.
- Click the [Start] button - [Control Panel] - [Hardware and Sound] - [Printers].
- Select [Brother [model name]], and click [Delete this printer] or right-click the icon, and then click [Delete].
-
In the Printers window, right-click and select [Run as administrator] - [Server Properties…].
If the authorization confirmation dialog box appears, click [Continue].
If the "User Account Control" dialog box appears, enter the password and click [OK]. The Print Server Properties window appears. - Click the [Drivers] tab and choose [Brother [model name]]. Click [Remove...].
- Select [Remove driver and driver package] and click [OK]. Follow the on-screen instructions.
-
Close the Print Server Properties window.
The printer driver has been uninstalled.
- Turn off the printer.
- Click the [Start] button, go to Printers and Faxes window.
- Choose "Brother [model name]", and click [File]-[Delete].
- Go to [File]-[Server Properties].
- Click the [Drivers] tab and choose "Brother [model name]". Then, click [Remove].
-
Close the Print Server Properties window. The printer driver has been uninstalled.
-
Please note that not all printers are compatible with all versions of Windows operating systems. To find out which operating systems are compatible with your printer, see the following link:
<Compatible Operating Systems> - You can normally uninstall printer drivers with the steps described above, but if you need to delete all the printer driver information due to a failed installation, use the printer driver cleanup tool.
- Confirm that the printer is turned off.
- From the Apple menu, open [System Settings]/[System Preferences] - [Printers & Scanners].
-
Select [Brother [model name]], and then click [Remove Printer...].

-
Close the Printers & Scanners window.
The printer driver has been uninstalled.
- Confirm that the printer is turned off.
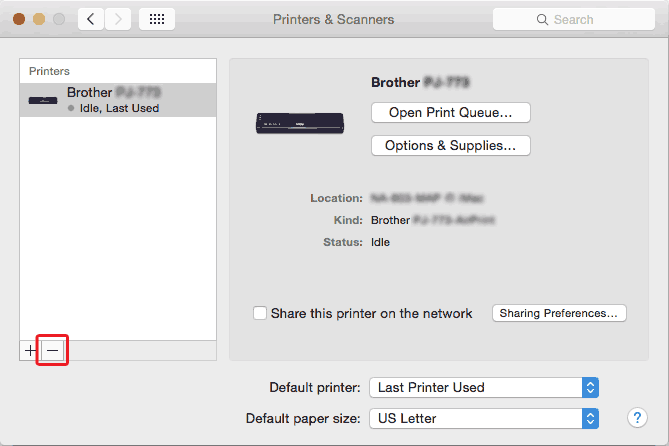
- From the Apple menu, open [System Preferences] - [Printers & Scanners]/[Print & Scan].
-
Select [Brother [model name]], and then click the " - " button.

-
Close the Printers & Scanners or Print & Scan window.
The printer driver has been uninstalled.
Related Models
MW-260, PJ-563, PJ-622, PJ-623, PJ-662, PJ-663, PJ-723, PJ-773, PJ-823, PJ-863, PT-1230PC, PT-2100, PT-2430PC, PT-2730, PT-3600, PT-7600, PT-9600, PT-9700PC, PT-9800PCN, PT-D450, PT-D460BT, PT-D600, PT-D610BT, PT-D800W, PT-E550W, PT-E800T, PT-P700, PT-P710BT, PT-P750W, PT-P900W, PT-P950NW, QL-1050, QL-1050N, QL-1060N, QL-1100, QL-580N, QL-720NW, QL-820NWB, RJ-3050, RJ-3150, RJ-3250WB, RJ-4030, RJ-4040, RJ-4250WB, RL-700S, SC-2000USB, TD-4000, TD-4100N, TD-4420DN, TD-4550DNWB
