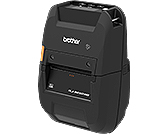
RJ-3250WB
FAQs & Troubleshooting |
How to charge the rechargeable Li-ion battery
Before using the rechargeable Li-ion battery (PA-BT-006), use one of the following methods to charge it.
- Print speed varies with the available battery power.
- Be sure to remove the insulated sheet before charging the battery.
- Recharging the Battery Using the Car Adapter (Optional: (PA-CD-600CG / PA-CD-600CGS / PA-CD-600WR)
- Recharging the Battery Using the Battery Charger (Optional: PA-BC-003)
- Recharging the Battery Using the Single Active Docking Station (Optional: PA-CR-005)
- Recharging the Battery Using the 4-bay Active Docking Station (Optional: PA-4CR-003)
| LED indicator | Status |
|---|---|
| Battery is charging. | |
(when power is turned off) (when power is turned on) |
Battery is fully charged.
Disconnect the AC Adapter or car adapter from the battery’s DC connector. |
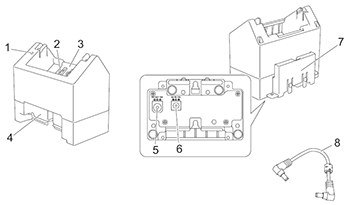
Recharging the Battery Using the Battery Charger (Optional: PA-BC-003)
 |
|
The AC Adapter (PA-AD-600A), which is sold separately, is required for charging.
To charge the rechargeable Li-ion battery, use the charger together with the AC Adapter (PA-AD-600A).
The Battery Charger (PA-BC-003) cannot recharge the battery alone.
-
Connect the AC Adapter to the charger’s DC connector IN, and then connect the AC power cord to the AC Adapter.
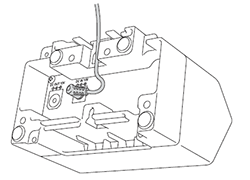
Insert the AC Adapter through the opening in the battery charger as shown in the illustration.
Install the AC Adapter so the battery charger does not press on it. - Connect the AC power cord to a nearby AC power outlet.
-
Align the charging terminals of the charger and the battery, and then insert the battery.
The charge indicator lights in orange when the battery is charging. -
The charge indicator will turn off when charging is complete.
You can then remove the battery.
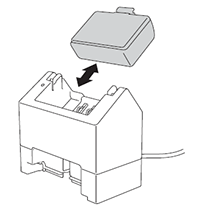
Recharging the Battery Using the Single Active Docking Station (Optional: PA-CR-005)
 |
|
-
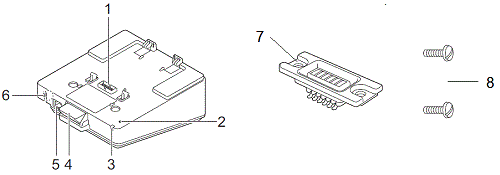
The AC Adapter (PA-AD-600A, sold separately) can be used for providing power from an AC wall outlet to the Docking Station and charging the battery if installed.
The Single Active Docking Station (PA-CR-005) cannot recharge the battery alone. - The Docking Station can be used without a battery as a power supply.
- Do not turn on the printer and the Docking Station simultaneously.
- Sequential printing and the mass storage mode are not supported when the Docking Station is used to print.
- When the printer is placed on the Docking Station, we recommend using the After one page of data is received (To refresh print status) in the Other tab of the printer driver properties before printing.
-
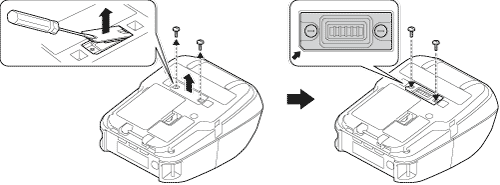
Remove the Docking Station terminal cover with a flathead screwdriver.
-
Install the Docking Station Terminal Attachment onto the printer using the Docking Station Terminal Attachment and screws included with the Docking Station.
Make sure the notched corner is aligned correctly.
-
Connect the AC Adapter to the Docking Station's DC Connector.
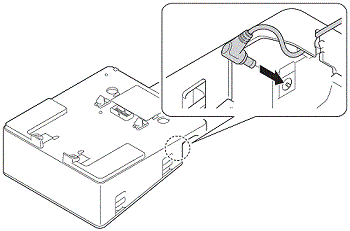
- Connect the AC power cord to the AC Adapter.
- Connect the AC power cord to a nearby AC power outlet.
-
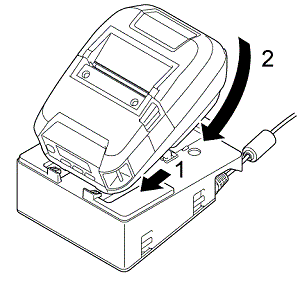
Align the Docking Station Terminals of the Docking Station and the printer.
-
Press the printer down and onto the Docking Station until the latches lock it firmly in place.
The printer’s LED Indicator lights in orange when charging.
The printer’s battery indicator will turn off when charging is complete.
- If a printer that is performing Wi-Fi® communication and has the wired LAN function turned on is placed on the Docking Station, Wi-Fi will turn off.
- When the printer is removed from the Docking Station, Wi-Fi will turn on again.
Printer Removal
Push the Eject Button on the back of the Docking Station, and lift the printer and remove it from the Docking Station.
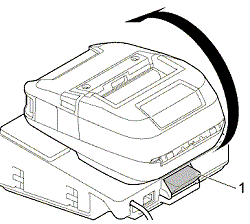
1. Eject Button
Lock the Eject Button
Insert a cotter pin (or similar) through the hole as illustrated below.
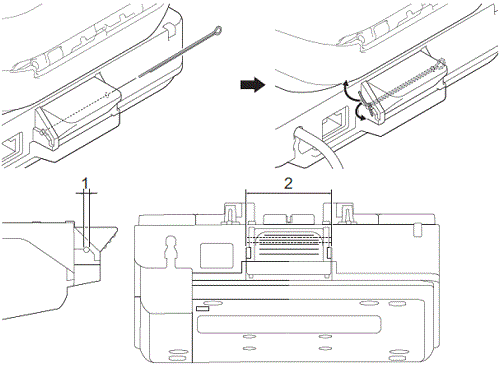
1. Diameter: 2.3 mm (0.09 in.)
2. Length: 41.2 mm (1.62 in.)
- Use a Low Carbon Steel Extended Prong Retaining Cotter Pin.
- Contact your Brother dealer or Brother Customer Service for the cotter pin.
Recharging the Battery Using the 4-bay Active Docking Station (Optional: PA-4CR-003)
The 4-bay Active Docking Station cannot recharge the printer's battery without being connected to an AC power outlet using the AC adapter (PA-AD-600A).
-
Remove the Docking Station terminal cover with a flathead screwdriver.

-
Install the Docking Station Terminal Attachment onto the printer using the Docking Station Terminal Attachment and screws included with the Docking Station.
Make sure the notched corner is aligned correctly.
-
Connect the AC Adapter to the Docking Station's DC Connector.
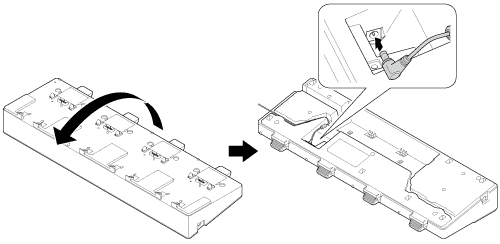
- Connect the AC power cord to the AC Adapter.
- Connect the AC power cord to a nearby AC power outlet.
-
Align the Docking Station Terminals of the Docking Station and the printer.
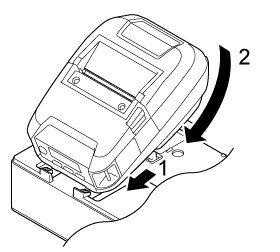
-
Press the printer down and onto the Docking Station until the latches lock it firmly in place.
The printer’s LED Indicator lights in orange when charging.The printer’s LED Indicator will turn off when charging is complete.
