RJ-4040
FAQs & Troubleshooting |
How do I transfer label templates with P-touch Transfer Express?
By using P-touch Transfer Express, label templates can easily be transferred to printers.
After the label template has been created by the administrator, it can be distributed to users together with P-touch Transfer Express.
The user can then use P-touch Transfer Express to transfer the label template to the printer
This is a simple procedure for allowing other users to print labels created by the administrator.
If the template is to be transferred as a new one, be sure to specify a [Key Assign] number (in P-touch Transfer Manager) that is not currently used. If the specified [Key Assign] number is already being used, the existing template will be overwritten with the new one.

1. Preparing P-touch Transfer Express
The user must prepare P-touch Transfer Express for transferring label templates to the printer.
P-touch Transfer Express is developed in English.
- The latest P-touch Transfer Express can be downloaded in the download page.
-
Download Transfer Express to any location on the computer.
The "Transfer Express" folder is created.
2. Transferring the label template to P-touch Transfer Manager
- In P-touch Editor, open the label template to be transferred.
-
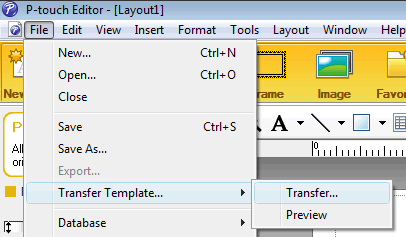
Click [File] - [Transfer Template] - [Transfer].

The label template is transferred to P-touch Transfer Manager.
P-touch Transfer Manager automatically starts up.-
For Windows 11 / Windows 10 / Windows Server 2019 / Windows Server 2016
The label template can also be transferred to P-touch Transfer Manager by clicking [Start Menu] - ([All apps] -) [Brother P-touch] - [P-touch Transfer Manager 2.x] to start P-touch Transfer Manager, then dragging the .lbx file to the P-touch Transfer Manager window. -
For Windows 8.1 / 8 / Windows Server 2012 / 2012 R2
The label template can also be transferred to P-touch Transfer Manager by clicking [P-touch Transfer Manager 2.x] on [Start] / [Apps] screen to start P-touch Transfer Manager, then dragging the .lbx file to the P-touch Transfer Manager window. -
For Windows 7 / Windows Vista / Windows XP / Windows Server 2008 / 2008 R2
The label template can also be transferred to P-touch Transfer Manager by clicking [Start] - [All programs] - [Brother P-touch] - [P-touch Tools] - [P-touch Transfer Manager 2.x] to start P-touch Transfer Manager, then dragging the .lbx file to the P-touch Transfer Manager window.
-
For Windows 11 / Windows 10 / Windows Server 2019 / Windows Server 2016
3. Saving the label template as a Transfer Package file (.pdz)
In order to create a file in a format that can be used by P-touch Transfer Express, save the label template as a Transfer Package file (.pdz).
-
In the folder view, select [Configurations].

-
Select the label template to be distributed.
Multiple label templates can be selected.

-
Click [File] - [Save Transfer File].

- If [Save Transfer File] was clicked while either [Configurations] or a created folder is selected, all label templates in the folder are saved as the Transfer Package file (.pdz).
- Multiple label templates can be combined into a single Transfer Package file (.pdz).
-
Type in the name, and then click [Save].
The label template is saved as a Transfer Package file (.pdz).

4. Distributing the Transfer Package file (.pdz) and P-touch Transfer Express to the user
If the user already has P-touch Transfer Express downloaded, it is not necessary for the administrator to send Transfer Express folder to the user. In this case, the user can simply move the distributed Transfer Package file to the folder [Transfer Express] and then double-click "PtTrExp.exe".
-
Move the Transfer Package file (.pdz) to the folder [Transfer Express].

- Distribute all files in the folder [Transfer Express] to the user.
5. Transferring the Transfer Package file (.pdz) to printer
Using P-touch Transfer Express received from the administrator, the user can transfer the Transfer Package file (.pdz) to the printer.
Do not turn off the power when transferring templates.
- Turn on the printer.
- Using a USB cable, connect the printer to the computer.
- Double-click "PtTrExp.exe", which was received from the administrator.
-
When there is a single Transfer Package file (.pdz) within the folder containing "PtTrExp.exe"
Click [Transfer].

Transfer of the Transfer Package file begins.
When there are either multiple or no Transfer Package files (.pdz) within the folder containing "PtTrExp.exe"
Click [Browse].

Select the Transfer Package file to be transferred, and then click [Open].

Click [Transfer].

Click [Yes].

Transfer of the Transfer Package file begins.

-
Click [OK].
Transfer of the Transfer Package file is completed.

