Innov-is NV180
FAQs & Troubleshooting |
Needle breaks.
When the needle breaks, replace it with a new one.
For details on replacing the needle, refer to "How do I change the needle ?".
Also, check the following possible causes and solutions.
-
Needle is installed incorrectly.
Reinstall the needle correctly.
Refer to "How do I change the needle ?".
-
Needle clamp screw is not tightened.
Tighten the needle clamp screw.
Refer to "How do I change the needle ?".Be sure to insert the needle until it touches the needle stopper and securely tighten the needle clamp screw with the screwdriver, otherwise the needle may break or damage may result.
-
Needle is turned or bent.
Replace the needle.
For details on checking and replacing the needle, refer to "How do I change the needle ?".Never sew with a bent needle. A bent needle will easily break and may cause injury.
-
Using improper needle or thread for the selected fabric.
Check the Fabric/Thread/Needle Combinations chart.
For more information on the proper needle or thread for the selected fabric, refer to "Combination of fabric, thread and needle".If the combination of the fabric, thread and needle is not correct, particularly when sewing heavy fabrics (such as denim) with thin needles (such as 65/9 to 75/11), the needle may bend or break.
-
Wrong presser foot was used.
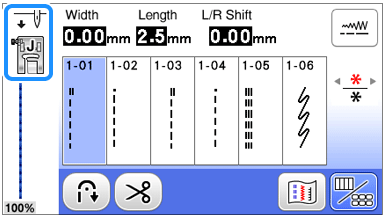
Use the recommended presser foot.When a stitch is selected, the icon for the presser foot that should be used appears in the screen. Check that the correct presser foot is attached before starting to sew. If the wrong presser foot is installed, attach the appropriate presser foot.

For details on the LCD screen, refer to "Outline of viewing and functions for keys on the utility stitch screen and the decorative stitch screen".
Use the appropriate presser foot for the type of stitch that you wish to sew, otherwise the needle may hit the presser foot, causing the needle to bend or break.
For details on the presser foot that should be used with the selected stitch, refer to Stitch Chart on the Operaton manual.
-
Upper threading is incorrect.
Check the steps for threading the machine and rethread the machine.
For details on threading the machine, refer to "How do I thread the machine (Threading the upper thread)?".If the upper threading is not correct, the thread may become tangled or the needle may bend or break.
-
Spool cap is set incorrectly.
Check the method for attaching the spool cap, then reattach the spool cap.
For details on attaching the spool cap, refer to "How do I thread the machine (Threading the upper thread)?".-
Slide the spool cap as far as possible to the right, as shown, with the rounded side on the left.

-
Choose a spool cap that best fits the size of spool being used.

- If the spool or the spool cap is not positioned correctly, the thread may become tangled around the spool pin or the needle may break.
-
Slide the spool cap as far as possible to the right, as shown, with the rounded side on the left.
-
Bobbin is set incorrectly.
Check the steps for setting the bobbin into the machine and reset the bobbin thread.
For details on setting the bobbin, refer to "How do I set the bobbin?".
-
Bobbin thread is incorrectly wound.
Use a correctly wound bobbin.
Check the steps for winding the bobbin and rewind the bobbin thread.
For details on winding the bobbin, refer to "How do I wind the bobbin?".Use a bobbin that has been correctly wound with thread, otherwise the needle may break or the thread tension will be incorrect.

-
Upper thread tension is too tight.
Loosen the upper thread tension so that it is appropriate.
Sewing : For details on adjusting the thread tension for sewing, refer to "How to adjust the thread tension".
Embroidery : For details on adjusting the thread tension for embroidering, refer to "How do I adjust thread tension for embroidering?".
-
Fabric is pulled during sewing.
Do not pull the fabric during sewing.
-
A bobbin designed specifically for this machine is not used.
Incorrect bobbins will not work properly.
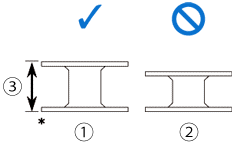
Be sure to use the included bobbins (part code: SA156, SFB: XA5539-151) or the same type.
SA156 is Class 15 type bobbin.
The bobbin's height is 11.5 mm (approx. 7/16 inch).
* Made of plastic
(1) This model
(2) Other models
(3) 11.5 mm (approx. 7/16 inch)
-
Presser foot is attached incorrectly.
Attach the presser foot correctly.
For details on attaching the presser foot, refer to "How do I remove or attach the presser foot ?".
-
Screw of the presser foot holder is loose.
Securely tighten the screw of the presser foot holder.
For details on attaching the presser foot holder, refer to "How do I remove or attach the presser foot holder?".
-
Fabric is too thick.
Use fabric that the needle can pierce when the handwheel is turned.
Refer to "Tips for sewing thick fabrics".
-
Fabric is fed forcefully when sewing thick fabric or thick seams.
Allow the fabric to be fed without being forcefully pushed.
Refer to "Combination of fabric, thread and needle", "Tips for sewing thick fabrics".
-
Stitch length is too short.
Adjust the stitch length to lengthen.
For details on adjusting a stitch length, refer to "How do I adjust a stitch width or length?".If stitches become bunched, lengthen the stitch length setting before continuing sewing. Otherwise, the needle may break.
-
There are scratches around the opening in the needle plate.
Replace the needle plate. To obtain parts, contact your authorized Brother dealer.
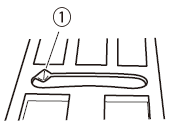
*There is a notch on the left side of the opening in the needle plate. This is not a scratch.
(1) Notch
-
There are scratches around the opening in the presser foot.
Replace the presser foot. To obtain parts, contact your authorized Brother dealer.
-
There are scratches on the bobbin case.
Replace the bobbin case. To obtain parts, contact your authorized Brother dealer.
-
Embroidery foot is attached incorrectly.
Attach the embroidery foot correctly.
For details on attaching the embroidery foot, refer to "How do I remove or attach the Embroidery foot ?".
-
Screw of the embroidery foot is loose.
Securely tighten the screw of the embroidery foot.
For details on tightening the screw of the embroidery foot, refer to "How do I remove or attach the Embroidery foot ?".
-
Stabilizer is not attached to fabric being embroidered.
Use a stabilizer material for embroidery.
Refer to "Attaching Iron-on Stabilizers (Backing) to the Fabric" described in "How do I hoop the fabric in the embroidery frame?".
Related FAQs
- Combination of fabric, thread and needle
- How do I wind the bobbin?
- How do I thread the machine (Threading the upper thread)?
- How do I set the bobbin?
- How do I remove or attach the presser foot ?
- How do I change the needle ?
- How do I remove or attach the Embroidery foot ?
- How do I remove or attach the presser foot holder?
- How do I adjust a stitch width or length?
- How do I hoop the fabric in the embroidery frame?
- How do I adjust thread tension for embroidering?
- How to adjust the thread tension
- Tips for sewing thick fabrics
- Outline of viewing and functions for keys on the utility stitch screen and the decorative stitch screen
