SDX1200
FAQs & Troubleshooting |
How to use Standard Cut Blade Holder and Deep Cut Blade Holder
You can also use the optional Standard Cut Blade Holder and Deep Cut Blade Holder to be cut the material using the ScanNCut DX. When cutting the material by those blades, adjust the blade scale setting and cut pressure setting with reference to the following table.
- Combination of Mat, Cutting Blade and Cutting Pressure
- Adjusting the Cutting Blade
- Installing the Holder in the Machine
- Adjusting the Cut Pressure Setting
Combination of Mat, Cutting Blade and Cutting Pressure
This table provides general guidelines. Before making your project, test attaching the same material.
Paper
| Material and its thickness | Mat (for ScanNCut DX) |
Type of Cutting blade | Blade scale setting | Cut pressure setting | ||
| Standard Tack Adhesive Mat | Low Tack Adhesive Mat | |||||
| Printer paper | 80 g/m² (0.1 mm) |
Standard cut blade(turquoise) |
3 |
-1 | ||
| Scrapbook paper (thin) |
120 g/m² (0.15 mm) |
3.5 | 0 | |||
| Scrapbook paper (medium-thick) |
200 g/m² (0.25 mm) |
4 | 0 | |||
| Cardstock (thin) | 200 g/m² (0.25 mm) |
4 | 0 | |||
| Cardstock (medium-thick) |
280 g/m² (0.35 mm) |
5 | 0 | |||
| Vellum, tracing paper | 0.07 mm | 3 | 0 | |||
| Poster board (thin) | 280 g/m² (0.35 mm) |
5.5 | 0 | |||
| Poster board (thick) | 400 g/m² (0.5 mm) |
7.5 | 4 | |||
*1 When cutting smooth paper
Fabric*2
| Material and its thickness | Mat (for ScanNCut DX) |
Type of Cutting blade | Blade scale setting | Cut pressure setting | ||
| Standard Tack Adhesive Mat | Low Tack Adhesive Mat | |||||
| Thin cotton fabric (for quilt piece) |
0.25 mm | Standard cut blade(turquoise) |
4 | 4 | ||
| Thin cotton fabric (except for quilt piece) |
0.25 mm | 4 | 4 | |||
| Flannel (for quilt piece) |
0.6 mm | 6.5 | 4 | |||
| Flannel (except for quilt piece) |
0.6 mm | 6.5 | 4 | |||
| Felt | 1 mm | Deep cut blade(purple) |
5 | 5 | ||
| Denim 14 oz | 0.75 mm | 5.5 | 6 | |||
*2 When cutting fabric, use the sheet for fabric cutting.
For details on cutting fabric, refer to Cut a thin fabric for the quilt piece and Cut the fabric other than quilt pieces .
Others
| Material and its thickness | Mat (for ScanNCut DX) |
Type of Cutting blade | Blade scale setting | Cut pressure setting | ||
| Standard Tack Adhesive Mat | Low Tack Adhesive Mat | |||||
| Plastic sheet (PP) | 0.2 mm | Standard cut blade (turquoise) |
4 | 0 | ||
| Vinyl | 0.2 mm | 4 | 0 | |||
| Magnet | 0.3 mm | 5.5 | 0 | |||
| Sticker or seal | 0.2 mm | 4 | 0 | |||
The settings indicated in the table are approximations. The setting will differ depending on the type and thickness of the material to be cut. Be sure to perform a trial cutting first.
Adjusting the Cutting Blade
-
Remove the protective cap.

- Please remove protective cap from blade holder before placing it into the machine carriage.
- Do not allow infants/children to put the protective caps in their mouths.
-
With the reference line on the holder facing toward you, fully turn the cap to the right to extend the blade tip to its maximum.
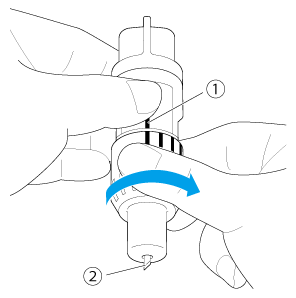
(1) Reference line
(2) Extend the blade tip to its maximum.
-
Check the thickness of the material, and then adjust the blade extension.
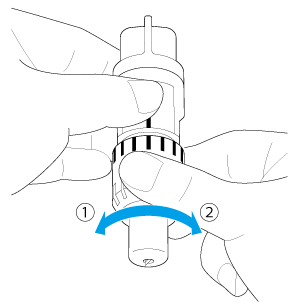
(1) Turn to the left to decrease the blade extension.
(2) Turn to the right to increase the blade extension.
Adjust the blade extension to slightly exceed the thickness of the material that will be cut. Use the markings on the holder to make the adjustment.
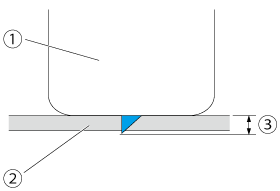
(1) End of holder cap
(2) Material that will be cut
(3) Length of blade tipBe careful that the blade does not extend too much. The blade can cut even though it only slightly extends from the holder. If too much of the blade extends, it may break.
Installing the Holder in the Machine
After adjusting the blade extension, install the holder in the machine.
-
Press
 in the operation panel to turn on the machine.
- Be sure to turn on the machine before installing the holder.
- If the holder is installed while the machine is off, the blade may break and material may not be cut cleanly.
-
Grasp the holder grip, and then insert the holder into the carriage.
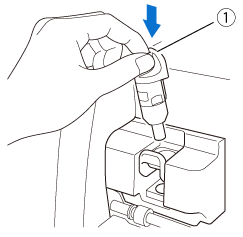
(1) Grip
-
Push down on the holder lock lever. Firmly push down until the holder is locked in place .
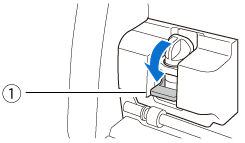
(1) Holder lock lever - After removing the blade holder from the machine, be sure to retract the blade into the holder and attach the protective cap.
- Do not leave the blade extended. Otherwise, injuries may result.
- Do not allow infants/children to put the protective caps in their mouths.
Adjusting the Cut Pressure Setting
-
Touch
 to display the settings screen.
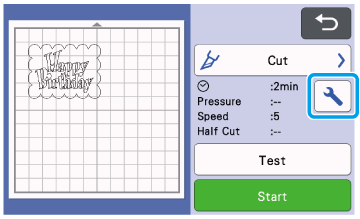
-
Touch
 or
or  for Cut Pressure (Manual Blade) to adjust the cutting pressure, and then touch the OK key.
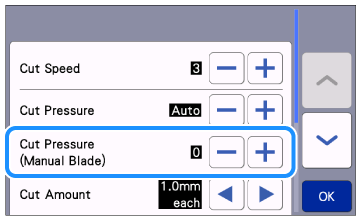
-
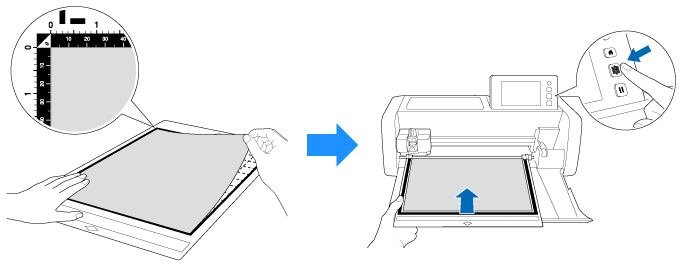
Attach the material to the mat, and then load the mat.
-
Perform test/trial cut.
For details on test/trial cut, refer to How do I perform trial cutting? .
If the material could not be cut cleanly, adjust the blade extension slightly or cutting pressure setting.
- If the blade extension is too large at a time, the blade will penetrate through the mat, damaging the blade and mat. When you adjust the blade extension, increase the extension by 0.5 a marking.
- If the part of the material is not cut, increase the cutting presser by 1.
- If the entire pattern is not cut, increase the blade extension by 0.5 a making.
- Cut the pattern when the result of test/trial cut is successful.
