PR1055X
FAQs & Troubleshooting |
How do I thread the machine? (Threading the upper thread)
![]() Moving and threading a selected needle bar
Moving and threading a selected needle bar
Upper threading
When threading the upper thread, carefully follow the instructions. If the upper threading is not performing correctly, the thread may break or become tangled, causing the needle to bend or break.
It is recommended that rayon or polyester embroidery thread be used (120 den/2, 135 dtex/2, 40 weight (in Americas and Europe), #50 (in Japan)).
The path that the embroidery machine should be threaded is indicated by a line on the machine. Be sure to thread the machine as indicated.
-
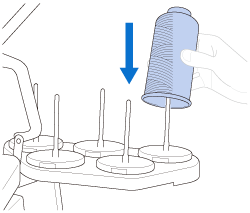
On the spool pin, place a spool with the thread color specified for the corresponding needle bar.

-
When using metallic thread or any other strong thread, place the included spool net over the spool. If the spool net is too long, fold it once to match the size of the spool before placing it over the spool. It may be necessary to adjust thread tension when using the spool net.

(1) Spool net
(2) Thread - Check that the spool stand has been completely opend.
- When using small spools of therad, be sure to place the included spool mat on the spool pin before placing the spool onthe pin.
-
Place the thread in the center of the spool stand so that the thread feeds off of the spool correctly and does not get tangled around the spool pin directly under the thread spool.

-
Use spool cap on all spools of thread shorter than the height of the spool pin.

(1) Spool mat
(2) Small spool
(3) Spool cap
-
When using metallic thread or any other strong thread, place the included spool net over the spool. If the spool net is too long, fold it once to match the size of the spool before placing it over the spool. It may be necessary to adjust thread tension when using the spool net.
The numbers indicate the thread path for each of the numbered needle bars. Be very careful to correctly thread the needle bars.

-
Pass the thread of a specified color through the holes on the thread guide, making sure that you have the thread color matched to the coordinating needle bar.
Pass the thread from spool pins 1, 3, 5, 6, 8 and 10 through the holes in both thread guides A and B.
Pass the thread from spool pins 2, 4, 7 and 9 through the hole in thread guide B only.
(1) Thread guide A
(There are 6 holes in this thread guide)
(2) Thread guide B
(There are 10 holes in this thread guide) -
Pass the thread through the hole (with the corresponding needle bar number) in thread guide C, then through the corresponding hole in thread guide D.
As an example, the threading for spool pin 1 is shown.
(1) Thread guide C
(2) Thread tension lever
(3) Holes in thread guide C
(4) Thread guide D- Before threading, make sure to slide the thread tension lever to the left so that the holes in thread guide C are fully open.

-
Pass the thread through the hole in the number 1 upper thread guide and pull the thread toward you.

(1) Hole in upper thread guide -
Hold the thread with both hands, and then pass it under the guide plate from the right.

(1) Upper thread guide plate
-
Wind the thread clockwise once around the number 1 thread tension disc.

(1) Thread tension disc
(2) Pass thread in a clockwise direction at this
location on the tension disks.- Make sure that the thread is securely positioned in the thread tension.
- All thread tension discs are threaded in clockwise direction.
-
Lead the thread along the thread path and around the correct thread guide pins as indicated on the machine, then slip the thread under the number 1 middle thread guide plate from the right.

(1) Thread guide pin
(2) Middle thread guide
-
The path from the upper thread guide around the thread tension disc and to the middle thread guide (steps6 through7) may differs depending on the spool number. Passing the thread through the thread guide pins is designed to prevent the thread from becoming tangled. Be sure to follow the thread path indicated on the machine.
-
Pass the thread along the number 1 slot to pass it through the number 1 take-up lever hole from right to left.

(1) Thread take-up lever
-
Pass the thread down through the slot to the lower thread guide, and then through the hole in the number 1 lower thread guide.

(1) Hole in lowert thread guide -
Use the included threader to pass the thread into the number 1 needle bar thread guide.

(1) Needle bar thread guide (2) Threader
Threading the needle
Use the automatic needle-threading mechanism to thread the needle.
-
Press the automatic needle-threading button.

>> The hook on the automatic needle-threading mechanism passes through the eye of the needle.
>> The spool thread indicator is turned off.- If the needle is not fully inserted, the hook of the automatic needle-threading mechanism will not pass through the eye of the needle during automatic needle threading, and the hook may bend or the needle cannot be threaded.
- If the hook of the automatic needle-threading mechanism is bent or damaged, contact your authorized Brother dealer.
- While the hook of the automatic needlethreading mechanism is passed through the eye of the needle, do not rotate the handwheel, otherwise the automatic needlethreading mechanism may be damaged.
- To avoid damage, the automatic threading mechanism may return to the back position when you turn the handwheel.
- The automatic needle-threading mechanism can thread one needle at the sewing position. When this mechanism is used, be sure that the needle bar that you want to thread is positioned as the sewing position, otherwise the automatic needle-threading mechanism cannot be used at the particular needle. If the needle bar is not at the sewing position, move it there.
-
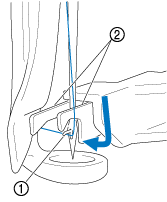
Pull out about 150 mm (6 inches) of thread. Allow thread to relax and eliminate any stress on the thread. Then, as shown in the illustration, pass the thread under the fork of the automatic needle-threading mechanism from the right, and then catch the thread with the hook that passes through the eye of the needle.

(1) Hook (2) Fork
- When catching the thread with the hook, be careful that the thread does not become loose.
-
Pass the thread under the guide on the presser foot.

(1) Guide on presser foot (2) Notch in guide on presser foot
- Make sure that the thread securely passes through the notch in the guide on the presser foot.
-
Securely pass the thread through the groove in the thread cutter, and then lightly pull the thread to cut it.

(1)Groove in thread cutter - If the thread is not correctly passed through the groove in the thread cutter, the message “Wiper error” appears and the needle cannot be threaded. Be sure to securely pass the thread through the groove.
- If enough thread is not pulled out, the thread cannot be pulled through the thread cutter.
-
Press the automatic needle-threading button.

- The threader moves back away from the needle. The thread is pulled through the needle eye.
- The wiper comes out and catches the thread between the needle and the threader.
- The threader goes back to the original home position.
-
This completes the upper threading for needle bar 1.
Thread the remaining needle bars in the same way.
-
If the needle bar to be threaded is not moved to the embroidering position, the needle cannot be threaded with the automatic needle-threading mechanism.
For the remaining needle bars, perform the following operation to move the needle bar to the embroidering position before trying to thread the needle.
-
When all upper threading is complete, be sure to slide the thread tension lever for thread guide C to the right, closing the
holes in the thread guide.
(1) Thread tension lever
(2) Holes in thread guide C- Embroidering with the holes in thread guide C fully open may cause the thread to become tangled or break.
Moving and threading a selected needle bar
You can move and thread a selected needle bar to the embroidering position at any time.
-
Touch
.

→ The needle bar move screen appears. -
Touch the key for the needle bar that youwish to move or thread.

→ The selected needle bar moves to the position of embroidery. -
Press the automatic needle-threading button while the needle bar move screen appears.

-
Touch to "OK" return to the previous screen.
-
In the embroidering screen, a blue frame appears around the thread information box of the selected needle bar.

- When changing one of the upper thread colors, it is easy to re-thread by cutting the thread currently being used between the spool and the thread guide above the spool. Place the new spool on the spool pin and tie the end of the new thread to the end of the previous thread. Then pull the thread through to the needle. For details, refer to How do I change the thread spool easily?.
-
In the embroidering screen, a blue frame appears around the thread information box of the selected needle bar.
