RJ-4030
FAQs & Troubleshooting |
How to use the RJ Utility (for Windows)
The RJ Utility is a computer program that allows you to change the printer's default settings. This utility can be used to adjust settings that are more advanced than the printer driver’s settings.
- Install the Printer Setting Tool from the [Downloads] section.
- Use the RJ Utility to configure the printer only when the printer is idle. The printer may malfunction if you attempt to configure it while it is handling a job.
Before Using the RJ Utility:
- Connect the printer to an AC or DC power outlet, or make sure that the battery is fully-charged.
- Make sure that the printer driver has been installed and is functional.
- Connect the printer to a computer via USB or Bluetooth® (RJ-4030/4030Ai).
Starting the RJ Utility:
- Connect the printer to be configured to the computer.
-
Start the Printer Setting Tool.
For Windows 8/8.1
For Windows 11 / Windows 10
Click [Start] - ([All apps] - [Brother] -) [Printer Setting Tool].
Click the [Printer Setting Tool] icon on the [Apps] screen.
For Windows 7 / Windows Vista
From the Start menu, click [All Programs] - [Brother] - [Label & Mobile Printer] - [Printer Setting Tool]. - Select the printer connected in step 1.
- Click the [Device settings] button. The main window is displayed.
How to Use the RJ Utility:
- In the main window of the RJ Utility, check the parameters with settings that can be changed.
- Select the desired settings from the pull-down menus or enter the desired values.
-
Click [Apply] to save the settings in the printer.
The settings are saved when you quit the RJ Utility, and the settings are applied the next time the RJ Utility is started.
If the printer is already connected when the RJ Utility is started, the printer's settings are applied.
For information on items in the RJ Utility window, refer to the following links:
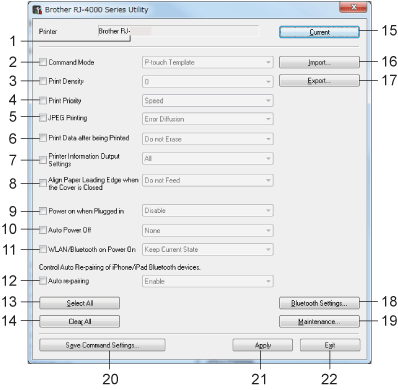
Main Window
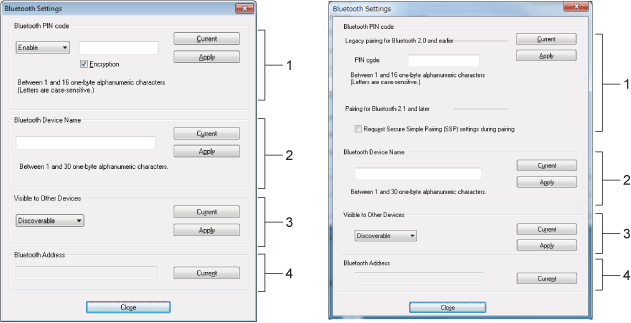
Bluetooth Settings Window
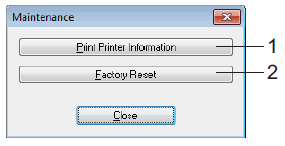
Maintenance Window

-
Printer
Displays the printer selected in the Printer Setting Tool. -
Command Mode
Sets the printer’s command format.
Available settings: [Raster], [ESC/P], [P-touch Template] -
Print Density
Adjusts the printing density on a scale of -5 to +5. -
Print Priority
Determines the printer's print quality.
Available settings: [Speed], [Quality]This setting can also be changed using the printer driver, however, in this case the setting is erased when the printer is turned off.
If the setting is changed using the RJ Utility, the setting is retained even when the printer is turned off, therefore, if you plan on printing without using the printer driver, use the RJ Utility to change this setting. -
JPEG Printing
Sets the image processing used when printing JPEG images via Bluetooth or with the mass storage feature.
Available settings: [Binary], [Error Diffusion] -
Print Data after being Printed
Determines whether the print data is erased automatically after printing.
Available settings: [Erase], [Do not Erase] -
Printer Information Output Settings
Determines which information is printed when printing the printer’s settings.
Available settings: [All], [Usage Log], [Printer Settings], [Printer Transfer Data] -
Align Paper Leading Edge when the Cover is Closed
Determines whether or not paper is automatically fed when the cover is closed.
Available settings: [Do not Feed], [Feed] -
Power on when Plugged in
Determines whether or not the printer turns on automatically when the power cord is connected.
Available settings: [Disable], [Enable] -
Auto Power Off
Determines the amount of time that passes before the printer turns off automatically.
Available settings: [None], 10 min. to 60 min. (10 min. increments) -
WLAN/Bluetooth on Power On
Determines the conditions for connecting via Wi-Fi® and Bluetooth when the printer is turned on.
Available settings: [On by Default], [Off by Default], [Keep Current State] -
Auto re-pairing (RJ-4030Ai only)
Controls Auto Re-pairing of iPhone/iPad Bluetooth devices.
Available settings: [Enable], [Disable] -
Select All
Places a check in the check boxes for all items. -
Clear All
Removes the checks in the check boxes for all items. -
Current
Retrieves the current setting values from the printer and applies them to each combo box. -
Import
Reads an exported file and applies the settings to the printer. -
Export
Saves the current settings to a file. -
Bluetooth Settings
Displays the [Bluetooth Settings] window. -
Maintenance
Displays the [Maintenance] window. -
Save Command Settings
Saves the content of the selected (checked) items as a command-format “.bin” file. Bluetooth settings are not saved.These settings commands are only intended for use for applying to printer settings.
Saved commands cannot be imported to the RJ Utility. -
Apply
Sends the selected (checked) settings to the printer. -
Exit
Exits the RJ Utility. The current settings are saved.
Bluetooth Settings Window (RJ-4030/4030Ai only)
| RJ-4030 | RJ-4030Ai |
 |
|
-
Bluetooth PIN code
RJ-4030:
Allows you to select whether a Bluetooth PIN code (passkey) is required, change the printer's Bluetooth PIN code, and select whether Bluetooth communication is encrypted.
If [Enable] is selected in the [Bluetooth PIN code] pull-down menu, the PIN code specified here must also be stored on the computer in order to communicate with the printer when using Bluetooth. You can change the PIN code if necessary.
If the [Encryption] is checked, data sent using the RJ Utility between the computer and printer will be encrypted when using Bluetooth.
RJ-4030Ai:
PIN code
Specifies the PIN code that will be used when pairing with devices that are compliant with Bluetooth 2.0 or earlier.
Request Secure Simple Pairing (SSP) settings during pairing
If this item is checked, pairing can be performed using the printer buttons for devices that are compliant with Bluetooth 2.1 or later. -
Bluetooth Device Name
Allows you to specify a name (up to 30 characters) for the printer. Useful when there are multiple Bluetooth printers present. -
Visible to Other Devices
Allows you to specify whether the printer can be "discovered" by other Bluetooth devices. -
Bluetooth Address
Displays the current Bluetooth address.The PIN code and the device name must use alphanumeric characters (A-Z, a-z, 0-9) only.
The device name can contain a space character; the PIN code cannot.

-
Print Printer Information
Click to print a report containing the following types of information.- Program version
- Printer usage history
- Missing dot test pattern
- RJ Utility setting information
- List of transferred data
- Network setting information
- Wi-Fi setting information
-
Factory Reset
Click [Factory Reset] to reset the RJ Utility to its default settings and send them to the printer.
