DCP-L2520DW
FAQs & Troubleshooting |
Scan a document into PaperPort™ using the TWAIN driver
To Access the Scanner follow the steps listed below:
The PaperPort™ is not available in some regions.
NOTE: The screens may differ depending on operating system being used and your Brother machine.
-
Open PaperPort™.
(Windows XP/ Windows Vista/ Windows 7/ Windows 10)
Click Start or or
or  (Start button) => (All Programs or All apps =>) Nuance PaperPort => PaperPort.
(Windows 8)-
On the Start screen, click
 .
.
If is not on the Start screen, right-click somewhere on an empty spot, and then click, All Apps from the bar.
 - Click PaperPort.
-
On the Start screen, click
-
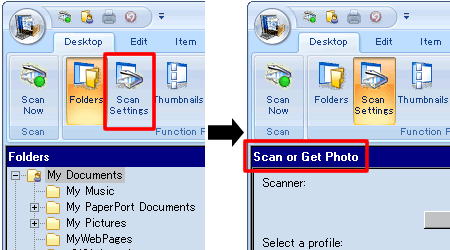
If the Scan or Get Photo panel is not already displayed on the left side of the screen, click Scan Settings. The Scan panel should then appear.
-
Under the scanner section click Select.
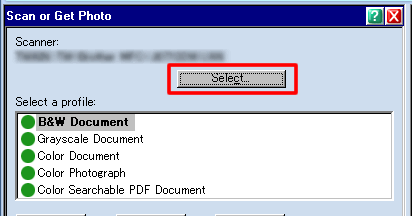
- Ensure that TWAIN has a check next to it and from the list of available scanners select the TWAIN driver for your model brother machine. (ex: TWAIN: TW - BROTHER [model name])
- Click OK. Your scanner should now be listed under the scanner section of the scan panel.
-
Under Select a Profile you can select from several pre-configured scanning profiles:
- B&W Document
- Grayscale Document
- Color Document
- Color Paragraph
- Color Searchable PDF Document
-
Place a check next to Display Scanner Dialog Box.
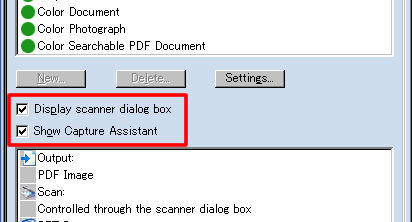
- If you would like additional options once the scan is complete, leave a check next to Show Capture Assistant.
-
Place the document you wish to scan in the automatic document feeder or on the scanner glass depending on your model machine. And click Scan.
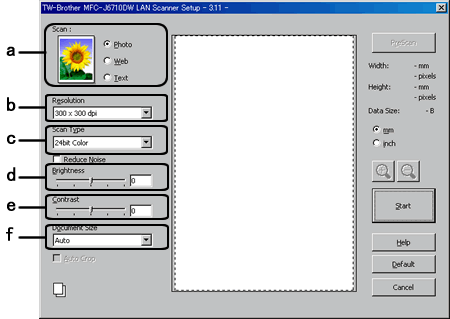
The Scanner Setup dialog box appears.
-
Scan (type of document):
- Photo: Select for scanning photo images
- Web: Select for attaching the scanned image to web pages.
- Text: Select for scanning text documents.
- Resolution: This is how sharp an image will be based on the dots per inch scanned (DPI). The higher the DPI the clearer the image will be, however the scan time and document size will increase.
150 x 150 DPI (recommended for text only scans); 300 x 300 DPI (recommended for OCR scan jobs and as a minimum for photos.)
-
Scan Type: This is the color scan option. The higher the color quality selected the longer the scan job will take to complete and the larger the file size will be.
- Black & White: Recommended for text only scans.
- Gray (Error Diffusion): Recommended for text only scans.
- True Gray: Recommended for gray scale photos or text.
- 256 Color: Recommended for picture graphics, and color charts.
- 24bit Color: Recommended for high quality photos.
Although using 24-bit color creates images with the most accurate colors, the image file will be approximately three times larger than a file created with 256 color. With this setting you may also click the Reduce Noise checkbox.
-
Brightness: Adjust the setting (-50 to 50) to obtain the best image. The default value is 0, representing an average.
You can set the level by dragging the slide bar to the right or left to lighten or darken the image respectively. You can also type a value in the box for the setting. If the scanned image is too light, set a lower brightness value and scan the document again. If the image is too dark, set a higher brightness value and scan the document again.
Brightness setting is not available when 256 Color is selected.
-
Contrast: You can increase or decrease the contrast level by moving the slide bar to the left or right.
An increase emphasizes dark and light areas of the image, while a decrease reveals more detail in gray areas. You can also type a value in the box for the setting.
The Contrast setting is only adjustable when you have selected gray, True gray, or 24bit Color.
- Document Size: Set the size of the document being scanned.
-
Scan (type of document):
- Click the Start button in the scanner window to begin the scan job.
-
When the scanning is complete, click Cancel. You will be prompted with the following options:
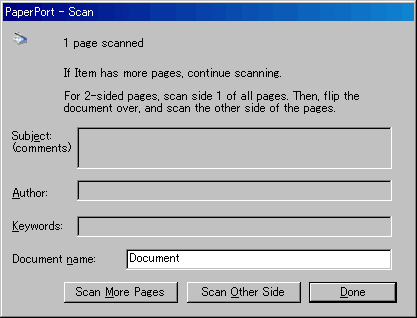
- Scan More Pages: Select this option if you wish to add additional pages to this scan job.
- Scan Other Side: Select this option to perform a manual 2-sided(duplex) scan of documents with images on both sides of a page.
- Done: Select this option if you are finished scanning.
- When you are done scanning you will be taken to the PaperPort™ Desktop and the scanned document should appear.
