TD-2135N
FAQs & Troubleshooting |
Using the Printer Setting Tool (for Windows)
Using the Printer Setting Tool, you can specify the printer’s settings from your computer.
The Printer Setting Tool is available from the [Downloads] section of this website.
Before using the Printer Setting Tool:
- Make sure the AC Adapter is connected to the printer and the AC Power Cord is connected to an AC power outlet.
- Make sure the printer driver has been installed correctly and you can print.
- Connect the printer to your computer with a USB cable.
- Connect the printer you want to configure to the computer.
-
Start the Printer Setting Tool.
For Windows 11 / Windows 10 / Windows Server 2016 / Windows Server 2019:
Click [Start] - ([All apps] - [Brother] -) [Printer Setting Tool].
For Windows 8/8.1 / Windows Server 2012 / Windows Server 2012 R2:
On the [Apps] screen, click [Printer Setting Tool].
For Windows 7 / Windows Server 2008 / Windows Server 2008 R2:
Click [Start] - [All Programs] - [Brother] - [Label & Mobile Printer] - [Printer Setting Tool].
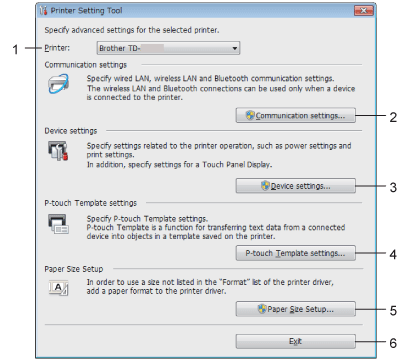
The main window appears.

-
Printer
Selects the printer to be configured.
If only one printer is connected, it is unnecessary to select since only that printer will appear. -
Communication Settings (TD-2120N/2130N only)
Specifies wired LAN, wireless LAN and Bluetooth® communication settings.
The wireless LAN and Bluetooth connections can be used only if the corresponding optional unit is attached to the printer and connection settings are completed.In order to open [Communication settings], you must be logged on with administrator rights.
-
Device Settings
Specifies printer device settings, such as power settings and print settings.
Settings can also be specified for the touch panel display (TD-2120N/2130N only).In order to open [Device settings], you must be logged on with administrator rights.
-
P-touch Template Settings
Specifies P-touch Template settings.
For more information on P-touch Template, download the P-touch Template Manual/Command Reference (English only) from the [Manuals] section. -
Paper Size Setup
Adds media information and settings to the printer driver in order to use a size not listed in the [Paper Size] list of the printer driver.In order to open [Size Setup], you must be logged on with administrator rights.
-
Exit
Closes the window.
-
Printer
-
Check that the printer to be configured appears beside [Printer].
If a different printer is displayed, select the desired printer from the drop-down list. -
Select the item for the settings to be specified, and then specify or change the settings in the dialog box that appeared.
For more information on the settings dialog boxes, see "Using the Communication settings (for Windows)" (TD-2120N/2130N only), "Using the Device Settings (for Windows)" or "Using P-touch Template Settings". - After changing the settings, click [Apply] - [Exit] in the settings dialog box to apply the settings to the printer.
-
Click [Exit] in the main window to finish.
Use the Printer Setting Tool to configure the printer only when the printer is in standby. The printer may malfunction if you attempt to configure it while it is handling a job.
