CM100DM
FAQs & Troubleshooting |
What should I do if I want to change the initial setting (position adjustment) for region embossing?
If the initial setting (position adjustment) failed, any of the following may be the cause.
Symptom 1
The scanning and cutting positions are misaligned.
Manually adjust the positions. For details, refer to “What should I do if the scanned and cut positions are misaligned?”.
After adjusting the scanning and cutting positions, adjust the position of the embossing template according to the instructions in "Adjusting the Embossing Template Position".
Symptom 2
The adjustment sheet for region embossing or template sheet is not cut cleanly.
Adjust the region embossing position according to the following procedure.
Adjusting the Embossing Template Position
Before adjusting the position, prepare the following.
-
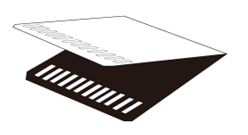
A4- or Letter-size thick paper that has not been embossedThe paper used for adjustments can be any color; however, we recommend using thick paper that is colored on the front and white on the back. Attach the paper to the mat with the colored side on the front. After cutting, fold the paper with the colored side on the inside, as shown below.The paper should have the same thickness as the adjustment sheet included with the Embossing Starter Kit, equivalent to "150 g/m2 - 200 g/m2".

Adjust the blade extension according to the thickness of the prepared paper, such as a setting of 3.5 for 150 g/m2 paper and a setting of 4 for 200 g/m2 paper. When using 150 g/m2 to 200 g/m2 paper, set the cutting pressure to 0.
-
Holder (turquoise)
-
Middle tack adhesive mat
The cutting mats used by this machine have been redeveloped with a different design, type, function, etc.
For details, refer to Important information about Mat.
Before adjusting the position, perform trial cutting on the left side of the prepared thick paper to check that the paper can be cut cleanly. Repeatedly perform trial cutting while adjusting the blade extension and cutting pressure until the paper is cut cleanly. The position cannot be correctly adjusted if the paper cannot be cut cleanly. Be sure to perform trial cutting on the prepared paper to check that it can be cut cleanly.
For details, refer to"How do I perform trial cutting?"
When performing trial cutting, use the left side of the material.

After performing a trial cutting to confirm that cutting can be completed correctly, follow the procedure below to adjust the position of the embossing template.
-
Touch
 or
or  in the settings screen until “Premium functions” is displayed.
-
Touch
 beside “Premium functions” in the settings screen.

-
Touch
 beside “Emboss Setting” in the kit settings screen.

-
Touch
 beside “Emboss Template Position Adjustment” in the embossing settings screen.

When is touched, the following message appears.

- Follow the on-screen instructions to adjust the position.
