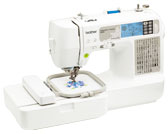
SE425
FAQs & Troubleshooting |
How do I thread the machine (Threading the upper thread)?
- The machine is marked with numbers that indicate the threading order. Follow the numbers in order.
- When threading the upper thread, carefully follow the instructions. If the upper hreading is not correct, the thread may become tangled or the needle may bend or break.
- When using accessories not included with this machine, attach the accessory to the machine after threading the machine.
- Never use the thread of No. 20 or lower.
- Turn on the sewing machine.

- Raise the presser foot lever.
The presser foot is raised.

 Presser foot lever
If the presser foot is not raised, the sewing machine cannot be threaded.
- Press
 (Needle position button) once or twice to raise the needle.

 Needle position button
The needle is correctly raised when the mark on the handwheel is at the top, as shown below. Check the handwheel and, if this mark is not at this position, press
 (Needle position button) until it is.

 Mark on handwheel
 - Pick up the spool pin and remove the spool cap that is inserted onto the spool pin.
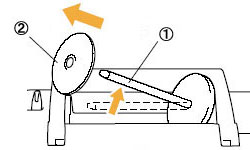
 Spool pin
 Spool cap
- Place the spool of thread onto the spool pin.
Slide the spool onto the pin so that the spool is horizontal and the thread unwinds to the front at the bottom.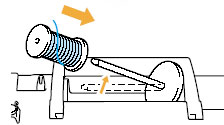
- Slide the spool cap onto the spool pin and return the spool pin to its original position.
Slide the spool cap as far as possible to the right, as shown, with the rounded side on the left.
If the spool or the spool cap is not positioned correctly, the thread may become tangled around the spool pin or the needle may break.
- Pull the thread from the spool and pass the thread under the hook of the thread guide.
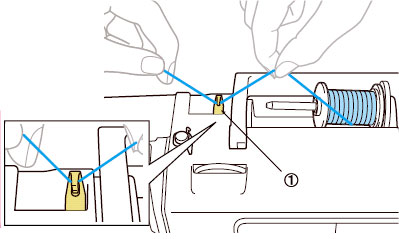
 Thread guide
- Pass the thread behind the thread guide cover and to the front.
While holding the thread near the spool with your right hand, pull the thread with your left hand as shown below.
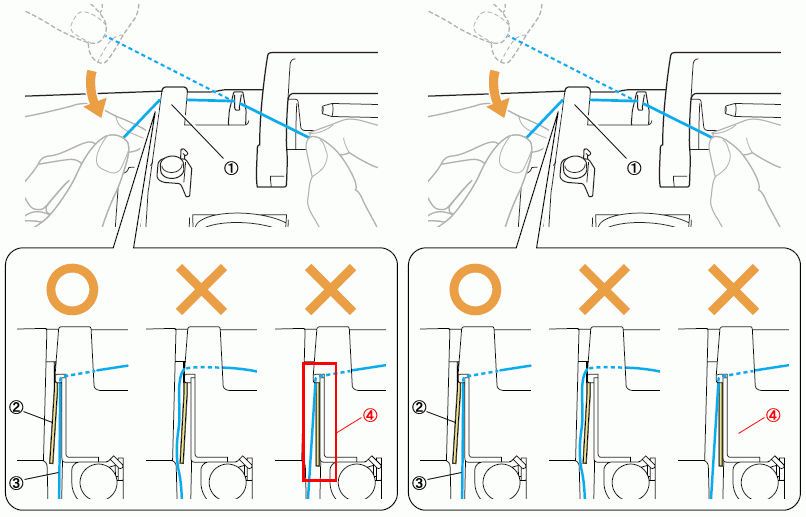
 Thread guide cover
 Thread guide spring
 Thread
 When the presser foot lever is lowered
- When passing the thread behind the thread guide cover, be sure to use both hands. If you do not hold the thread with your right hand, the thread will be loose and you will not be able to secure the thread in the thread spring guide. It may cause incorrect thread tension.
- Make sure that the presser foot lever is raised before passing the thread behind the thread guide cover. If the presser foot lever is lowered, the thread guide spring is shut and you cannot hang the thread on the thread guide spring correctly.
- Pass the thread through the guides in the order shown below.

- Make sure that the thread is passed into the thread take-up lever as shown below.
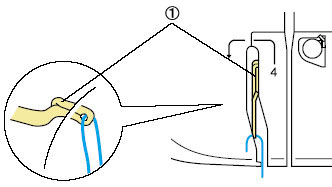
 Thread take-up lever
If the needle is not raised, you cannot pass the thread into the thread take-up lever. Be sure to press the needle position button to raise the needle before passing the thread into the thread take-up lever.
- Pass the thread behind the needle bar thread guide.
The thread can easily be passed behind the needle bar thread guide by holding the thread in your left hand, then feeding the thread with your right hand, as shown.
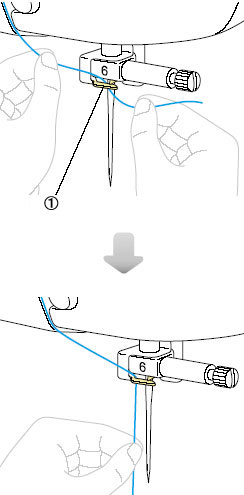
 Needle bar thread guide
- Lower the presser foot lever to lower the presser foot.

 Presser foot lever
Content Feedback
To help us improve our support, please provide your feedback below.
