MFC-9120CN
FAQs & Troubleshooting |
Scan multiple pages into one file instead of each scan being saved as a separate file.
In order to scan a multi-page document into a single file, you must configure the scan to use a file type that supports multi-page documents. Complete the steps listed below:
When you scan a document, you can either use the ADF (automatic document feeder) or the Flatbed scanner glass.
To see how to scan multiple pages into one file using the ADF, click here.
To see how to scan multiple pages into one file using the Flatbed scanner glass, click here.
Scanning from an Automatic Document Feeder (ADF)
Step 1: Configure the "Scan to" feature
The first two steps have two kinds of instructions respectively for Windows and Macintosh. Refer to the instructions applicable for your computer and then continue to step 3.
For Windows Users:
-
Open the ControlCenter.
(Windows 2000/ Windows XP/ Windows Vista/ Windows 7)
Click Windows/start -> (All) Programs -> Brother -> [model name] (Where [model name] is the model number of the machine) -> ControlCenterx.
The ControlCenter application will be loaded in the Task Tray near the system clock. (It appears as a blue square labeled CCx.)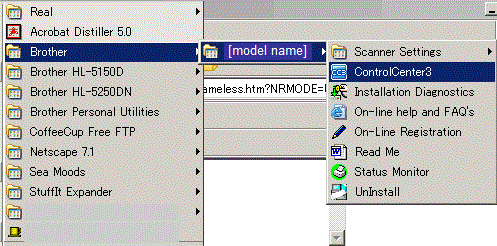
(Windows 8 or later) if applicable*
*: Click here to see the operating systems compatibility information.-
(Windows 8)
On the Start screen, click . If
. If  is not on the Start screen, right-click somewhere on an empty spot, and then click, All Apps from the bar.
(Windows 10)
Click (Start) => (All apps =>) Brother.
- Click Brother Utilities.
- Select your model name from the pulldown list.
-
Click ControlCenter.
The ControlCenter application will be loaded in the Task Tray near the system clock. (It appears as a blue square labeled CCx.)
-
(Windows 8)
-
Double-click on the ControlCenter icon located in the Task Tray to launch the program window. Go to STEP 3.

For Macintosh Users:
-
Open the ControlCenter by clicking Macintosh HD -> Library -> Printers -> Brother -> Utilities -> ControlCenter -> ControlCenter.app
The ControlCenter application will be loaded in the Task Tray near the system clock.

-
Click on the ControlCenter icon located in the Task Tray, and then click Open to launch the program window.
<Modern user interface> 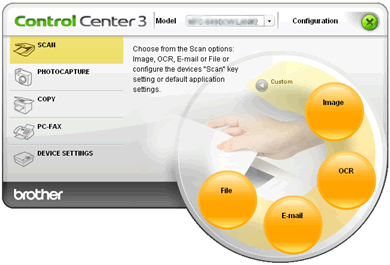
<Classic user interface> 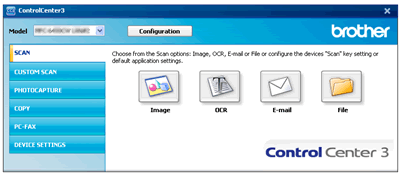
-
Click on Configuration -> SCAN.
-
Choose the type of scan you require. The choices are: Image, E-mail and File. The Scan to configuration window will appear.
-
The Scan to configuration window will appear.
<For Windows Users> 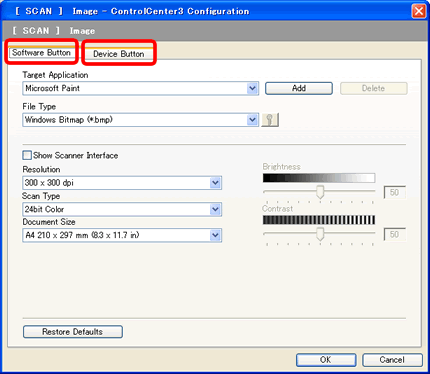
<For Macintosh Users> 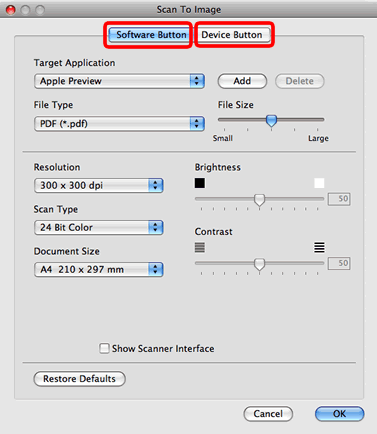
-
The Software Button tab configures the Scan to button within the ControlCenter software interface. The Device Button tab configures the Scan to key on the Brother machine. Choose the tab you want to configure.
-
Under File Type choose an option that allows multi-page documents:
a) PDF (*.PDF)
b) Tiff Multi-Page # Uncompressed (*.tif)
c) Tiff Multi-Page # Compressed (*.tif)
-
Click OK.
Step 2-1: To use the Scan to feature from the ControlCenter
-
Place the document to be scanned on the Automatic Document Feeder (ADF).
-
Launch the ControlCenter following the instructions in the Step 1.
-
On the SCAN menu left-click the button that corresponds with the type of scan you want to perform Image, E-mail or File.
- The document will now scan into a single file.
Step 2-2: To use the SCAN key on the Brother machine
-
Make sure that the ControlCenter has been launched by following the instructions in the Step 1.
-
Place the document to be scanned on the Automatic Document Feeder (ADF).
-
Press the Scan key on the Brother machine.
-
Scroll using your up or down arrow key and choose the type of scan you want to perform Image, E-mail or File.
-
Press OK.
- Press Start, Black (Mono) Start or Color (Colour) Start to begin the process. The document will now scan into a single file.
Scanning from the Flad bed scanner glass
To scan multiple pages into one file, you need to use the ScanSoft™ PaperPort™ or Presto! PageManager that was installed during the MFL-Pro Suite installation.
The ScanSoft™ PaperPort™ software or Presto! PageManager is provided on the installation CD for your machine.
For Windows Users:
Follow the instructions below to scan using the ScanSoft™ PaperPort™:
-
Lift the document cover.
-
Place the documents face down on the scanner glass.
-
Close the document cover.
-
Open the ScanSoft™ PaperPort™.
(Windows 2000/ Windows XP/ Windows Vista/ Windows 7)
Click Start => All programs => ScanSoft PaperPort xx => PaperPort.
("xx" varies depending on your PaperPort version.)
(Windows 8 or later) if applicable*
*: Click here to see the operating systems compatibility information.(Windows 8)
-
On the Start screen, click
 . If
. If  is not on the Start screen, right-click somewhere on an empty spot, and then click, All Apps from the bar.
 - Click PaperPort.
(Windows 10)
Click (Start) => (All apps =>) Nuance PaperPort => PaperPort.
 -
On the Start screen, click
-
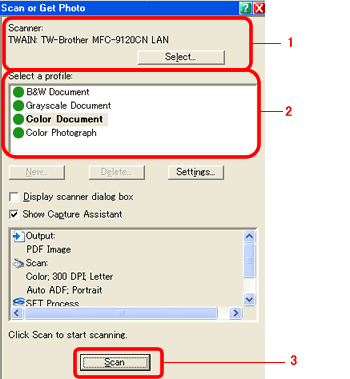
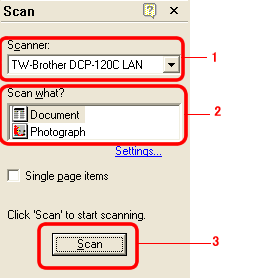
Choose your Scanner (1) and scanning profile (2) and press the SCAN button (3) on the panel. The machine will then start scanning.
(If the panel is not shown on the left side of screen, click File => Scan or Get Photo or Scan.)
The panel for PaperPort™ 11SE Users:
The panel for PaperPort® 9.0SE Users:
-
When scanning is finished, it will ask if you wish to scan more pages.
(If you are using PaperPort® 9.0SE, click CANCEL when the scanning is complete. Then you will be prompted with the Scan More Pages option.)
If you want to scan more pages, put the next document on the scanner glass and press the Scan More Pages button (4).
When you have finished scanning all your documents, click the Done button (5). The file will be saved in My PaperPort Documents.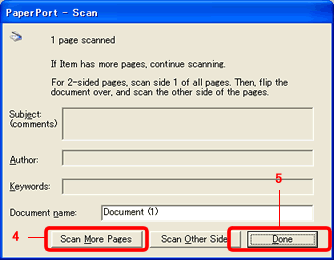
For Macintosh Users:
Follow the instructions below to scan using the Presto! PageManager:
-
Lift the document cover.
-
Place the documents face down on the scanner glass.
-
Close the document cover.
-
Double click on the Presto! PageManager shortcut icon on the desktop. or Click Leopard => Application => Presto! PageManager.
(The steps may differ depending on your Macintosh version.)
-
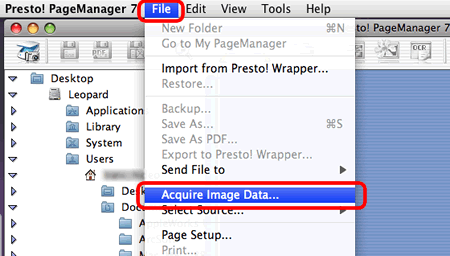
Click File => Acquire Image Data.
-
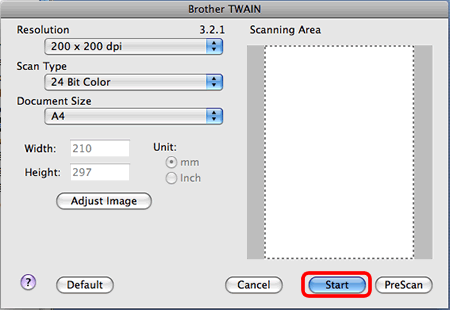
Click Start.
-
Put the next document on the scanner glass and click Start again.
-
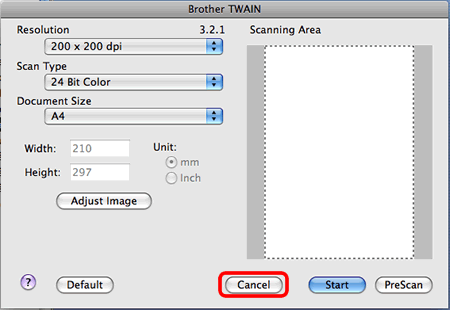
When you have finished scanning all your documents, click Cancel.
-
The file surrounded by an orange border is the created one scanned file. The total number of pages is shown at the bottom right.
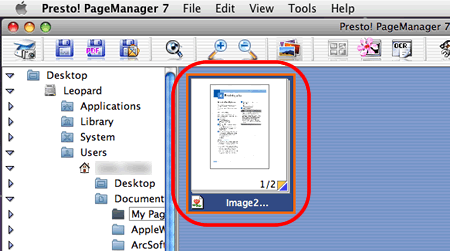
-
Click File -> Save As PDF....
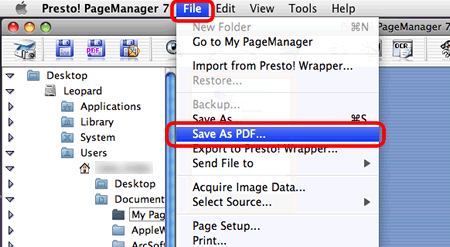
-
Set the file name and the folder, and click Save.
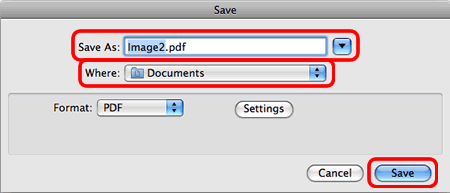
-
The files become one PDF file as below, and it is saved in the folder of your choice.
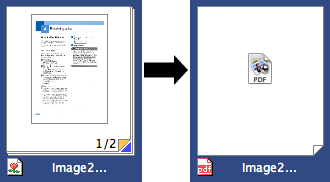
Related Models
DCP-110C, DCP-120C, DCP-130C, DCP-165C, DCP-330C, DCP-350C, DCP-375CW, DCP-385C, DCP-395CN, DCP-540CN, DCP-585CW, DCP-7020, DCP-7030, DCP-7040, DCP-8060, DCP-8065DN, DCP-8070D, DCP-8080DN, DCP-8085DN, DCP-9040CN, DCP-9045CDN, DCP-J125, MFC-210C, MFC-230C, MFC-240C, MFC-250C, MFC-255CW, MFC-290C, MFC-295CN, MFC-3240C, MFC-3340CN, MFC-3360C, MFC-420CN, MFC-440CN, MFC-465CN, MFC-490CW, MFC-495CW, MFC-5440CN, MFC-5460CN, MFC-5490CN, MFC-5840CN, MFC-5860CN, MFC-5890CN, MFC-5895CW, MFC-620CN, MFC-640CW, MFC-6490CW, MFC-665CW, MFC-685CW, MFC-6890CDW, MFC-7220, MFC-7225N, MFC-7340, MFC-7345N, MFC-7420, MFC-7440N, MFC-7820N, MFC-7840W, MFC-790CW, MFC-795CW, MFC-820CW, MFC-8440, MFC-845CW, MFC-8460N, MFC-8480DN, MFC-8660DN, MFC-8670DN, MFC-8680DN, MFC-8690DW, MFC-885CW, MFC-8860DN, MFC-8870DW, MFC-8890DW, MFC-9010CN, MFC-9120CN, MFC-9125CN, MFC-9320CW, MFC-9325CW, MFC-9420CN, MFC-9440CN, MFC-9450CDN, MFC-9840CDW, MFC-990CW, MFC-J220, MFC-J265W, MFC-J270W, MFC-J410, MFC-J410W, MFC-J415W, MFC-J615W, MFC-J630W
