MFC-210C
FAQs & Troubleshooting |
Why does my machine's LCD show "NO CARTRIDGE" even though I have already installed all the ink cartridges?
There is a possibility that ink cartridges other than ones you replaced are empty.
- Open the Scanner Cover by lifting from the right-hand side of the machine until it locks securely into the open position.
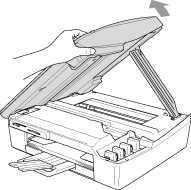
- Check the LCD display while keeping the cover open. If you see the message "Change Cartridge Install xx", the color displayed at "xx" is empty.
- If there are empty ink cartridges, please replace them.
(To see how to replace the ink cartridge, refer to the Related FAQs at the end of the page.)
- If there are not other empty ink cartridges, please reinstall the ink cartridges you replaced following the steps below:
Cartridges that have already been installed are no longer vacuum-sealed, so it is very important that these cartridges remain upright. If a cartridge is removed from the machine and placed on its side, air may be introduced into the ink supply tubes. As a result, repeated cleaning will likely be required before normal print quality is restored.
NOTE: Illustrations shown below are from the representative product and may differ from your Brother machine.
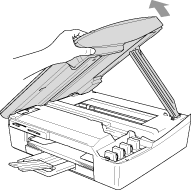
- Open the Scanner Cover by lifting from the right-hand side of the machine until it locks securely into the open position.
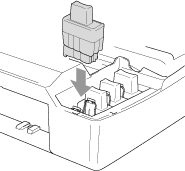
- Pull the ink cartridge hook toward you and remove the ink cartridge for the color shown on the LCD. Reinstall the ink cartridge and press down firmly on the ink cartridge until the hook snaps over it securely. Push the hook towards the cartridge to verify it is securely latched over the top edge of the cartridge.

Make sure the following again:
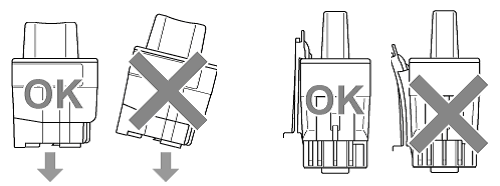
Keep the ink cartridge in an upright position when you insert it into the slot. Press down FIRMLY on the top of the cartridge until it is fully seated. Push the white plastic hook towards the cartridge to verify it is fully latched over the cartridge's top edge.
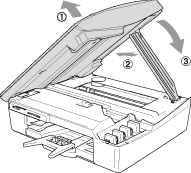
- After installing the ink cartridges, lift the scanner cover to release the lock Gently push the scanner cover support down and close the scanner cover.
-
The LCD may then display:
Did you change Blck? 1.Yes 2.No.
The LCD may display this question for the color(s) that was replaced.
BE SURE to select 1 Yes. If 1 YES is not selected for the replaced cartridges, the error message will appear again.
- After all the correct selections are made, the machine will then go into a cleaning. Once the cleaning is complete, the LCD will return to date and time.
If the LCD still displays No Cartridge, unplug the machine from the AC power outlet and wait approximately 10 seconds, and then plug it back in. If the date and time appear on the display, the problem is solved.
If you still have the same problem, please contact Brother Customer Service from "Contact Us".
