HL-4040CN
FAQs & Troubleshooting |
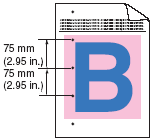
Spots are printed at 75mm.
Spots are printed 75mm (2.95 in.) apart down the page.

First try printing a few pages to try and clean the drum unit. If the problem is not solved after printing a few pages, the drum unit may have glue from a label stuck on the drum surface.
Follow the steps below to perform additional cleaning of the drum unit.
- Clean the drum unit in Drum Cleaning mode.
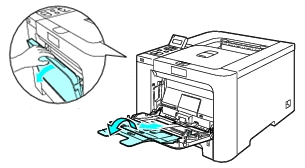
- Open the MP tray and lower it gently.
- Pull out the MP tray support and unfold the flap.

-
Put a blank sheet of paper in the MP tray.
-
Press the Cancel button once.
If the printer starts warming up, wait until it stops and then go on to the step e. -
Press the Cancel button first and then press the Back button.
Keep the Cancel and Back buttons pressed down until "DRUM CLEANING" is displayed on the LCD. -
Press the Go button.
The paper will feed into the printer to start the drum cleaning. -
When "DRUM CLEANING / COMPLETED" is displayed on the LCD, press the Cancel button.
-
Try to print again.
If this problem still remains, repeat steps a- g several times.
We recommend this cleaning operation once a month to keep the best quality.
- Pull the drum unit out from the printer and clean it. See "How do I clean the drum unit?".
If the problem is not solved after doing step 2, repeat step 1 again.
- If this problem is not solved after doing steps 1 and 2, the drum unit may be damaged.
Replace the drum unit with a new one. See "How do I replace the drum unit?".
Content Feedback
To help us improve our support, please provide your feedback below.
