MFC-8950DW
FAQs & Troubleshooting |
Install the optional lower tray
Follow the steps below to install the optional lower tray:
NOTE:
Illustrations shown below are from a representative product and operating system, and may differ from your Brother machine and operating system.
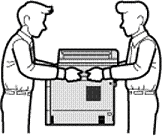
This machine is heavy. To prevent possible injuries at least two people should lift the machine. Be careful not to pinch your fingers when you put the machine down. If you use a Lower Tray, carry it separately from your machine.
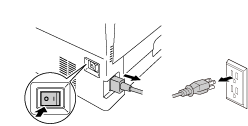
- Turn off the power switch, and remove all the cables from the machine.
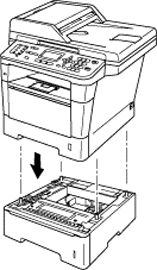
- Together two people should lift the machine carefully and place it onto the lower tray unit, so that the alignment pins of the lower tray unit are inserted into the guide holes on the bottom of the machine as shown.
- Plug all the cables back into the machines then turn on the power switch.
- Set the paper size and tray setting on the control panel of your machine.
To set the paper size and type for the lower tray:
*If your Brother machine has a touchscreen, please follow the steps under "For touchscreen models" below.- Press Menu.
- Press the Up or Down arrow key to choose General Setup. Press OK.
- Press the Up or Down arrow key to choose Paper. Press OK.
- Press the Up or Down arrow key to choose Paper Size. Press OK.
- Press the Up or Down arrow key to choose Tray#2. Press OK.
- Press the Up or Down arrow key to choose the size of paper you loaded in the optional lower tray. Press OK.
- Press Clear.
- Press the Up or Down arrow key to choose Paper Type. Press OK.
- Press the Up or Down arrow key to choose Tray#2. Press OK.
- Press the Up or Down arrow key to choose the type of paper you loaded in the optional lower tray. Press OK.
- Press Stop/Exit.
- Press Menu on the touchscreen.
- Press the Up or Down arrow key to display General Setup. Press General Setup.
- Press the Up or Down arrow key to display Tray Setting. Press Tray Setting.
- Press the Up or Down arrow key to display Tray#2. Press Tray#2.
- Press the Right or Left arrow key to display the size of paper you loaded in the optional lower tray. Press the size.
- Press the type of paper you loaded in the optional lower tray.
- Press Stop/Exit.
- For Windows Users:
Configure the printer driver to work with the lower tray.
- Open Printer Properties. (Click here to see how to open Printer Properties.)
- Choose the Accessories tab and click Auto Detect. Once the lower tray and paper size have been detected, then click Apply.
(Under certain conditions Auto Detect may not be available. If this situation occurs, you can manually add the options you have installed. In Available Options select the option you have installed, click Add and then Apply.)
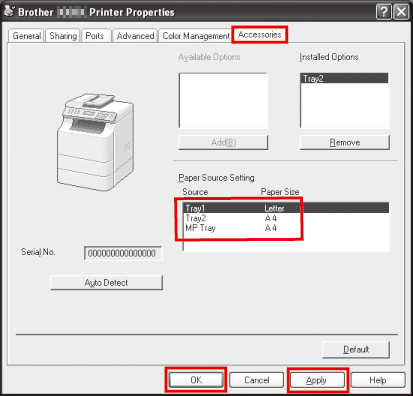
- Open Printer Properties. (Click here to see how to open Printer Properties.)
- For Macintosh Users:
The printer driver is already configured for use with the lower paper tray. No additional steps are required.
Content Feedback
To help us improve our support, please provide your feedback below.
