RJ-3150
FAQs & Troubleshooting |
How to use the Paper Size Setup (for Windows)
With [Paper Size Setup] in the Printer Setting Tool, paper sizes not available in the [Paper Size] list of the printer driver can be added.
As opposed to specifying paper settings for a normal printer, the paper format must be sent to the printer to add the paper size to the printer.
Printing with a paper format not registered with the printer may not provide the intended print results.
Paper Size Setup Dialog Box

-
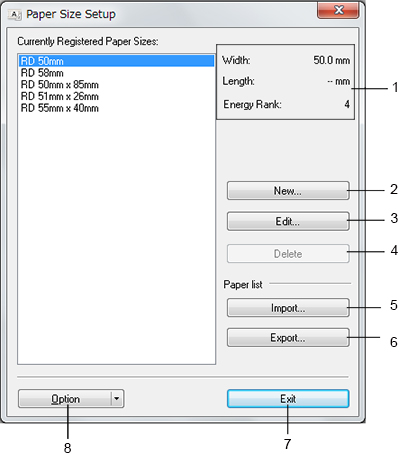
Current settings
Displays the current settings for the selected paper format.
-
New
Click this button to display the [New] dialog box and register a new paper format.Do not register a paper size if the same paper size has already been registered. It may cause an unintended result.
To use paper of the same size as one that is currently registered, select the size you want from the [Currently Registered Paper Sizes] list in the [Paper Size Setup] dialog box, and then change and overwrite the settings from the [Edit] dialog box. -
Edit
Edits the settings for the selected paper format.
To save the selected paper format with the new settings, click [Overwrite]. To add a paper format with the new settings, change the name in the [Paper Size Name] box, and then click [Add]. -
Delete
Deletes the selected paper format. A deleted paper format cannot be restored. -
Import
Reads the text file containing the paper format settings, and uses it to replace the contents of the [Currently Registered Paper Sizes] list.When the list is imported, the entire contents of the [Currently Registered Paper Sizes] list will be replaced with the imported paper formats.
-
Export
Exports the paper formats in the [Currently Registered Paper Sizes] list to a file. The exported formats can then be distributed to other computers. -
Exit
Exits [Paper Size Setup], and returns to the main window of the Printer Setting Tool. -
Option
Click the button, and then select an operation.
Click [Register Paper Size With Printer] to register the settings for the selected paper format in your printer.
Click [Save in Command File] to export the paper settings as a command file. (The file extension is “.bin”.)- When the paper format is registered with the printer and [Exit] is clicked, the [Paper Size Setup] dialog box appears with the added paper size in the [Currently Registered Paper Sizes] list. If the application is running, exit the application, and then restart it for the new paper format to appear in the list.
-
If the following functions are being used, you can quickly apply their settings to the printer.
- Mass storage feature
- Bluetooth® (Object Push Profile (OPP)) (For Bluetooth models only)
- Wi-Fi® (File Transfer Profile (FTP)) (For Wi-Fi models only)
These settings commands are only intended to be used for applying settings to a printer. These commands cannot be imported into [Paper Size Setup].
