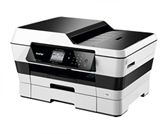
MFC-J6720DW
FAQs & Troubleshooting |
I'm having problems sending faxes to one particular number.
Follow these steps:
-
Dial the "problem" fax number from a telephone and verify it answers with fax tones.
- If the number answers with fax tones, go to Step 2.
- If the number does not answer with fax tones, there may be a problem with the recipient's fax machine or fax line. Contact the recipient and ask them to verify their fax number and fax machine's functionality.
-
Set the machine's Compatibility to Normal:
-
Press
 (Settings).
 -
Press All Settings.
-
Press the Up or Down arrow key to display Initial Setup.
-
Press Initial Setup.
-
Press the Up or Down arrow key to display Compatibility.
-
Press Compatibility.
-
Press Normal.
-
Press
 (Home).
-
Press
-
Send a fax to the "problem" number:
- Click here if you are trying to send a fax using the Automatic Document Feeder (ADF).
- Click here If you are trying to send a fax using the flat scanner glass.
NOTE: Illustrations shown below are from a representative product and may differ from your Brother machine
Sending a fax from the ADF
Follow these steps:-
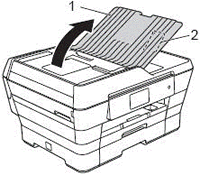
Open the ADF Document Support (1) and the ADF Document Output Support Flap (2).
-
Place the document(s) you want to send into the ADF face up, top edge first until you feel it touch the roller.
-
Insert the document underneath the paper guides (1).
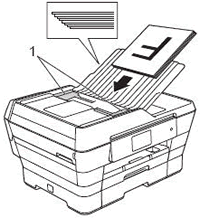
- After you put your document(s) in the ADF, the Brother machine's display (hereinafter called LCD) should display ADF Ready.
-
Insert the document underneath the paper guides (1).
-
Do one of the following:
- If the LCD displays ADF Ready, go to Step e.
- If the LCD continues to display the Home screen or a menu screen, go to Step d.
-
Make sure the document is between 5.8 and 11.7 inches wide and 5.8 and 17 inches long.
If the document is fewer than 5.8 inches wide, the document sensors will not detect it. You will need to use a wider sheet of paper.- If the LCD displays ADF Ready, go to Step e.
- If the document meets the above-listed specifications and the LCD continues to display the Home screen, the More screen, a Shortcut screen or a menu screen when you place a document into the ADF, please contact Brother Customer Service from "Contact Us."
-
Press
 (Fax).
-
Do one of the following:
-
If
 (Sending Faxes) appears on the LCD, press it.
 -
If
 (Sending Faxes) does not appear on the LCD, go to Step g.
-
If
-
Dial a known-working fax number.
-
You can use the dial pad to manually dial the number, press
 (Address Book) to use the Address Book, or press
  (Call History) to use the Outgoing or Incoming Call History.
 - If you are using access numbers for calling cards or long-distance security codes, or if you must press 9 to access an outside line and a pause is required between the dialing of those numbers and the fax number, be sure to press Pause when needed.
- Pressing Pause will insert a 3.5-second pause between numbers.
-
You can press Pause as many times as needed to increase the length of the pause.
Redial will turn into Pause after you dial the number.
-
You can use the dial pad to manually dial the number, press
-
Do one of the following:
-
To send a black and white fax, follow these steps:
When manually sending a fax by pressing Hook to listen for a dial tone before dialing, make sure you wait until you hear the receiving machine's fax tones before you press Fax Start on the Brother machine.
- Press Fax Start. The machine will send the fax.
- Go to Step 4.
-
To send a color fax, follow these steps:
- Press Options.
- Press the Up or Down arrow key to display Color Setting.
- Press Color Setting.
-
Press Color.
When manually sending a fax by pressing Hook to listen for a dial tone before dialing, make sure you wait until you hear the receiving machine's fax tones before you press Fax Start on the Brother machine. - Press OK.
-
Press Fax Start.
The machine will send the fax. - Go to Step 4.
-
To send a black and white fax, follow these steps:
Sending a fax from the flat scanner glass
Follow these steps:- You cannot send multipage color faxes from the flat scanner glass.
- You can send documents up to Letter or A4 size.
- Since you can only scan one page at a time on the flat scanner glass, it is easier to send multipage faxes using the ADF.
- The ADF must be empty when you are faxing from the flat scanner glass.
-
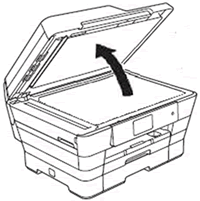
Lift the document cover.
-
Place the document face down in the upper-left corner of the flat scanner glass.
-
Use the guide lines on the upper-left corner of the scanner glass to help you position the document.
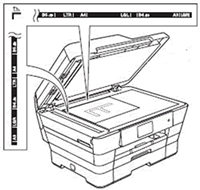
-
Use the guide lines on the upper-left corner of the scanner glass to help you position the document.
-
Close the document cover.
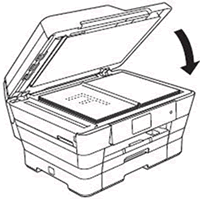
-
Press
 (Fax).
-
Do one of the following:
-
If
 (Sending Faxes) appears on the LCD, press it.
 -
If
 (Sending Faxes) does not appear on the LCD, go to Step f.
-
If
-
Dial a known-working fax number.
-
You can use the dial pad to manually dial the number, press to use the Address Book, or press
 (Address Book) to use the Address Book, or press
  (Call History) to use the Outgoing or Incoming Call History.
 - If you are using access numbers for calling cards or long-distance security codes, or if you must press 9 to access an outside line and a pause is required between the dialing of those numbers and the fax number, be sure to press Pause when needed.
- Pressing Pause will insert a 3.5-second pause between numbers.
-
You can press Pause as many times as needed to increase the length of the pause.
Redial will turn into Pause after you dial the number.
-
You can use the dial pad to manually dial the number, press to use the Address Book, or press
-
Do one of the following:
-
To send a black and white fax, follow these steps:
-
Press Fax Start.
- The machine will scan the page.
- The LCD will read Next page?
-
Do one of the following:
-
To send a single-page fax, press No.
The machine will send the fax. - To send more than one page, go to Step iii.
-
To send a single-page fax, press No.
- Press Yes.
- Place the next page on the scanner glass.
-
Press OK.
- The machine will scan the page.
- To scan additional pages, repeat Steps iii through v.
- When you have scanned all the pages you want to send, press No.The machine will send the fax.
- Go to Step 4.
-
Press Fax Start.
-
To send a color fax, follow these steps:
- Press Options.
- Press the Up or Down arrow key to display Color Setting.
- Press Color Setting.
- Press Color.
- Press OK.
- Press Fax Start.The machine will send the fax.
- Go to Step 4.
-
To send a black and white fax, follow these steps:
-
Do one of the following:
- If the fax is successful, the issue is resolved.
- If the fax is not successful, there is likely a problem with the recipient's fax machine or fax line. Contact the recipient and ask them to verify their fax number and fax machine's functionality.
Content Feedback
To help us improve our support, please provide your feedback below.
