MFC-9840CDW
FAQs & Troubleshooting
I have upgraded the Operating System to Windows 7. How can I install "PaperPort™ 11SE" ?
You can install "PaperPort™ 11SE" from the CD-ROM supplied with your machine. Please follow the Step1, 2 and 3 below to install "PaperPort™ 11SE".
There are three steps for installing "PaperPort™ 11SE". You need to install three kinds of software: PaperPort, Microsoft Visual C++ 2005 Redistributable Package (depending on your machine) and PaperPort Image Printer.
Step1: Installing PaperPort
Put the supplied CD-ROM into your CD-ROM drive. If the Brother screen appears automatically, close the screen.
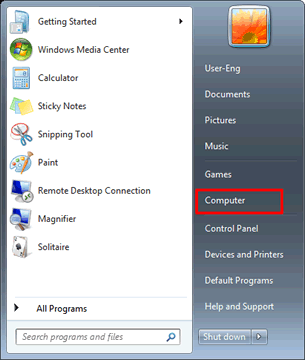
Click on Start and then Computer .
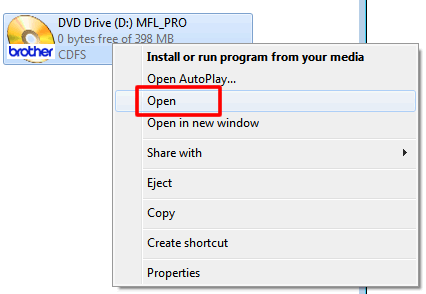
Right-click on CD-ROM icon and select Open .
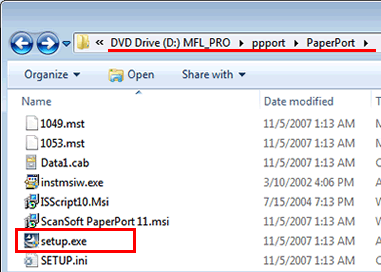
Open the ppport folder and then the PaperPort folder. Double-click setup.exe .
The installation will start. Please follow the installation screen directions.
- For DCP-9040CN, DCP-9045CDN, MFC-9440CN, MFC-9840CDW users: Please skip Step 2 and go onto the Step 3. - For Users of other machines:
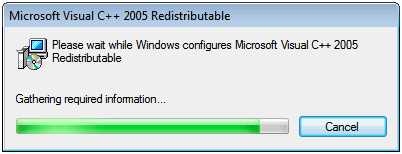
Step2: Installing Microsoft Visual C++ 2005 Redistributable Package
[For 32bit users]
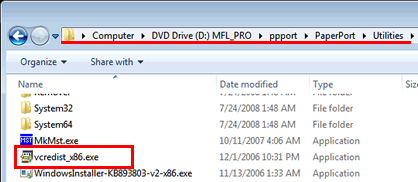
Open the Utilities folder. Double-click vcredist_x86.exe .
A window will appear. After finishing installation the window will close.
Open the Utilities folder. Double-click vcredist_x86.exe .
A window will appear. After finishing installation the window will close.
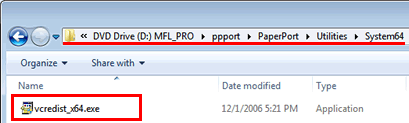
Open the System64 folder. Double-click vcredist_x64.exe .
A window will appear. After finishing installation the window will close.
Step3: Installing PaperPort Image Printer
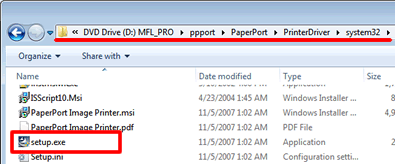
[For 32bit users]
Go back to the PaperPort folder. Open the PrinterDriver folder, and then the sytem32 folder.
Double-click setup.exe .
The installation will start. Please follow the installation screen directions.
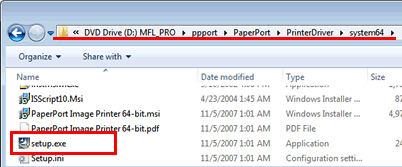
Go back to the PaperPort folder. Open the PrinterDriver folder, and then the system64 folder.
Double-click setup.exe .
The installation will start. Please follow the installation screen directions.
If your question was not answered, have you checked other FAQs?
Have you checked the manuals?
If you need further assistance, please contact Brother customer service:
Related Models DCP-7030, DCP-7040, DCP-9040CN, DCP-9045CDN, MFC-7340, MFC-7345N, MFC-7440N, MFC-7840W, MFC-9440CN, MFC-9450CDN, MFC-9840CDW
Content Feedback
To help us improve our support, please provide your feedback below.
Error Messages Paper Feed / Paper Jam Print Scan Copy Telephone Fax Mobile Others Advanced Functions (for Administrators) Linux Product Setup Driver / Software Network Settings Consumables / Paper / Accessories Cleaning Specification OS Support Information Video FAQs
Printer Scanner / Scan Key Tool PC-FAX / Fax-modem Security Enhancement Error Message on Machine's Display Error Message on Status Monitor Error Message on Computer Error Message on Mobile Device Paper Jam Paper Feed Problem Cannot Print (via Network) Cannot Print (via USB / Parallel) Cannot Print (via Mobile Device) Print Quality Problem Direct Print Problem General Print Problem Print from Computer (Windows) Print from Mobile Device Print directly from Machine Print Settings / Management Tips for Printing Cannot Scan (via Network) Cannot Scan (via USB / Parallel) Cannot Scan (via Mobile Device) Scan Quality Problem General Scan Problem Scan from Machine Scan from Mobile Device Scan from Computer (Windows) Scan from Computer (Macintosh) Scan Settings / Management Tips for Scanning Cannot Copy Copy Quality Problem Copy Settings / Management Telephone Problem Telephone Operation Telephone Settings Advanced Networking Wired Network Setting Problem Wireless Network Setting Problem Wired Network Settings Wireless Network Settings Tips for Network Settings Cannot Send a Fax Cannot Receive a Fax Fax Quality Problem General Fax Problem Fax Sending Operation Fax Receiving Operation Fax Sending Operation from Computer (PC-Fax) Fax Receiving Operation with Computer (PC-Fax) Fax Settings / Management Tips for Fax iOS Device-related Problem Brother iPrint&Scan / Mobile Connect (iOS) AirPrint (iOS) Android™ Device-related Problem Brother iPrint&Scan / Mobile Connect (Android™) Brother Image Viewer (Android™ Device) Windows Phone Device-related Problem Brother iPrint&Scan (Windows Phone Device) Machine problem Machine Setup / Settings Paper Handling Accessory Installation Installing Drivers / Software Updating Drivers / Software / Firmware Uninstalling Drivers / Software Driver / Software Settings Driver / Software tips Consumables Paper Accessories Cleaning Product Specification Paper Specification Windows Support Macintosh Support Tutorial Video