MFC-8710DW
FAQs & Troubleshooting |
I cannot print automatically a document that has different paper sizes.
You can set the Brother machine to automatically select the appropriate paper tray based on the paper size.
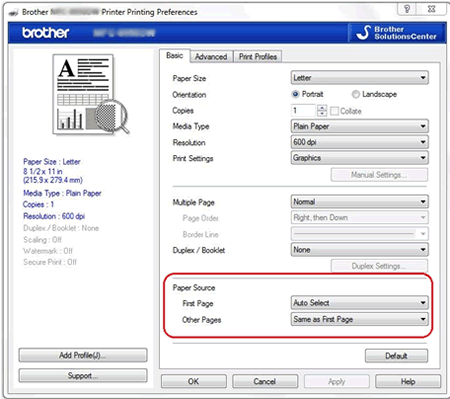
If you select Auto Select as the Paper Source, the application will automatically print from the appropriate tray based on the document's paper size. Auto Select is the default setting of the printer driver. For this feature to work, the tray settings must be defined from the machine's control panel, the printer driver must be configured properly, and the paper size must be configured properly within the document's properties.
PART 1: ADJUST THE BROTHER MACHINE'S PAPER SIZE SETTING
To set the Paper Size:
*If your Brother machine has a Touchscreen, follow the steps under "For Touchscreen models" below.
PART 2: CONFIGURE THE PAPER SOURCE WITHIN THE DRIVER
NOTE: The steps may differ depending on your application.
Windows | Macintosh
(Windows)
(Macintosh)
If you select Auto Select as the Paper Source, the application will automatically print from the appropriate tray based on the document's paper size. Auto Select is the default setting of the printer driver. For this feature to work, the tray settings must be defined from the machine's control panel, the printer driver must be configured properly, and the paper size must be configured properly within the document's properties.
PART 1: ADJUST THE BROTHER MACHINE'S PAPER SIZE SETTING
To set the Paper Size:
*If your Brother machine has a Touchscreen, follow the steps under "For Touchscreen models" below.
- Press Menu.
- Press the Up or Down arrow key to select General Setup. Press OK.
- Press the Up or Down arrow key to select Paper. Press OK.
- Press the Up or Down arrow key to select Paper Size. Press OK.
- Do one of the following:
- To set the paper size for the MP Tray, press the Up or Down arrow key to select MP Tray. Press OK.
- To set the paper size for Tray#1, press the Up or Down arrow key to select Tray#1. Press OK.
- To set the paper size for Tray#2, press the Up or Down arrow key to select Tray#2. Press OK.
- To set the paper size for the MP Tray, press the Up or Down arrow key to select MP Tray. Press OK.
- Press the Up or Down arrow key to select Letter, Legal, A4, A5, A5L, A6, B5, B6, Folio, Executive or Any.
NOTE:- The Any size option appears only when you choose the MP Tray. If you select Any for the MP Tray Paper Size, you must choose MP Only for the Tray Use setting.
- A5L and A6 size are not available for Tray#2.
- The Any size option appears only when you choose the MP Tray. If you select Any for the MP Tray Paper Size, you must choose MP Only for the Tray Use setting.
- Press OK.
- Press Stop/Exit.
- Press Menu.
- Press the Up or Down arrow key to display General Setup. Press General Setup.
- Press the Up or Down arrow key to display Tray Setting. Press Tray Setting.
- Do one of the following:
- To set the paper type for the MP Tray, press the Up or Down arrow key to display MP Tray. Press MP Tray.
- To set the paper type for Tray#1, press the Up or Down arrow key to display Tray#1. Press Tray#1.
- To set the paper type for Tray#2, press the Up or Down arrow key to display Tray#2. Press Tray#2.
- To set the paper type for the MP Tray, press the Up or Down arrow key to display MP Tray. Press MP Tray.
- Press the Left or Right arrow key to display the paper size options. Press Letter, A4, Legal, Executive, A5, A5L, A6, B5, B6, Folio or Any.
NOTE:- The Any size option appears only when you choose the MP Tray. If you select Any for the MP Tray Paper Size, you must choose MP Only for the Tray Use setting.
- A5L and A6 size are not available for Tray#2.
- The Any size option appears only when you choose the MP Tray. If you select Any for the MP Tray Paper Size, you must choose MP Only for the Tray Use setting.
- Press Thin, Plain, Thick, Thicker, Recycled Paper or Label.
NOTE: You can choose Label for the MP Tray. - Press Stop/Exit.
PART 2: CONFIGURE THE PAPER SOURCE WITHIN THE DRIVER
NOTE: The steps may differ depending on your application.
Windows | Macintosh
(Windows)
- Ensure that your document's paper sizes are configured properly. If you are unsure how to verify this setting, please contact your application vendor for additional support.
- From within your application, access the print dialog box. These steps will vary depending on the application, but can often be accessed by clicking File => Print.
- Click Properties or Preferences.
- Click on the Basic tab.

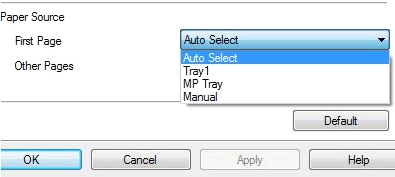
- In the Paper Source dropdown, make sure you choose Auto Select.

- Click Apply => OK.
- Click OK or Print, depending on your application. The document should print from the tray based on the selections you made.
(Macintosh)
- Ensure that your document's paper sizes are configured properly. If you are unsure how to verify this setting, please contact your application vendor for additional support.
- From within the application, access the print dialog box. The steps will vary depending on the application you are using.
- From the Applications Dropdown choose Print Settings.
- On the Basic tab from the Paper Source, make sure you choose Auto Select.

- Click Print.
Content Feedback
To help us improve our support, please provide your feedback below.
