MFC-295CN
FAQs & Troubleshooting |
When printing documents the characters appear ghosted, blurry, or doubled.
Ghost printing is characterized by repeating light mirror image of the original image or text on the page. This problem may also be described as fuzzy, blurry, or doubled print. (underlined in red). This may be caused by something like oil that may be adhered on the surface of the Encoder strip, inside the machine.
[Printing Sample]
If you are experiencing ghost printing from your Brother machine, please follow the steps below to clean the Encoder strip.
Markings and debris can adhere on the surface of the encoder strip from the reasons listed below.
- Touching the encoder strip with your hands can place smudge marks on the encoder strip.
- The removal of jammed paper can cause grease to get applied to the surface of the encoder strip.
Clean the Encoder Strip
DO NOT use flammable substances or any type of spray to clean the inside or outside of the machine.
Doing this may cause a fire or electrical shock.
- Prepare a lint free cloth such as a T-shirt, DRY eye glass cleaner cloth, DRY monitor cloth or wash cloth.
DO NOT USE ANY TYPE OF PAPER PRODUCTS (EX: paper towel, tissue paper, napkin, filter, newspaper etc.) This will help ensure that the dirt will be removed from the encoder strip.
- Unplug your Brother machine from the AC power outlet (electrical socket).
- Open the scanner cover.
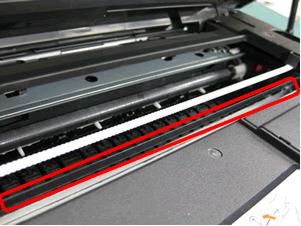
- Confirm the position of the Encoder Strip.
The encoder strip is a clear plastic strip in front of the white vinyl band.(surrounded in red shown in the picture below)
There is a warning in the machine to not touch the strip; however, this warning is to stop users from touching the strip with fingers because of the oils on your skin. It is OK to touch and clean the strip with a lint free cloth.
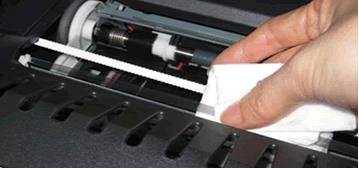
- With the lint free cloth, firmly grab the encoder strip on both sides and rub the cloth down the strip from one end to the other (left to right then right to left) at least three times. (Please see "reference image1&2" below) In most cases, you have to rub firmly and aggressively to completely clean the strip and solve the problem. The encoder strip is very flexible, durable and has slack so do not be afraid of breaking the strip. It does not easily break.
- DO NOT pull on the strip with force. Too much force may damage the machine.
- DO NOT touch encoder strip with bare hands.
- DO NOT scrub hard the encoder strip. Doing this may cause scratches on its surface.
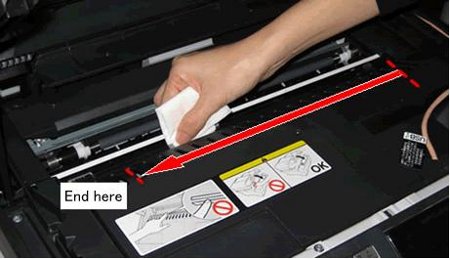
- Clean encoder strip from right to left. Make sure to stop just before the left corner.
[reference image 1]
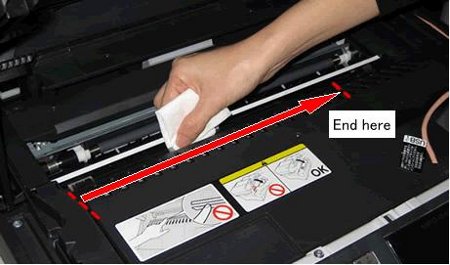
- Clean encoder strip from left to right. Make sure to stop just before the right corner.
[reference image 2]
- Repeat STEPS 6 and 7, 2 or 3 times to clean thoroughly.
- After cleaning the encoder strip, close the scanner cover.
- Plug the power cord back into the AC power outlet (electrical socket) and try printing again.
If ghost printing still appears, please check "Checking the Print Alignment" below.
Checking the Print Alignment
- Set a sheet of A4 size paper in the tray and press Menu.
- Press the UP OR DOWN ARROW key or the dial pad to choose Ink or Ink Management and press OK.
- Press the UP OR DOWN ARROW key or the dial pad to choose Test Print and press OK.
- Press the UP OR DOWN ARROW key or the dial pad to choose Alignment and press OK.
- Press Black (Mono) or Color (Colour) start. The machine begins printing the Alignment Check Sheet.
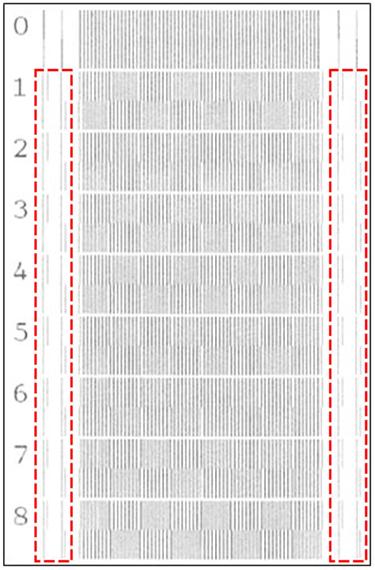
- By reviewing this Check Sheet, you can determine if the alignment needs adjustment.
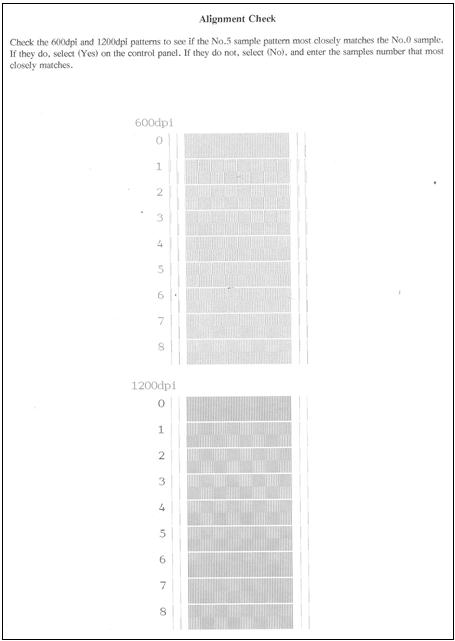
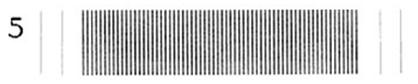
- Examine the 600 dpi and 1200 dpi test prints on the Alignment Check Sheet. Check whether number 5 sample is the most similar to number 0 sample for 600 dpi and 1200 dpi.
To closely match with number 0, please meet the following conditions:- "Both ends of each long lines and short lines" are overlapped.
- "Center pattern lines" are the most similar to number 0.
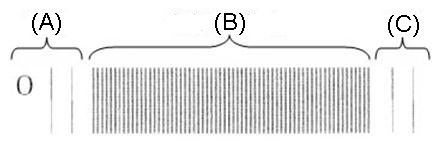
(A) Both long lines and short lines (In this image, two lines are overlapped.)
(B) Center pattern lines
(C) Both long lines and short lines (Same as (A))
<Good example for number 5 sample>
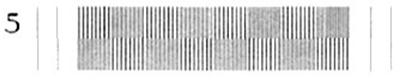
<Bad example_1 for number 5 sample>
"Both ends of each long lines and short lines" are nearly overlap, but "center pattern lines" are not similar to number 0 sample.
<Bad example_2 for number 5 sample>
"Center pattern lines" are similar to number 0 sample, but "both ends of each long lines and short lines" are not overlapped.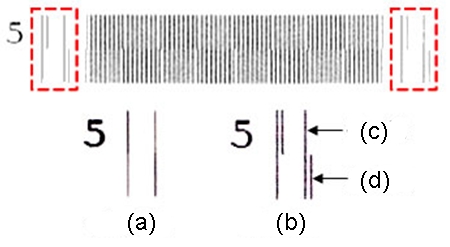
(a) Good example
(b) Bad example
(c) Long line
(d) Short line
If the number 5 sample of both the 600 dpi and 1200 dpi most closely matches the 0 sample, press the UP ARROW key or 1 to choose Yes. There is no problem with print alignment. Go to STEP 10.
If either condition does not apply to number 5 sample, there is a problem with the print alignment. Press the DOWN ARROW key or 2 to choose No. The display will then prompt you to choose the sample that most closely matches the 0 sample for 600 dpi and then 1200 dpi. Go to STEP 8. - Here, we will make a correction for print alignment.
Enter correction number in the order of 600 dpi, 1200 dpi. Check 600 dpi print alignment first.
- If "both ends of each long lines and short lines" are overlapped:
Among the "center pattern lines", enter the number that is the most similar to number 0 sample.
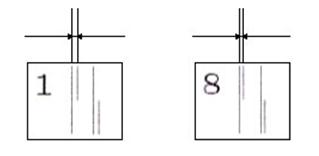
Below is the example image. You can recognize that number 6 sample is the most similar to number 0 sample. Therefore, press 6.
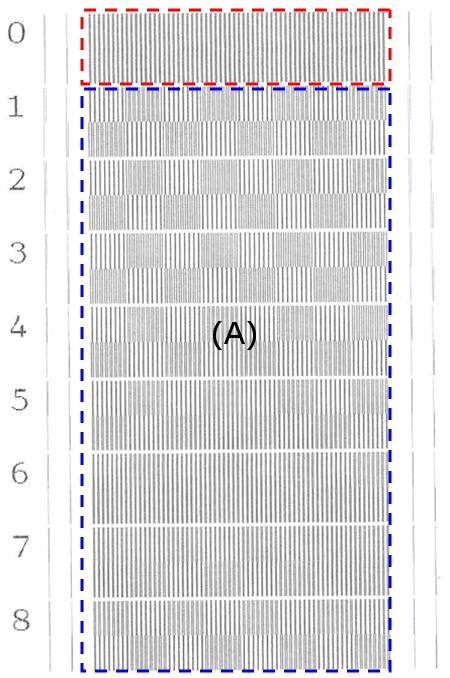
(A) Choose the number that is the most similar to number 0 sample among the "center pattern lines".
- If "both ends of each long lines and short lines" are NOT overlapped:
As for the example image below, if you find none of the overlapped long lines and short lines among No.1 to 8, enter the number that has the most narrow space between long lines and short lines.
For this example image, No.8 has the most narrow space. Therefore, press 8.
When the pattern that "Both ends of each long lines and short lines" are NOT overlapped, there is a large deviation of the print. It might possible we cannot make a correction at once.
When you finished with print alignment check, please try printing. If there's no improvement, please repeat correcting the print alignment.
- If "both ends of each long lines and short lines" are overlapped:
- Next, for 1200 dpi, do the same task as 600 dpi (Go back to STEP 8).Choose and enter an appropriate number.
- Press Stop/Exit to finish print alignment check. Please try printing and see if the problem has improved or not.
If you have no problem with "Alignment Check Sheet", but still gets fuzzy, blurry, or doubled print characters, ink might not be working properly. Please check the FAQ down below and see if there's a problem by "Print Quality Check Sheet".
>Improve poor print quality.