QL-810W/ 810Wc
FAQs & Troubleshooting |
Using the Communication settings (for Windows)
To use the Communication settings, please follow the steps below:
-
Open the Printer Setting Tool.
To learn how to open the Printer Setting Tool, refer to the FAQ: "Using the Printer Setting Tool (for Windows)". -
Select [Communication settings].
The [Communication settings] window appears.
- Specify or change the settings.
For information on items in the Communication settings window, refer to the following links:
- Settings Dialog Box
- Menu Bar
- General Tab
- Wired LAN (QL-820NWB/820NWBc only) / Wireless LAN Tabs
- Wireless Direct Tab
- Bluetooth Tab (QL-820NWB/820NWBc only)
- Applying Setting Changes to Multiple Printers
-
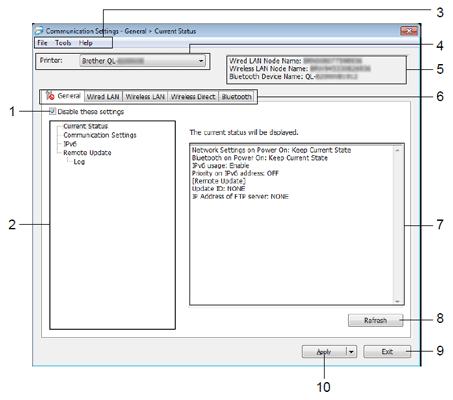
Disable these settings
When this check box is selected, appears in the tab, and the settings can no longer be specified or changed.
Settings in a tab where appears will not be applied to the printer even if [Apply] is clicked.
In addition, the settings in the tab will not be saved or exported when the [Save in Command File] or [Export] command is executed.
To apply the settings to the printer, or to save or export them, make sure you clear the check box. -
Items
When [Current Status] is selected, the current settings appear in the settings display/change area.
Select the item for the settings that you want to change. -
Menu Bar
Commands are categorized under each menu (File, Tool and Help) by function. -
Printer
Lists the connected printers. -
Node Name
Displays the node name (nodes can be renamed). (See Menu Bar.) -
Settings Tabs
Contains settings that may be specified or changed.
If appears in the tab, the settings in that tab will not be applied to the printer.
 -
Settings Display / Change Area
Displays the current settings for the selected item. -
Refresh
Updates the displayed settings with the most recent information. -
Exit
Exits [Communication Settings], and returns to the main window of the Printer Setting ToolSettings are not applied to printers if [Exit] is clicked without clicking the [Apply] button after changing the settings.
-
Apply
Applies the settings to the printer.
To save the specified settings in a command file, select [Save in Command File] from the drop-down list.
The saved command file can be used with the mass storage mode to apply the settings to a printer.Clicking [Apply] applies all settings in all tabs to the printer.
If the [Disable these settings] check box is selected, the settings in that tab are not applied
-
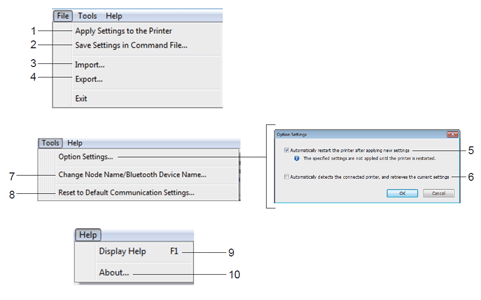
Apply Settings to the Printer
Applies the settings to the printer. -
Save Settings in Command File
Saves the specified settings in a command file. The file extension is ".bin".
The saved command file can be used with the mass storage mode to apply the settings to a printer.- If the [Disable these settings] check box is selected, the settings in that tab are not saved.
-
The following information is not saved with the command file:
- Node name
- IP address, subnet mask and default gateway (when the IP address is set to [STATIC])
- The saved communication settings commands are intended to be used only for applying settings to a printer. To apply the settings to the printer using this command file, use the mass storage mode.
- Saved command files contain authentication keys and passwords. Take necessary measures to protect saved command files, such as saving them in a location that cannot be accessed by other users.
- Do not send command files to a different printer model.
-
Import
-
Import current wireless settings from the computer
Imports the settings from the computer.
- When importing the computer's wireless settings, administrator privileges for the computer are needed.
- Only personal security authentication settings (open system, public key authentication and WPA/WPA2-PSK) can be imported. Enterprise security authentication (such as LEAP and EAP-FAST), WPA2-PSK (TKIP) and WPA-PSK (AES) settings cannot be imported.
- If multiple wireless LANs are enabled for the computer you use, the first wireless settings (only personal settings) that are detected will be considered for the import data.
- Only the settings (communication mode, SSID, authentication method, encryption mode and authentication key) from the [Wireless LAN] tab - [Wireless Settings] pane can be imported.
-
Select a Profile to import
Imports the exported file and applies the settings to a printer.
Click [Browse] and select the file you want to import. The settings in the selected file appear in the settings display/change area.-
All settings, such as wireless settings or TCP/IP settings, can be imported, except for node names.
-
Only profiles that are compatible with the selected printer can be imported.
- If the imported profile’s IP address is set to [STATIC], change the IP address of the imported profile, if needed, so that it does not duplicate the IP address of an existing configured printer on the network.
-
-
Import current wireless settings from the computer
-
Export
Saves the current settings in a file.
- If the [Disable these settings] check box is selected the settings in that tab are not saved.
-
The exported file is not encrypted.
-
Automatically restart the printer after applying new settings
If this check box is selected, the printer automatically restarts after communication settings are applied.
If this check box is cleared, you must restart the printer manually.
When configuring multiple printers, you can reduce the time needed to change settings by clearing this check box. In this case, we recommend selecting this check box when configuring the first printer so that you can confirm that each setting is operating as intended.
-
Automatically detects the connected printer, and retrieves the current settings
If this check box is selected and a printer is connected to the computer, the printer is automatically detected and the printer’s current settings are displayed in the [Current Status] pane.
If the model of the connected printer is different from that of the printer shown in the [Printer] drop-down list, the settings available on all tabs change to match the connected printer.
-
Change Node Name/Bluetooth Device Name
Allows renaming a node. -
Reset to Default Communication Settings
Returns the communication settings to their factory settings. -
Display Help
Displays the Help topics. -
About
Displays the application's version information
Communication Settings
-
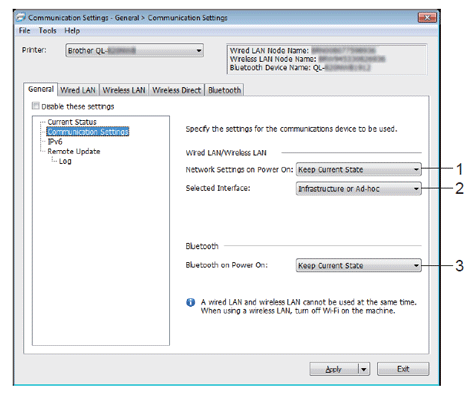
Network Settings on Power On
Specifies the conditions for connecting via Wi-Fi® when the printer is turned on.
QL-810W/810Wc: Select [On by Default], [Off by Default] or [Keep Current State].
QL-820NWB/820NWBc: Select [Wireless LAN by Default], [Wired LAN by Default] or [Keep Current State]. -
Selected Interface
Select [Infrastructure or Ad-hoc], [Infrastructure and Wireless Direct] or [Wireless Direct]. -
Bluetooth on Power On (QL-820NWB/820NWBc only)
Specifies the conditions for connecting via Bluetooth® when the printer is turned on.
Select [On by Default], [Off by Default] or [Keep Current State].
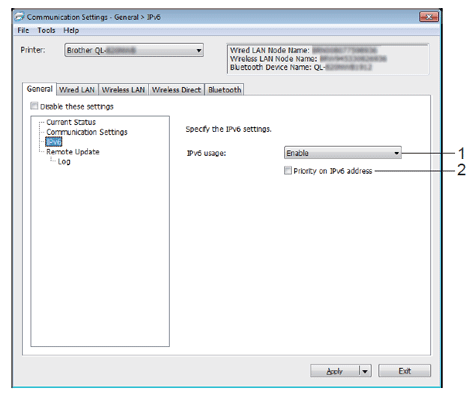
IPv6
-
IPv6 usage
Select [Enable] or [Disable].
-
Priority on IPv6 address
Select to give priority to an IPv6 address.
Remote Update
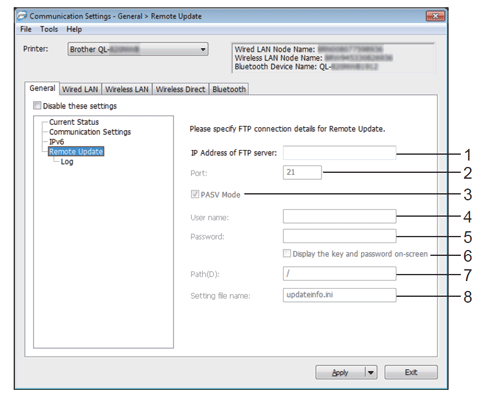
Remote Update is a printer feature that enables the semi-automatic update of the printer's settings with a simple connection to a network folder where the update files are saved.
-
IP Address of FTP server
Types the FTP server address.
-
Port
Specifies the port number used to access the FTP server.
- PASV Mode
-
User name
Types a user name that has permission to login to the FTP server.
-
Password
Types the password associated with the user name you entered in the Username field.
- Display the key and password on-screen
-
Path
Types the path to the folder on the FTP server where you want to download the update file from.
-
Setting file name
Specifies the update file name on the FTP server.
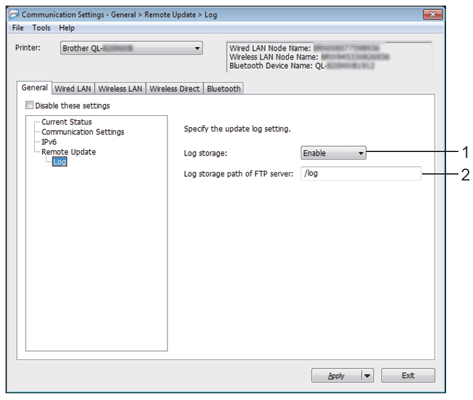
Log
-
Log storage
Selects whether to export the update log to the FTP server.
-
Log storage path of FTP server
Types the path to the folder on the FTP server where you want to export the log data.
Wired LAN (QL-820NWB/820NWBc only) / Wireless LAN Tabs
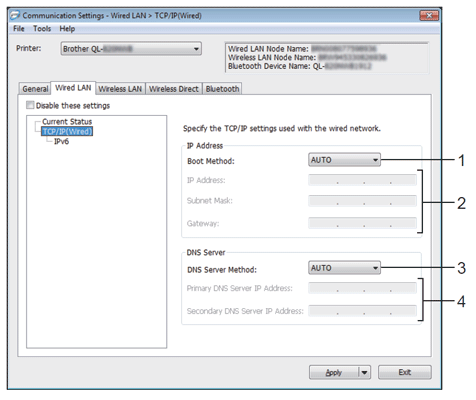
TCP/IP (Wired)
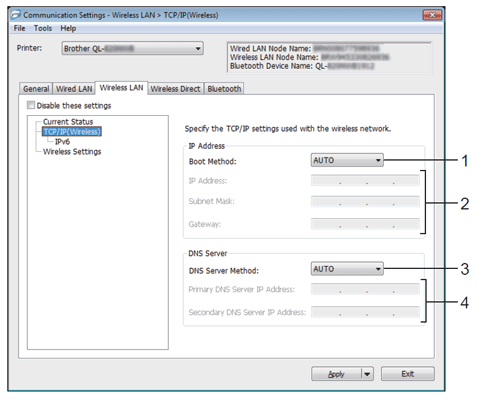
TCP/IP (Wireless)
-
Boot Method
Select [AUTO], [BOOTP], [DHCP], [RARP], or [STATIC].
-
IP Address/Subnet Mask/Gateway
Specifies the various networking values.
You can type these settings only when the IP address is set to [STATIC].
-
DNS Server Method
Select [AUTO] or [STATIC].
-
Primary DNS Server IP Address/Secondary DNS Server IP Address
You can type these settings only when the DNS server is set to [STATIC].
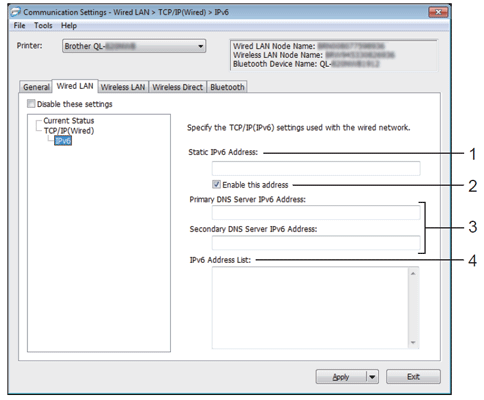
IPv6
-
Static IPv6 Address
Specifies a permanent IPv6 address.
-
Enable this address
Enables the specified static IPv6 address.
-
Primary DNS Server IPv6 Address/Secondary DNS Server IPv6 Address
Specifies the DNS server IPv6 addresses.
-
IPv6 Address List
Displays the list of IPv6 addresses.
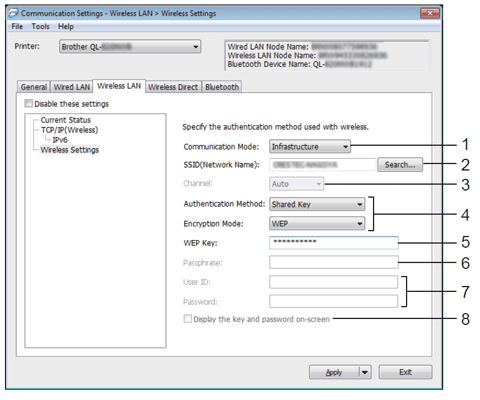
Wireless Settings
-
Communication Mode
Select [Infrastructure] or [Ad-hoc] (except QL-820NWBc).
-
SSID (Network Name)
Clicking [Search] displays the available SSID selections in a separate dialog box.
-
Channel
Lists available channels.
This setting is valid only in Ad-Hoc mode.
-
Authentication Method/Encryption Mode
The supported encryption modes for the authentication methods are as shown in Communication Modes and Authentication Methods/Encryption Modes. -
WEP Key
You can specify a setting only when WEP is selected as the encryption mode.
-
Passphrase
You can specify a setting only when WPA3-SAE or WPA/WPA2-PSK/WPA3-SAE is selected as the authentication method.
-
User ID / Password
You can specify settings only when LEAP, EAP-FAST, PEAP, EAP-TTLS or EAP-TLS is selected as the authentication method. In addition, with EAP-TLS, it is not necessary to register a password, but a client certificate must be registered. To register a certificate, connect to the printer from a web browser, and then specify the certificate. -
Display the key and password on-screen
If this check box is selected, keys and passwords are displayed in plain (non-encrypted) text.
Communication Modes and Authentication Methods/Encryption Modes
-
When [Communication Mode] is set to [Ad-hoc]
Authentication Method
Encryption Mode
Open System
None / WEP
-
When [Communication Mode] is set to [Infrastructure]
Authentication Method
Encryption Mode
Open System
None / WEP
Shared Key
WEP
WPA3-SAE (QL-820NWBc only)
AES
WPA/WPA2-PSK/WPA3-SAE
TKIP+AES / AES
LEAP (Except QL-820NWBc)
CKIP
EAP-FAST/NONE
TKIP+AES / AES
EAP-FAST/MS-CHAPv2
TKIP+AES / AES
EAP-FAST/GTC
TKIP+AES / AES
PEAP/MS-CHAPv2
TKIP+AES / AES
PEAP/GTC
TKIP+AES / AES
EAP-TTLS/CHAP
TKIP+AES / AES
EAP-TTLS/MS-CHAP
TKIP+AES / AES
EAP-TTLS/MS-CHAPv2
TKIP+AES / AES
EAP-TTLS/PAP
TKIP+AES / AES
EAP-TLS
TKIP+AES / AES
To specify higher level security settings:
When performing certificate verification with EAP-FAST, PEAP, EAP-TTLS or EAP-TLS authentication methods, the certificate cannot be specified from the Printer Setting Tool. After the printer is configured to connect to the network, specify the certificate by accessing the printer from a web browser.
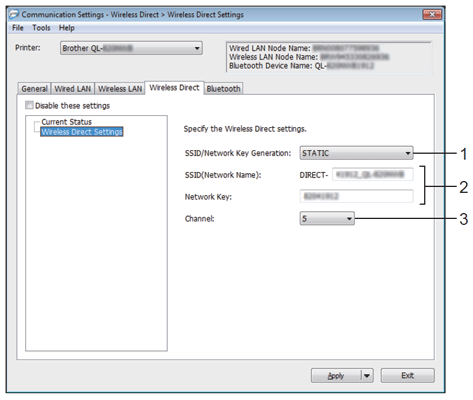
Wireless Direct Settings
-
SSID/Network Key Generation
Select [AUTO] or [STATIC]. -
SSID (Network Name)/Network Key
Specifies the SSID (25 ASCII characters or fewer) and the network key (63 characters or fewer) you want to use in the Wireless Direct mode.The factory settings for the SSID and password are as follows:
SSID: "DIRECT-*****_QL-810W" or "DIRECT-*****_QL-820NWB" where "*****" is the last five digits of the product serial number.
(You can find the serial number label in the DK Roll compartment of the Label Printer.)
The password: "DIRECT-*****_QL-810W" or "DIRECT-*****_QL-820NWB" where ***** is the last five digits of the serial number. -
Channel
Specifies the channel to use for the Wireless Direct mode.
Bluetooth Tab (QL-820NWB/820NWBc only)
Bluetooth Settings
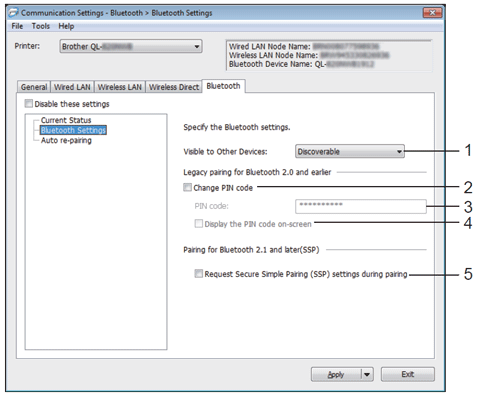
-
Visible to Other Devices
Allows the printer to be “discovered” by other Bluetooth devices.
Available settings: [Discoverable], [Not Discoverable] -
Change PIN code
If this check box is selected, you can change the PIN.
-
PIN code
Specifies the PIN that will be used when pairing with devices compliant with Bluetooth 2.0 or earlier.
-
Display the PIN code on-screen
If this check box is selected, your computer displays the PIN by default.
-
Request Secure Simple Pairing (SSP) settings during pairing
If this check box is selected, pairing can be performed using the Label Printer buttons for devices that are compliant with Bluetooth 2.1 or later.
Auto re-pairing
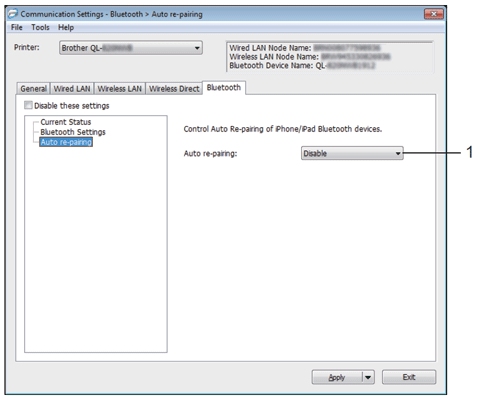
-
Auto re-pairing
Sets whether or not to automatically reconnect to previously connected iPhone/iPad or Bluetooth devices when the power is turned On.
Available settings: [Enable], [Disable]
Applying Setting Changes to Multiple Printers
- After applying settings to the first printer, disconnect the printer from the computer, and then connect the second printer to the computer.
-
Select the newly connected printer from the [Printer] drop-down list.
If the [Automatically detects the connected printer, and retrieves the current settings] check box in the [Option Settings] dialog box is selected, the printer connected with the USB cable is automatically selected.
For details, see Menu Bar. -
Click [Apply].
The same settings that were applied to the first printer are applied to the second printer.We recommend selecting the [Automatically restart the printer after applying new settings] check box when configuring the first printer so that you can confirm that a connection with the wireless access point/router can be correctly established with the settings. For details, see Menu Bar.
-
Repeat steps 1 - 3 for all printers whose settings you want to change.
-
If the IP address is set to [STATIC], the printer’s IP address will also be changed to the same address as the first printer.
Change the IP address if needed. -
To save the current settings in a file, click [File] - [Export].
The same settings can be applied to another printer by clicking [File] - [Import], then selecting the exported settings file. (See Menu Bar.)
-
If the IP address is set to [STATIC], the printer’s IP address will also be changed to the same address as the first printer.
Not all computers, mobile devices, and operating systems, may support Ad-hoc mode.
