Your machine is equipped with a replaceable cutter unit. It is time to replace the cutter unit when the blade begins to have difficulty cutting the label roll.
To replace the cutter unit:
Turn off the printer and unplug the power cord from the electrical outlet.
Open the label roll compartment cover, lift up the label lever, and remove the label roll from the compartment.
If your printer is fitted with a cutter cover as shown, lift it up. (If not, go to the next step.)
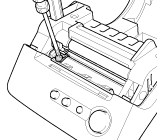
Using a cross-head or Phillips screwdriver, loosen the screw securing the cutter unit. The screw securing the cutter unit cannot be completely removed. Simply loosen it to remove the cutter unit from the printer.
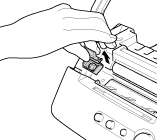
Grip the tab and lift out the cutter unit. Be very careful not to touch the sharp edge of the cutter.
Put the new cutter unit into the machine by aligning the two holes with the two posts in the machine and pressing it into place.
Tighten the screw securing the cutter unit.
If your printer is fitted with a cutter cover, close it.
Install the label roll and close the label roll compartment cover.
Plug the power cord back into the electrical outlet.
If your question was not answered, have you checked other FAQs?