HL-8050N
FAQs & Troubleshooting |
How do I replace the Fuser Unit & Transfer Roll Cartridge?
- Never touch the labeled area found on or near the heat roller. You can get burnt. To avoid injuries or burns, if a sheet of paper is wrapped around the heat roller, do not try to remove it by yourself. Switch off the printer immediately, and contact Brother Customer Service.
- Be sure to switch off and unplug the printer before accessing the interior of the printer for cleaning, maintenance, or fault clearance. Access to a live printer's interior can cause electric shock.
- Never throw a transfer roll cartridge into a naked/open flame. It can cause an explosion and you can get burnt.
- Do not replace the fuser unit immediately after using the printer. You may get burnt.
- Do not remove and reinsert the transfer roll cartridge in use.
- When the message to replace the transfer roll cartridge appears, replace the transfer roll cartridge immediately. Otherwise, the printer will stop printing.
Follow the procedure below to replace the Fuser Unit & Transfer Roll Cartridge.
-
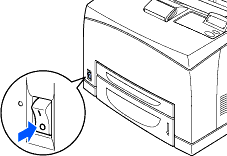
Turn off the printer power switch and leave it for 30 minutes until the fuser unit cools down.
-
Remove any paper from the center output tray.

-
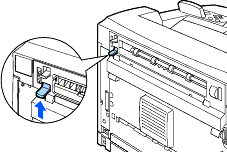
Open the back cover by lifting the lower gray lever at the top left corner of the back of the printer.
Do not touch any parts inside the printer.
-
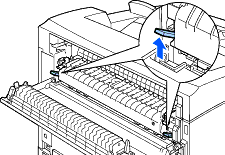
Push down the 2 beige levers at the bottom of the used fuser unit.

-
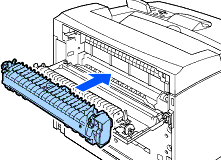
Remove the used fuser unit slowly.

-
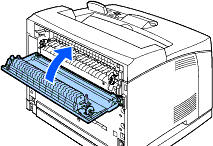
Install the new fuser unit slowly.
-
Lift up the 2 beige levers at the bottom of the fuser unit to lock it.
-
Close the back cover.
Do not close the back cover if the fuser unit is not installed. Forcibly closing it may damage the lever or the cover.
-
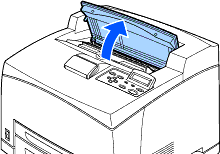
Open the top cover.
Do not touch any parts inside the printer.
-
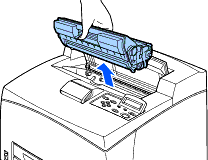
Hold the toner cartridge by the grip and pull it out slowly.
To prevent the toner from dirtying the surface, lay a piece of paper on the surface first before putting the toner cartridge down.
-
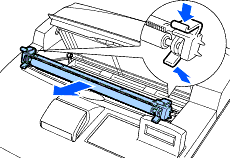
Pull the 2 levers on the upper part of the transfer roll cartridge, then squeeze the 2 beige levers on the bottom of the used transfer roll cartridge and pull it out slowly towards you.
-
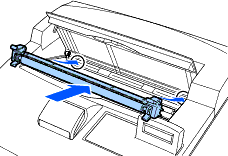
Pick up the new transfer roll cartridge by the levers at both ends and slowly push it into the slot.
-
Hold the toner cartridge by the grip and insert it into the slot inside the printer.
Ensure that the toner cartridge is firmly set.

-
Close the top cover securely.
Turn the printer switch back on.