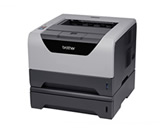
HL-5370DW/HL-5370DWT
FAQs & Troubleshooting |
Configure the Brother machine for a wireless network using automatic wireless mode (SecureEasySetup™, Wi-Fi Protected Setup or AOSS™)
IMPORTANT:
If you have previously configured the wireless settings of the machine, you must reset the network (LAN) settings before you can configure the wireless settings again. Click here to see the details of how to reset the machine back to the factory settings.
If you have a WLAN access point/router supporting SecureEasySetup™, WPS (Wi-Fi Protected Setup) or AOSS™ (AirStation One-Touch Secure System), you can easily connect your Brother machine to your wireless network as below.
To use SecureEasySetup™, WPS or AOSS™, your WLAN access point/router must support SecureEasySetup™, WPS or AOSS™. Confirm your WLAN access point/router has the SecureEasySetup™, WPS or AOSS™ symbol as shown below. For more details, refer to the instructions provided with your access point/router.

STEP I: Configure the wireless settings:
-
Place the Brother machine within range of your SecureEasySetup™, WPS or AOSS™ access point/router.
The range may differ depending on your environment. Refer to the instructions provided with your access point/router.
-
Make sure that the Brother machine's power cord is plugged in.
-
Turn on the machine and wait until the machine is in the Ready state.
-
Hold down the SecureEasySetup™, WPS or AOSS™ button on your WLAN access point/router for a few seconds.

The length holding down the button may differ depending on the WLAN access point/router. For the information on how to confirm if the WLAN access point/router is ready for use, refer to the instructions provided with your access point/router.
-
Press the wireless setup button located at the back of the printer for less than 2 seconds as shown in the illustration below.
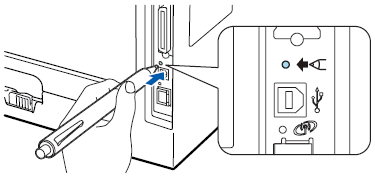
- Use a pointy object such as a ballpoint pen to press the button.
- If you press the button for 3 seconds or more, the printer will change to the PIN Method of the Wi-Fi Protected Setup mode. -
The machine will automatically detect which mode (SecureEasySetup™, WPS or AOSS™) your access point/router uses to configure your machine.
-
A connection result appears on the LED.
[LED Indication: Connected]
The Status LED is on. (Green)
The LED will turn on for 5 minutes.
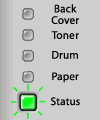
If the LED indicates Connected, the machine has successfully connected to your access point/router. If you connect the Brother machine to a wireless network for the first time, go to STEP II: Installing the driver for network. If not, wireless setup is now complete.[LED Indication: Connection Fail]
The Status LED will blink. (Red)
The LED will blink (turn on for 0.1 second and off for 0.1 second) for 30 seconds.
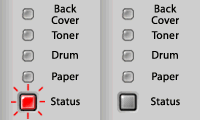
If the LED indicates Connection Fail, the machine has not successfully connected to your access point/router. Try starting from STEP 4 again. If the same message is indicated again, reset the machine back to the default factory settings and try again. Click here to see the details of how to reset the machine back to the factory settings.[LED Indication: No Access Point]
The Paper and Status LED will blink.
The LED will blink (turn on for 0.1 second and off for 0.1 second) for 30 seconds.
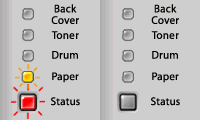
If the LED indicates No Access Point, the machine has not detected your access point/router on your network with the SecureEasySetup™ mode, the Wi-Fi Protected Setup mode or AOSS™ mode enabled. Make sure you place the Brother machine as close to the network access point/router as possible with minimal obstructions and try starting from STEP 4 again. If the same message is indicated again, reset the machine back to the default factory settings and try again. Click here to see the details of how to reset the machine back to the factory settings.[LED Indication: Connection Error]
The Status LED will flash. (Red)
The LED will flash 10 times and then turn OFF for half a second. This pattern will repeat 20 times.
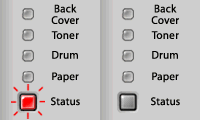
If the LED indicates Connection Error, a session overlap has been detected. The machine has detected more than one access point/router on your network with the SecureEasySetup™ mode, the Wi-Fi Protected Setup mode or AOSS™ mode enabled. Make sure that only one access point/router has the SecureEasySetup™ mode, the Wi-Fi Protected Setup mode or the AOSS™ mode enabled and try starting from STEP 4 again.
STEP II: Installing the driver for network:
Please continue to the following steps to install the printer driver for network connection. Even if you have printed with USB connection, you need to install the printer driver for network connection.
NOTE: The screens may differ depending on operating system being used and your Brother machine.
-
Make sure that your computer is ON and you are logged on with Administrator rights.
If there are any programs running, close them.
-
Put the installation CD-ROM into your CD-ROM drive.
For Windows users:
If you do not have the CD-ROM, please go to Downloads section of this website and download Full Driver & Software Package. The installation instructions are available on the download page.
For Macintosh users:
If you do not have the CD-ROM, please go to Downloads section of this website and download the printer driver. The installation instructions are available on the download page. -
Start install program.
For Windows users:
The opening screen will appear automatically. If prompted, choose your model and language.
NOTE: If the installation screen does not appear automatically, click here to see how to open the installan.
For Macintosh users:
Double-click the HL5300 icon on your desktop. Double-click Start Here icon. If prompted, choose your model and language.
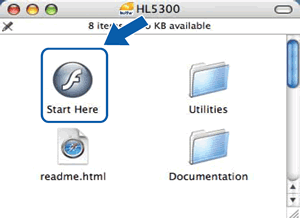
-
The CD-ROM main menu will appear. Click Install Printer Driver.
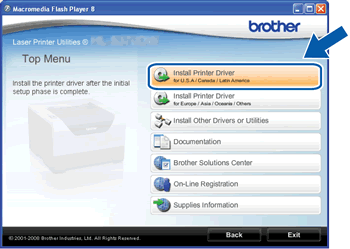 For Windows users, choose the Install Printer Driver icon for your region.
 -
Click Wireless Network users.
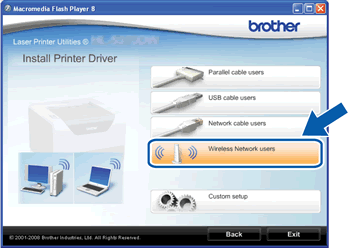
When the User Account Control screen appears, click Allow or Yes.
-
Choose Driver Install Only, and then click Next.
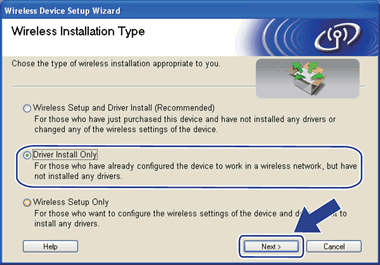
- Follow the on-screen instructions to complete setup.
Related FAQs
- How do I factory reset the print server?
- What is SecureEasySetup™, Wi-Fi Protected Setup (PBC*)or AOSS™?
- Configure the Brother machine for a wireless network with a network cable using the Installation CD-ROM
- Important points you need to confirm before configuring your Brother machine for a wireless network.
