Selecting the best possible print quality from a Windows PC
When printing from a PC system you can alter the print quality to suit your particular printing requirements. To select the best print quality, follow the steps below:
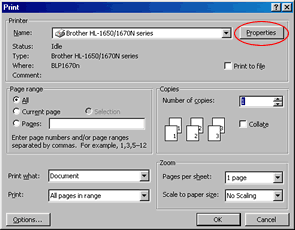
From a Windows applications such as Microsoft Word, click the "File" menu, and then select the "Print" option. You will see a dialogue similar to the one below:
Click the "Properties" button.
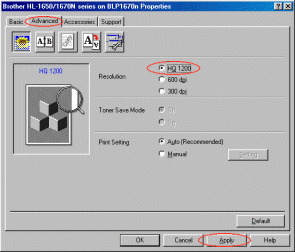
You will then see the Brother dialogue screen. Select the "Advanced" tab and then select the "Device Options" icon until you see the following:
In the screenshot below three options are displayed: HQ-1200 or 1200 dpi, 600 dpi and 300 dpi. The options available to you will vary by model name.
Select the highest possible print quality.
Once you have made your selection, click the 'Apply' button and then the 'OK' button to return back to the original 'Print' dialogue. Now click the 'OK' button and the print job will be sent to the printer printing in the way you specified.
If your question was not answered, have you checked other FAQs?