HL-2230
FAQs & Troubleshooting |
Adjust the default preferences of my printer driver (Mac OS X 10.5.8 or greater)
You can configure the following settings:
I. Page Setup
II. Printer Driver Settings
III. PRINT SETTINGS
Click on the drop menu (Copies & Pages or the name of the application) and click on Print Settings.
Basic tab


I. Page Setup
- From an application such as Apple TextEdit, click File and Page Setup.
- Make sure the Brother machine is selected next to Format for.
- Select the desired Paper Size, Orientation, and Scale.
- Click OK.

II. Printer Driver Settings
- Click here to see how to change the driver settings.
- After you change any settings, If you want to save the current settings, you will need to save it as a preset.
Mac OS X 10.5.8, v10.6.x: Click on Standard next to Presets then select Save As. Type a name for this preset and click OK. Each time the Print window is opened, click Standard next to Presets and select the name of the Preset you wish to use.
Mac OS X v10.7x or greater: Click on Default Settings next to Presets then select Save Current Settings as a Preset.... Type a name for this preset and click OK. This will be the default setting each time you print.
III. PRINT SETTINGS
Click on the drop menu (Copies & Pages or the name of the application) and click on Print Settings.
Basic tab

- Media Type: To achieve the best print results, the media being printed on should be selected in the driver. The machine changes the way it prints depending on the selected media type.
- Plain Paper
- Thin Paper
- Thick Paper
- Thicker Paper
- Bond Paper
- Envelopes
- Env. Thick
- Env. Thin
- Recycled Paper
- Label
- Plain Paper
- Resolution: You can change the resolution as follows.
- 300 dpi: Decent print quality with possible jagged edges visible.
- 600 dpi: Recommended for ordinary printing. Good print quality with reasonable print speeds.
- HQ1200: The finest print mode. Use this mode to print precise images such as photographs.
The print speed will change depending on what print quality setting you choose. Higher print quality takes longer to print, while lower print quality takes less time to print. - 300 dpi: Decent print quality with possible jagged edges visible.
- Toner Save Mode: You can conserve toner using this feature. When you set Toner Save Mode to On, print appears lighter. The default setting is Off.
- We do not recommend Toner Save Mode for printing Photo or Gray Scale images.
- Toner Save Mode is not available for HQ 1200 resolution.
- We do not recommend Toner Save Mode for printing Photo or Gray Scale images.
- Paper Source: You can choose Auto Select, Tray 1 or Manual.
- Reverse Print (For Mac OS X 10.4.11 only): Check Reverse Print to rotate the data by 180 degrees.

- Graphics Quality: You can change the print quality as follows:
- Graphics: This is a graphics mode (contrast priority). Choose this setting for printing text and figures, such as business and presentation documents. You can represent sharp contrasts between shaded areas.
- Text: This is the best mode for printing text documents.
- Graphics: This is a graphics mode (contrast priority). Choose this setting for printing text and figures, such as business and presentation documents. You can represent sharp contrasts between shaded areas.
- Skip Blank Page: If Skip Blank Page is checked, the printer driver automatically detects blank pages and excludes them from printing.
- Improve Print Output: This feature allows you to improve a print quality issue.

- Reduce Paper Curl: If you choose this setting, the paper curl may be reduced. If you are printing only a few pages, you do not need to choose this setting. We recommend that you change the printer driver setting in Media Type to a thin setting.
- Improve Toner Fixing: If you choose this setting, the toner fixing on paper may be improved. If this selection does not provide enough improvement, change the printer driver setting in Media Type to a thick setting.
- Reduce Ghosting: If you are using the machine in a high humidity environment this setting may reduce ghosting on the paper. Do not use this setting if the humidity is below 30% or ghosting may increase.
This feature may not reduce ghosting for all types of paper. Before you buy a lot of paper, test a small quantity to make sure that the paper is suitable.
- Reduce Paper Curl: If you choose this setting, the paper curl may be reduced. If you are printing only a few pages, you do not need to choose this setting. We recommend that you change the printer driver setting in Media Type to a thin setting.
- Sleep Time: When the machine does not receive data for a certain period of time, it enters sleep mode. In sleep mode, the machine acts as though it were turned off. When you choose Printer Default, the timeout setting will be reset to the default time; this can be altered in the driver. If you want to change the sleep time, choose Manual and then enter the time in the text box on the driver. While the machine is in sleep mode, the Ready LED is dimmed, but the machine can still receive data. Receiving a print file or document or pressing Go will automatically wake up the machine to start printing.

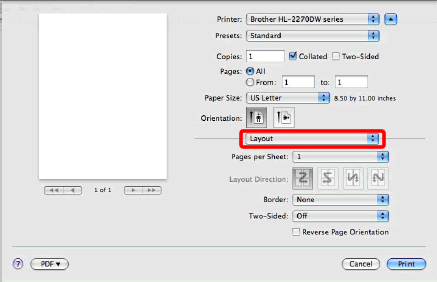
- Pages per Sheet: Choose how many pages will appear on each side of the paper.
- Layout Direction: When you specify the pages per sheet, you can also specify the direction of the layout.
- Border: If you want to add a border, use this function.
- Two-Sided (only available for HL2240D, HL2270DW, and HL2275DW)
- Choose Long-edged binding or Short-edged binding for Two-Sided.
- Select Paper Handling from the drop menu that you selected Layout from.
- Choose All pages in Print and click Print. You can print pages on both sides of the paper.
- Choose Long-edged binding or Short-edged binding for Two-Sided.
- Reverse Page Orientation (Mac OS X 10.5 or greater only): Check Reverse Page Orientation to reverse the data from up to down.
- Flip Horizontally (Mac OS X 10.6 or greater only): Check Flip Horizontally to print as a reflection flipped left-to-right.
Content Feedback
To help us improve our support, please provide your feedback below.
