HL-2170W
FAQs & Troubleshooting |
How can I configure my printer in a wireless network using SecureEasySetup™, Wi-Fi Protected Setup™ or AOSS™?
Please follow the steps below:
If you are going to connect the printer to your network, we recommend that you contact your system administrator prior to installation.
- Press the wireless setup button located at the back of the printer for less than 2 seconds. This will put the printer in one-push wireless setting mode. This feature will automatically detect which mode your access point uses for one-push configuration (SecureEasySetup™, Wi-Fi Protected Setup™ or AOSS™) of your printer.
- Use a pointy object such as a ballpoint pen to press the button.
- Do not press the wireless setup button for 3 seconds or more. If you press it for more than 3 seconds, the Printer will change to the PIN Method of the Wi-Fi Protected Setup™ mode. To clear this mode, wait for 5 minutes or turn the printer power switch off and then turn it on again. After clearing this mode, press the wireless setup button and try from the step 1 again.
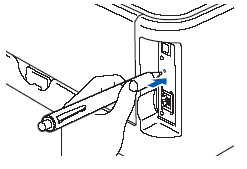
- The printer starts the one-push wireless setting mode.
The printer searches for an access point that supports SecureEasySetup™, Wi-Fi Protected Setup™ or AOSS™ for 2 minutes. During that time, the Toner LED alternates turning on for 0.2 seconds and off for 0.1 second.
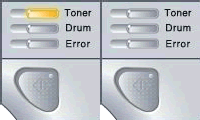
- Put your access point in the SecureEasySetup™ mode, the Wi-Fi Protected Setup™ mode or the AOSS™ mode, depending on what is supported by your access point. Please refer to the instruction manual that came with your access point.
After that, the printer connects and downloads setting from the access point. During that time, the Toner and the Drum LED alternates turning on for 0.2 seconds and off for 0.1 second.
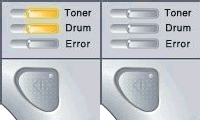
- Wait for the Ready LED (Go button) of your printer to indicate "Connection succeeded". When the printer has successfully connected to your router or access point, the Ready LED turns on for 5 minutes.
Now you can use your printer on the wireless network.
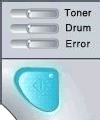
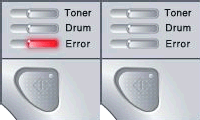
If the Error LED is turned on and off every 0.1 second for 30 seconds, it indicates "Connection failed". To clear this message, go to the step 5.
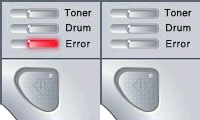
If the Error LED repeats the pattern 20 times turning off half a second after flashing 10 times, it indicates "Session overlap". To clear this message, go to the step 6.
- The printer has not successfully connected to your router or access point. Try starting from the step 1 again.
If the same message is indicated again, reset the printer back to the default factory settings and try again. For resetting, please refer to the instructions, "How do I factory reset the print server?".
- The printer has detected more than 2 routers or access points on your network that have the Wi-Fi Protected Setup™ mode or the AOSS™ mode enabled. Make sure that only one router or access point has the Wi-Fi Protected Setup™ mode or the AOSS™ mode enabled and try starting from the step 1 again.
Related FAQs
- Reset the print server to the default factory settings
- What is SecureEasySetup™, Wi-Fi Protected Setup (PBC*)or AOSS™?
- Configure the Brother machine for a wireless network with a network cable using the Installation CD-ROM
- Important points you need to confirm before configuring your Brother machine for a wireless network.
Content Feedback
To help us improve our support, please provide your feedback below.
